Jeep Cherokee (XJ): Ducts and outlets
WARNING: ON VEHICLES EQUIPPED WITH AIRBAGS, REFER TO GROUP 8M - PASSIVE RESTRAINT SYSTEMS BEFORE ATTEMPTING ANY STEERING WHEEL, STEERING COLUMN, OR INSTRUMENT PANEL COMPONENT DIAGNOSIS OR SERVICE. FAILURE TO TAKE THE PROPER PRECAUTIONS COULD RESULT IN ACCIDENTAL AIRBAG DEPLOYMENT AND POSSIBLE PERSONAL INJURY.
PANEL OUTLET DUCTS
The panel outlet ducts are integral to the instrument panel assembly. Refer to Instrument Panel Assembly in Group 8E - Instrument Panel Systems for the procedures.
PANEL OUTLET BARRELS
(1) Use a trim stick or another suitable wide flatbladed tool to gently pry the panel outlet barrel out of the panel outlet housing (Fig. 32). The barrel is retained by a light snap fit.

Fig. 32 Panel Outlet Barrels
1 - DEMISTER OUTLETSБЮ 2 - PANEL OUTLET BARRELS
(2) To install, position the barrel in the panel outlet housing and press firmly until the barrel snaps into place.
DEMISTER OUTLETS
The side window demister outlets are integral to the instrument panel end caps. Refer to Instrument Panel End Cap in Group 8E - Instrument Panel Systems for the procedures.
DEFROST DUCT/DEMISTER ADAPTER
(1) Remove the instrument panel assembly from the vehicle. Refer to Instrument Panel Assembly in Group 8E - Instrument Panel Systems for the procedures.
(2) Disconnect the demister hoses from the defrost duct/demister adapter (Fig. 33).
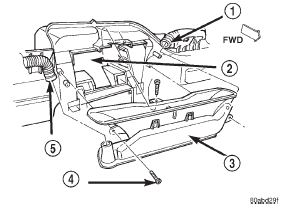
Fig. 33 Defrost Duct/Demister Adapter
1 - HOSE
2 - INSTRUMENT PANEL
3 - DEFROST DUCT/DEMISTER ADAPTER
4 - SCREW
5 - HOSE
(3) Remove the three screws that secure the defrost duct/demister adapter to the instrument panel.
(4) Remove the defrost duct/demister adapter from the instrument panel.
(5) Reverse the removal procedures to install.
Tighten the mounting screws to 2.2 N·m (20 in. lbs.).
DEMISTER HOSES
(1) Remove the instrument panel assembly from the vehicle. Refer to Instrument Panel Assembly in Group 8E - Instrument Panel Systems for the procedures.
(2) Disconnect the ends of the demister hose from the demister duct (Fig. 34) and the defrost duct/demister adapter (Fig. 33).
(3) Reverse the removal procedures to install.
DEMISTER DUCTS
(1) Remove the instrument panel assembly from the vehicle. Refer to Instrument Panel Assembly in Group 8E - Instrument Panel Systems for the procedures.
(2) Remove the end cap from the instrument panel. Refer to Instrument Panel End Cap in Group 8E - Instrument Panel Systems for the procedures.
(3) Disconnect the demister hoses from the demister duct (Fig. 34).
(4) Remove the two screws that secure the demister duct to the top of the instrument panel.
(5) Remove the demister duct from the instrument panel.

Fig. 34 Demister Duct Remove/Install
1 - DEMISTER DUCT
2 - SCREWS
3 - DEMISTER HOSE
(6) Reverse the removal procedures to install.
Tighten the mounting screws to 2.2 N·m (20 in. lbs.).
CONSOLE REAR DUCT
(1) Disconnect and isolate the battery negative cable.
(2) Remove the floor console from the floor panel transmission tunnel (Fig. 35). Refer to Group 23 - Body for the procedures.
(3) Lift the rear of the console rear duct out of the console rear mounting bracket on the floor panel transmission tunnel and slide the duct rearward to disengage it from the floor duct and adapter.
(4) Remove the console rear duct from the vehicle.
(5) Reverse the removal procedures to install.
FLOOR DUCT AND ADAPTER
(1) Remove the instrument panel from the vehicle.
Refer to Instrument Panel Assembly in Group 8E - Instrument Panel Systems for the procedures.
(2) Remove the heater-A/C housing from the vehicle.
See Heater-A/C Housing in this group for the procedures.
(3) Remove the three screws that secure the floor duct and adapter to the heater-A/C housing (Fig. 35).
(4) Remove the floor duct and adapter from the heater-A/C housing.
(5) Reverse the removal procedures to install.
Tighten the mounting screws to 2.2 N·m (20 in. lbs.).
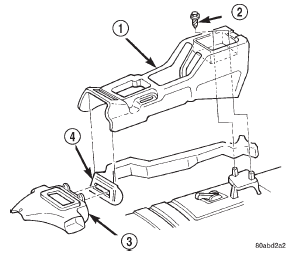
Fig. 35 Floor Duct and Console Rear Duct Remove/Install
1 - FLOOR CONSOLE
2 - SCREW
3 - FLOOR DUCT AND ADAPTER
4 - CONSOLE REAR DUCT
 Compressor clutch relay. Condenser. Dual function high pressure
switch/high pressure cut-off
switch
Compressor clutch relay. Condenser. Dual function high pressure
switch/high pressure cut-off
switch
 Evaporator coil. Fixed orifice tube. Heater-a/c control
Other materials:
Service procedures
Brake fluid level
Always clean the master cylinder reservoir and cap
before adding fluid. This will prevent dirt from falling
in the reservoir and contaminating the brake
fluid.
The reservoir has a ADD and a FULL mark on the
side (Fig. 11) fill to the FULL mark.
Fig. 11 Master Cylinder F ...