Jeep Cherokee (XJ): Service procedures
LUBRICANT CHANGE
(1) Raise and support the vehicle.
(2) Remove the lubricant fill hole plug from the differential housing cover.
(3) Remove the differential housing cover and drain the lubricant from the housing.
(4) Clean the housing cavity with a flushing oil, light engine oil, or lint free cloth. Do not use water, steam, kerosene, or gasoline for cleaning.
(5) Remove the original sealant from the housing and cover surfaces.
(6) Apply a bead of Mopart Silicone Rubber Sealant, or equivalent, to the housing cover (Fig. 6).
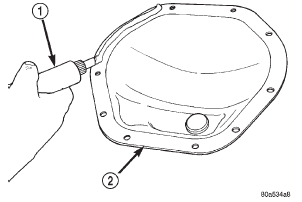
Fig. 6 Apply Sealant
1 - SEALANT
2 - AXLE HOUSING COVER
Install the housing cover within 5 minutes after applying the sealant.
(7) Install the cover and any identification tag.
Tighten the cover bolts to 41 N·m (30 ft. lbs.) torque.
(8) For Trac-loky differentials, a quantity of Mopart Trac-loky lubricant (friction modifier), or equivalent, must be added after repair service or a lubricant change. Refer to the Lubricant Specifications section of this group for the quantity necessary.
(9) Fill differential with Mopart Hypoid Gear Lubricant, or equivalent, to bottom of the fill plug hole. Refer to the Lubricant Specifications section of this group for the quantity necessary.
CAUTION: Overfilling the differential can result in lubricant foaming and overheating.
(10) Install the fill hole plug and lower the vehicle.
(11) Trac-loky differential equipped vehicles should be road tested by making 10 to 12 slow figureeight turns. This maneuver will pump the lubricant through the clutch discs to eliminate a possible chatter noise complaint.


Other materials:
Disassembly and assembly
Housing end plug
DISASSEMBLY
(1) Unseat and remove retaining ring from groove
with a punch through the hole in the end of the
housing (Fig. 2).
Fig. 2 End Plug Retaining Ring
1 - RETAINING RING
(2) Slowly rotate stub shaft with 12 point socket
COUNTER-CLOCKWISE to force the end plug out
...