Jeep Cherokee (XJ): A-pillar trim. Lower a-pillar cowl trim. Front inner scuff plate
REMOVAL (1) Remove front and rear assist handles, if
equipped.
(2) Remove the inner scuff plate.
(3) Remove the lower A-pillar cowl trim.
(4) Using a small flat blade, pry the trim plugs
from the A-pillar trim.
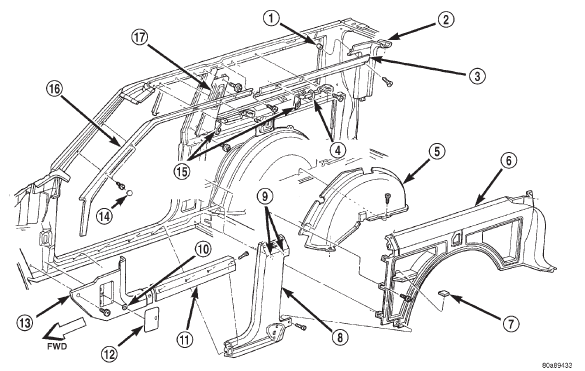
(5) Remove the screws attaching the A-pillar trim
to the A-pillar (Fig. 65).
(6) Separate the A-pillar trim from the A-pillar. INSTALLATION (1) Position the A-pillar trim on the A-pillar.
(2) Install the screws attaching the A-pillar trim to
the A-pillar. (3) Install the trim plugs.
(4) Install the lower A-pillar cowl trim.
(5) Install the inner scuff plate.
(6) Install the assist handles. REMOVAL (1) Remove the inner scuff plate.
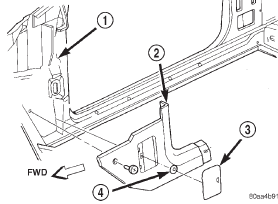
(2) Remove the nut behind the fuse panel access
door (Right side only) (Fig. 66).
(3) Remove the fasteners attaching the lower A-pillar
cowl trim to the A-pillar lower cowl.
(4) Separate the lower A-pillar cowl trim from the
A-pillar lower cowl.
1 - SPACER
1 - COWL PANEL INSTALLATION (1) Position the lower A-pillar cowl trim on the
A-pillar lower cowl.
(2) Install the screws attaching the lower A-pillar
cowl trim to the A-pillar lower cowl.
(3) Install the nut behind the fuse panel access
door (Right side only).
(4) Install the inner scuff plate. REMOVAL (1) If necessary, remove the bucket seat side shield
trim cover.
(2) Remove the screws attaching the inner scuff
plate to the front door sill (Fig. 65).
(3) Separate the inner scuff plate from the door
sill. INSTALLATION (1) Position the inner scuff plate on the front door
sill.
(2) Install the screws attaching the inner scuff
plate to the front door sill.
(3) If removed, install the bucket seat side shield
trim cover.A-pillar trim
Lower a-pillar cowl trim

Fig. 65 Trim Panels-2-Door Vehiclles
2 - LIFTGATE PILLAR TRIM
3 - UPPER QUARTER PANEL TRIM
4 - COAT HOOK
5 - WHEELHOUSE COVER
6 - LOWER QUARTER PANEL TRIM
7 - COVER
8 - LOWER B-PILLAR TRIM
9 - PUSH-IN FASTENER
10 - NUT
11 - INNER SCUFF PLATE
12 - ACCESS DOOR
13 - COWL PANEL TRIM
14 - TRIM PLUG
15 - OVERHEAD ASSIST HANDLE
16 - A-PILLAR TRIM
17 - UPPER B-PILLAR TRIM
Fig. 66 Lower A-Pillar Cowl Trim
2 - COWL PANEL TRIM
3 - ACCESS DOOR
4 - NUTFront inner scuff plate
 Drip rail molding. Luggage rack. Air exhaust grille
 Door sill scuff plate. Assist handle. B-pillar trim
Other materials:
Maintenance-Free Battery. Air Conditioner Maintenance. Body Lubrication
Maintenance-Free Battery
Your vehicle is equipped with a maintenance-free battery.
You will never have to add water, nor is periodic maintenance
required.
WARNING!
Battery fluid is a corrosive acid solution and can
burn or even blind you. Do not allow battery fluid
to contact your eyes, ...
