 Jeep Cherokee Service ManualPassive restraint systems » Removal and installation
Clockspring
Clockspring
The clockspring cannot be repaired. It must be replaced if faulty or damaged, or if the driver side airbag has been deployed.
WARNING: THE AIRBAG SYSTEM IS A SENSITIVE, COMPLEX ELECTROMECHANICAL UNIT. BEFORE ATTEMPTING TO DIAGNOSE OR SERVICE ANY AIRBAG SYSTEM OR RELATED STEERING WHEEL, STEERING COLUMN, OR INSTRUMENT PANEL COMPONENTS YOU MUST FIRST DISCONNECT AND ISOLATE THE BATTERY NEGATIVE (GROUND) CABLE. THEN WAIT TWO MINUTES FOR THE SYSTEM CAPACITOR TO DISCHARGE BEFORE FURTHER SYSTEM SERVICE. THIS IS THE ONLY SURE WAY TO DISABLE THE AIRBAG SYSTEM. FAILURE TO DO THIS COULD RESULT IN ACCIDENTAL AIRBAG DEPLOYMENT AND POSSIBLE PERSONAL INJURY.
REMOVAL
NOTE: Before starting this procedure, be certain to turn the steering wheel until the front wheels are in the straight-ahead position.
(1) Place the front wheels in the straight-ahead position.
(2) Remove the driver side airbag module from the steering wheel. Refer to Driver Side Airbag Module in the Removal and Installation section of this group for the procedures.
(3) If the vehicle is so equipped, disconnect the upper clockspring wire harness connector from the steering wheel wire harness for the vehicle speed control switches located within the hub cavity of the steering wheel.
(4) Remove the nut that secures the steering wheel armature to the steering column upper shaft, which is located within the hub cavity of the steering wheel.
(5) Pull the steering wheel off of the steering column upper shaft spline using a steering wheel puller (Special Tool C-3428-B).
(6) Remove the steering column opening cover from the instrument panel. Refer to Steering Column Opening Cover in the Removal and Installation section of Group 8E - Instrument Panel Systems for the procedures.
(7) If the vehicle is so equipped, move the tilt steering column to the fully raised position.
(8) Remove the three screws that secure the lower steering column shroud to the upper shroud (Fig. 13).
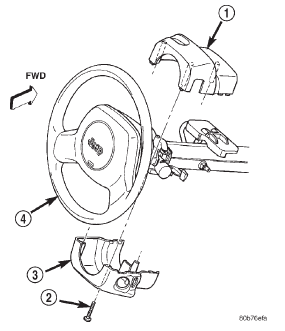
Fig. 13 Steering Column Shrouds Remove/Install
1 - UPPER SHROUD
2 - SCREW (3)
3 - LOWER SHROUD
4 - STEERING WHEEL
(9) If the vehicle is equipped with a standard nontilt steering column, loosen the two upper steering column mounting nuts. If the vehicle is equipped with the optional tilt steering column, move the tilt steering column to the fully lowered position.
(10) Remove both the upper and lower shrouds from the steering column.
(11) Disconnect the two instrument panel wire harness connectors from the lower clockspring connector receptacles (Fig. 14).
(12) The multi-function switch water shield bracket on the top of the steering column has a small access window which allows access to the upper clockspring latch with a small screwdriver (Fig. 15).
Gently pry both plastic latches of the clockspring assembly to release them from the steering column upper housing.
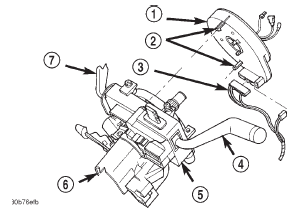
Fig. 14 Clockspring Remove/Install
1 - CLOCKSPRING
2 - LATCHES
3 - WIRE HARNESS
4 - TURN SIGNAL SWITCH LEVER
5 - WATER SHIELD BRACKET
6 - STEERING COLUMN
7 - WIPER SWITCH LEVER
NOTE: If the clockspring plastic latches are broken, be certain to remove the broken pieces from the steering column upper housing
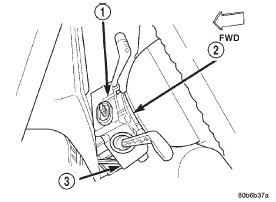
Fig. 15 Upper Clockspring Latch Access Window
1 - UPPER CLOCKSPRING LATCH ACCESS WINDOW
2 - CLOCKSPRING
3 - WATER SHIELD AND BRACKET
(13) Remove the clockspring from the steering column.
The clockspring cannot be repaired. It must be replaced if faulty or damaged, or if the driver side airbag has been deployed.
(14) If the removed clockspring is to be reused, lock the clockspring rotor to the clockspring case to maintain clockspring centering until it is reinstalled on the steering column. This can be done by inserting a stiff wire through the small index hole located at about the 11 o'clock position in the centered clockspring rotor and case. Refer to Clockspring Centering in the Adjustments section of this group for an illustration of the clockspring index hole. Bend the wire over after it has been inserted through the index hole to prevent it from falling out.
INSTALLATION
If the clockspring is not properly centered in relation to the steering wheel, steering shaft and steering gear, it may be damaged. Refer to Clockspring Centering in the Adjustments section of this group before installing or reinstalling a clockspring.
Service replacement clocksprings are shipped precentered and with a locking pin installed. This locking pin should not be removed until the clockspring has been installed on the steering column. If the locking pin is removed before the clockspring is installed on a steering column, the clockspring centering procedure must be performed.
NOTE: Before starting this procedure, be certain that the front wheels are still in the straight-ahead position.
(1) If the removed clockspring is being reused, remove the wire from the index hole that is locking the clockspring rotor to the clockspring case to maintain clockspring centering.
(2) Be certain that the turn signal switch stalk is in the neutral position, then carefully slide the centered clockspring down over the steering column upper shaft until the clockspring latches engage the steering column upper housing.
(3) If a new clockspring has been installed, remove the locking pin that is securing the clockspring rotor to the clockspring case and maintaining clockspring centering.
(4) Reconnect the two instrument panel wire harness connectors to the lower clockspring connector receptacles. Be certain that the connector latches are fully engaged.
(5) Position the steering column shrouds on the steering column.
(6) Install and tighten the three screws that secure the lower steering column shroud to the upper shroud. Tighten the screws to 2 N·m (18 in. lbs.).
(7) Install the steering column opening cover onto the instrument panel. Refer to Steering Column Opening Cover in the Removal and Installation section of Group 8E - Instrument Panel Systems for the procedures.
(8) Install the steering wheel onto the steering column upper shaft. Be certain to index the flats on the hub of the steering wheel with the formations on the inside of the clockspring rotor. Pull the upper clockspring wire harnesses through the lower hole in the steering wheel armature.
(9) Install and tighten the steering wheel mounting nut. Tighten the nut to 61 N·m (45 ft. lbs.). Be certain not to pinch the wire harnesses between the steering wheel and the nut.
(10) If the vehicle is so equipped, reconnect the upper clockspring wire harness connector to the steering wheel wire harness for the vehicle speed control switches.
(11) Install the driver side airbag module onto the steering wheel. Refer to Driver Side Airbag Module in the Removal and Installation section of this group for the procedures.
Driver side airbag module
Driver side airbag module trim cover
Passenger side airbag module
Passenger side airbag door
Airbag control module
Clockspring
Jeep Cherokee Service Manual
- Lubrication and maintenance
- Suspension
- Differential and driveline
- Brakes
- Clutch
- Cooling system
- Battery
- Starting systems
- Charging system
- Ignition system
- Instrument panel systems
- Audio systems
- Horn systems
- Speed control system
- Turn signal and hazard warning systems
- Wiper and washer systems
- Lamps
- Passive restraint systems
- Electrically heated systems
- Power distribution systems
- Power lock systems
- Vehicle theft/security systems
- Power seat systems
- Power window systems
- Power mirror systems
- Chime/buzzer warning systems
- Overhead console systems
- Engine
- Exhaust system
- Frame and bumpers
- Frame
- Fuel system
- Steering
- Transmission and transfer case
- Tires and wheels
- Body
Categories
