 Jeep Cherokee Service ManualClutch » Removal and installation
Clutch hydraulic linkage
Clutch hydraulic linkage
The clutch master cylinder, slave cylinder and connecting line are serviced as an assembly only. The linkage components cannot be overhauled or serviced separately. The cylinders and connecting line are sealed units. Also note that removal/installation procedures for right and left hand drive models are basically the same. Only master cylinder location is different.

Fig. 14 Clutch Housing Attachment
1 - HOUSING-TO-TRANSMISSION BOLTS (46 N·m/34 ft. lbs.)
2 - CLUTCH HOUSING
3 - TRANSMISSION
REMOVAL
(1) Raise vehicle.
(2) Remove fasteners attaching slave cylinder to clutch housing.
(3) Remove slave cylinder from clutch housing (Fig. 15).
(4) Disengage clutch fluid line from body clips, if applicable.
(5) Lower vehicle.
(6) Verify that cap on clutch master cylinder reservoir is tight. This is necessary to avoid spilling fluid during removal.
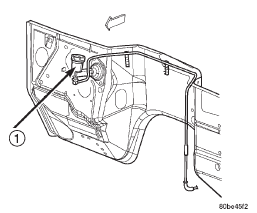
(7) Remove clutch master cylinder attaching nuts (Fig. 16) or (Fig. 17).
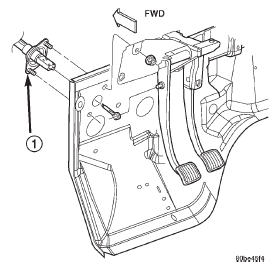
(8) Disengage captured bushing on clutch master cylinder actuator from pivot pin on pedal arm (Fig.
18).
(9) Slide actuator off pivot pin.
(10) Disconnect clutch interlock safety switch wires.
(11) Remove clutch hydraulic linkage through engine compartment.

Fig. 15 Slave Cylinder
1 - CLUTCH SLAVE CYLINDER

Fig. 16 Left Hand Drive Clutch Master Cylinder
1 - CLUTCH MASTER CYLINDER
INSTALLATION
(1) Be sure reservoir cover on clutch master cylinder is tight to avoid spills.
(2) Position clutch linkage components in vehicle.
Work connecting line and slave cylinder downward past engine and adjacent to clutch housing (Fig. 16) or (Fig. 17).

Fig. 17 Right Hand Drive Clutch Master Cylinder
1 - CLUTCH MASTER CYLINDER

Fig. 18 Clutch Pedal Attachment
1 - CLUTCH MASTER CYLINDER
(3) Position clutch master cylinder on dash panel (Fig. 16) or (Fig. 17).
(4) Attach clutch master cylinder actuator to pivot pin on clutch pedal (Fig. 18).
(5) Install and tighten clutch master cylinder attaching nuts to 38 N·m (28 ft. lbs.) torque.
(6) Raise vehicle.
(7) Insert slave cylinder push rod through clutch housing opening and into release lever. Be sure cap on end of rod is securely engaged in lever. Check this before installing cylinder attaching nuts.
(8) Install and tighten slave cylinder attaching nuts to 23 N·m (17 ft. lbs.) torque.
(9) Secure clutch fluid line in body and transmission clips.
(10) Lower vehicle.
(11) Connect clutch interlock safety switch wires.
Clutch cover and disc
Release bearing
Pilot bearing
Clutch housing
Clutch hydraulic linkage
Jeep Cherokee Service Manual
- Lubrication and maintenance
- Suspension
- Differential and driveline
- Brakes
- Clutch
- Cooling system
- Battery
- Starting systems
- Charging system
- Ignition system
- Instrument panel systems
- Audio systems
- Horn systems
- Speed control system
- Turn signal and hazard warning systems
- Wiper and washer systems
- Lamps
- Passive restraint systems
- Electrically heated systems
- Power distribution systems
- Power lock systems
- Vehicle theft/security systems
- Power seat systems
- Power window systems
- Power mirror systems
- Chime/buzzer warning systems
- Overhead console systems
- Engine
- Exhaust system
- Frame and bumpers
- Frame
- Fuel system
- Steering
- Transmission and transfer case
- Tires and wheels
- Body
