 Jeep Cherokee Service ManualCooling system » Diagnosis and testing
Cooling system-testing for leaks
Cooling system-testing for leaks
ULTRAVIOLET LIGHT METHOD
All Jeep models have a leak detection additive added to the cooling system before they leave the factory.
The additive is highly visible under ultraviolet light (black light). If the factory original coolant has been drained, pour one ounce of additive into the cooling system. The additive is available through the part's department. Place the heater control unit in HEAT position. Start and operate the engine until the radiator upper hose is warm to the touch. Aim the commercially available black light tool at the components to be checked. If leaks are present, the black light will cause the additive to glow a bright green color.
The black light can be used along with a pressure tester to determine if any external leaks exist (Fig.
17).
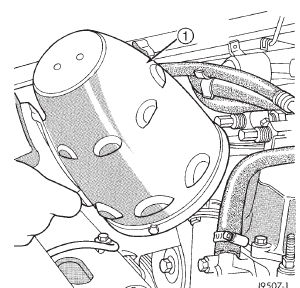
Fig. 17 Leak Detection Using Black Light-Typical
1 - TYPICAL BLACK LIGHT TOOL
PRESSURE TESTER METHOD
The engine should be at the normal operating temperature.
Recheck the system cold if the cause of coolant loss is not located during warm engine examination.
WARNING: HOT, PRESSURIZED COOLANT CAN CAUSE INJURY BY SCALDING.
Carefully remove the radiator pressure cap from the filler neck and check the coolant level. Push down on the cap to disengage it from the stop tabs.
Wipe the inner part of the filler neck and examine the lower inside sealing seat for nicks, cracks, paint, dirt and solder residue. Inspect the reserve/overflow tank tube for internal obstructions. Insert a wire through the tube to be sure it is not obstructed.
Inspect the cams on the outside part of the filler neck. If the cams are bent, seating of pressure cap valve and tester seal will be affected. Replace cap if cams are bent.
Attach pressure tester 7700 (or an equivalent) to the radiator filler neck (Fig. 18).
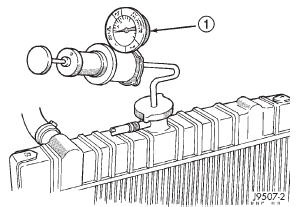
Fig. 18 Pressurizing System-Typical
1 - TYPICAL COOLING SYSTEM PRESSURE TESTER
Operate the tester pump to apply 124 kPa (18 psi) pressure to the system. If the hoses enlarge excessively or bulge while testing, replace as necessary.
Observe the gauge pointer and determine the condition of the cooling system according to the following criteria:
- Holds Steady: If the pointer remains steady for two minutes, there are no serious coolant leaks in the system. However, there could be an internal leak that does not appear with normal system test pressure. Inspect for interior leakage or do the Internal Leakage Test. Do this if it is certain that coolant is being lost and no leaks can be detected.
- Drops Slowly: Shows a small leak or seepage is occurring. Examine all connections for seepage or slight leakage with a flashlight. Inspect the radiator, hoses, gasket edges and heater. Seal any small leak holes with a Sealer Lubricant or equivalent. Repair leak holes and reinspect the system with pressure applied.
- Drops Quickly: Shows that a serious leakage is occurring. Examine the system for serious external leakage. If no leaks are visible, inspect for internal leakage. Large radiator leak holes should be repaired by a reputable radiator repair shop.
INTERNAL LEAKAGE INSPECTION
Remove the engine oil pan drain plug and drain a small amount of engine oil. Coolant, being heavier than engine oil, will drain first. Another way of testing is to operate the engine and check for water globules on the engine oil dipstick. Also inspect the automatic transmission oil dipstick for water globules.
Inspect the automatic transmission fluid cooler for leakage. Operate the engine without the pressure cap on the radiator until thermostat opens.
Attach a pressure tester to the filler neck. If pressure builds up quickly, a leak exists as a result of a faulty cylinder head gasket or crack in the engine.
Repair as necessary.
WARNING: DO NOT ALLOW PRESSURE TO EXCEED 124 KPA (18 PSI). TURN THE ENGINE OFF.
TO RELEASE THE PRESSURE, ROCK THE TESTER FROM SIDE TO SIDE. WHEN REMOVING THE TESTER, DO NOT TURN THE TESTER MORE THAN 1/2 TURN IF THE SYSTEM IS UNDER PRESSURE.
If there is no immediate pressure increase, pump the pressure tester until the indicated pressure is within the system range. Vibration of the gauge pointer indicates compression or combustion leakage into the cooling system.
WARNING: DO NOT DISCONNECT THE SPARK PLUG WIRES WHILE THE ENGINE IS OPERATING.
CAUTION: Do not operate the engine with a spark plug shorted for more than a minute. The catalytic converter may be damaged.
Isolate the compression leak by shorting each spark plug to the cylinder block. The gauge pointer should stop or decrease vibration when spark plug for leaking cylinder is shorted. This happens because of the absence of combustion pressure.
COMBUSTION LEAKAGE TEST (WITHOUT PRESSURE TESTER)
DO NOT WASTE reusable coolant. If the solution is clean, drain the coolant into a clean container for reuse.
WARNING: DO NOT REMOVE THE CYLINDER BLOCK DRAIN PLUGS OR LOOSEN THE RADIATOR DRAINCOCK WITH THE SYSTEM HOT AND UNDER PRESSURE. SERIOUS BURNS FROM COOLANT CAN OCCUR.
Drain sufficient coolant to allow for thermostat removal. Refer to Thermostat Replacement. Disconnect the water pump drive belt.
Disconnect the upper radiator hose from the thermostat housing. Remove the housing and thermostat.
Install the thermostat housing.
Add coolant to the radiator to bring the level to within 6.3 mm (1/4 in) of the top of the thermostat housing.
CAUTION: Avoid overheating. Do not operate the engine for an excessive period of time. Open the draincock immediately after the test to eliminate boil over of coolant.
Start the engine and accelerate rapidly three times (to approximately 3000 rpm) while observing the coolant. If internal engine combustion gases are leaking into the cooling system, bubbles will appear in the coolant. If bubbles do not appear, there is no internal combustion gas leakage.
On-board diagnostics (OBD)
Accessory drive belt diagnosis
Preliminary checks
Radiator coolant flow check
Cooling system-testing for leaks
Viscous fan drive
Electric cooling fan
Radiator cap-to-filler neck seal-pressure relief check
Radiator cap-pressure testing
Coolant-low level aeration
Deaeration
Jeep Cherokee Service Manual
- Lubrication and maintenance
- Suspension
- Differential and driveline
- Brakes
- Clutch
- Cooling system
- Battery
- Starting systems
- Charging system
- Ignition system
- Instrument panel systems
- Audio systems
- Horn systems
- Speed control system
- Turn signal and hazard warning systems
- Wiper and washer systems
- Lamps
- Passive restraint systems
- Electrically heated systems
- Power distribution systems
- Power lock systems
- Vehicle theft/security systems
- Power seat systems
- Power window systems
- Power mirror systems
- Chime/buzzer warning systems
- Overhead console systems
- Engine
- Exhaust system
- Frame and bumpers
- Frame
- Fuel system
- Steering
- Transmission and transfer case
- Tires and wheels
- Body
Categories
