 Jeep Cherokee Service ManualDifferential and driveline » 194 RBI axle » Adjustments
Differential bearing preload and
gear backlash
Differential bearing preload and gear backlash
Differential side bearing preload and gear backlash is achieved by selective shims inserted between the bearing cup and the axle housing. The proper shim thickness can be determined using slip-fit dummy bearings D-348 in place of the differential side bearings and a dial indicator C-3339. Before proceeding with the differential bearing preload and gear backlash measurements, measure the pinion gear depth and prepare the pinion gear for installation. Establishing proper pinion gear depth is essential to establishing gear backlash and tooth contact patterns.
After the overall shim thickness to take up differential side play is measured, the pinion gear is installed, and the gear backlash shim thickness is measured. The overall shim thickness is the total of the dial indicator reading, starting point shim thickness, and the preload specification added together.
The gear backlash measurement determines the thickness of the shim used on the ring gear side of the differential case. Subtract the gear backlash shim thickness from the total overall shim thickness and select that amount for the pinion gear side of the differential (Fig. 70).
SHIM SELECTION
NOTE: It is difficult to salvage the differential side bearings during the removal procedure. Install replacement bearings if necessary.
(1) Remove side bearings from differential case.
(2) Install ring gear, if necessary, on differential case and tighten bolts to specification.
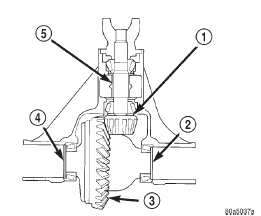
Fig. 70 Axle Adjustment Shim Locations
1 - PINION GEAR DEPTH SHIM
2 - DIFFERENTIAL BEARING SHIM-PINION GEAR SIDE
3 - RING GEAR
4 - DIFFERENTIAL BEARING SHIM-RING GEAR SIDE
5 - COLLAPSIBLE SPACER
(3) Install dummy side bearings D-348 on differential case.
(4) Install differential case in axle housing.
(5) Insert Dummy Shims 8107 (0.118 in. (3.0 mm)) starting point shims between the dummy bearing and the axle housing (Fig. 71).
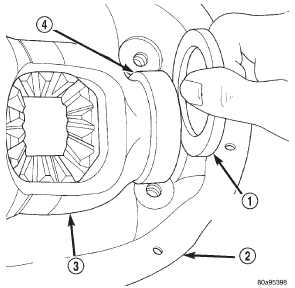
Fig. 71 Insert Starting Point Shims
1 - SPECIAL TOOL 8107
2 - AXLE HOUSING
3 - DIFFERENTIAL CASE
4 - SPECIAL TOOL D-348
(6) Install the marked bearing caps in their correct positions. Install and snug the bolts.
(7) Using a dead-blow type mallet, seat the differential dummy bearings to each side of the axle housing (Fig. 72) and (Fig. 73).
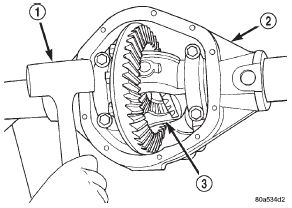
Fig. 72 Seat Pinion Gear Dummy Side Bearing
1 - MALLET
2 - AXLE HOUSING
3 - DIFFERENTIAL CASE
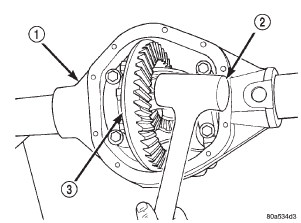
Fig. 73 Seat Ring Gear Side Dummy Bearing
1 - AXLE HOUSING
2 - MALLET
3 - DIFFERENTIAL CASE
(8) Thread guide stud C-3288-B into rear cover bolt hole below ring gear (Fig. 74).
(9) Attach dial indicator C-3339 to guide stud.
Position the dial indicator plunger on a flat surface on a ring gear bolt head (Fig. 74).
(10) Push firmly and hold differential case to pinion gear side of axle housing (Fig. 75).
(11) Zero dial indicator face to pointer.
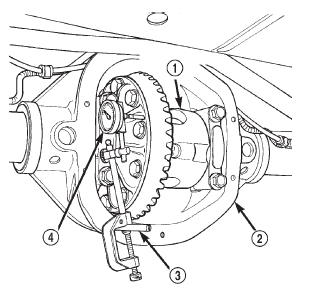
Fig. 74 Differential Side play Measurement
1 - DIFFERENTIAL CASE
2 - AXLE HOUSING
3 - SPECIAL TOOL C-3288-B
4 - SPECIAL TOOL C-3339
(12) Push firmly and hold differential case to ring gear side of the axle housing (Fig. 76).
(13) Record dial indicator reading.
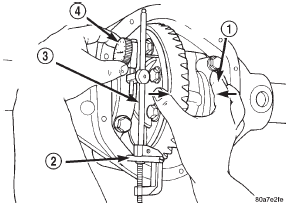
Fig. 75 Hold Differential Case and Zero Dial
Indicator
1 - FORCE DIFFERENTIAL CASE TO PINION GEAR SIDE
2 - SPECIAL TOOL C-3288-B
3 - SPECIAL TOOL C-3339
4 - ZERO DIAL INDICATOR FACE
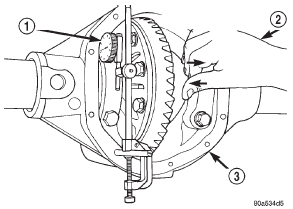
Fig. 76 Hold Differential Case and Read Dial Indicator
1 - READ DIAL INDICATOR
2 - FORCE DIFFERENTIAL CASE TO RING GEAR SIDE
3 - AXLE HOUSING
(14) Add the dial indicator reading to the starting point shim thickness to determine total shim thickness to achieve zero differential end play.
(15) Add 0.008 in. (0.2 mm) to the zero end play total. This new total represents the thickness of shims to compress, or preload the new bearings when the differential is installed.
(16) Rotate dial indicator out of the way on guide stud.
(17) Remove differential case, dummy bearings, and starting point shims from axle housing.
(18) Install pinion gear in axle housing. Install the yoke and establish the correct pinion rotating torque.
(19) Install differential case and dummy bearings in axle housing (without shims) and tighten retaining cap bolts.
(20) Position the dial indicator plunger on a flat surface between the ring gear bolt heads (Fig. 74).
(21) Push and hold differential case toward pinion gear.
(22) Zero dial indicator face to pointer.
(23) Push and hold differential case to ring gear side of the axle housing.
(24) Record dial indicator reading.
(25) Subtract 0.002 in. (0.05 mm) from the dial indicator reading to compensate for backlash between ring and pinion gears. This total is the thickness of shim required to achieve proper backlash.
(26) Subtract the backlash shim thickness from the total preload shim thickness. The remainder is the shim thickness required on the pinion side of the axle housing.
(27) Rotate dial indicator out of the way on guide stud.
(28) Remove differential case and dummy bearings from axle housing.
(29) Install new side bearing cones and cups on differential case.
(30) Install spreader W-129-B, utilizing some components of Adapter Set 6987, on axle housing and spread axle opening enough to receive differential case.
(31) Place side bearing shims in axle housing against axle tubes.
(32) Install differential case in axle housing.
(33) Rotate the differential case several times to seat the side bearings.
(34) Position the indicator plunger against a ring gear tooth (Fig. 77).
(35) Push and hold ring gear upward while not allowing the pinion gear to rotate.
(36) Zero dial indicator face to pointer.
(37) Push and hold ring gear downward while not allowing the pinion gear to rotate. Dial indicator reading should be between 0.12 mm (0.005 in.) and 0.20 mm (0.008 in.). If backlash is not within specifications transfer the necessary amount of shim thickness from one side of the differential housing to the other (Fig. 78).
(38) Verify differential case and ring gear runout by measuring ring to pinion gear backlash at eight locations around the ring gear. Readings should not vary more than 0.05 mm (0.002 in.). If readings vary more than specified, the ring gear or the differential case is defective.
After the proper backlash is achieved, perform the Gear Contact Pattern Analysis procedure.

Fig. 77 Ring Gear Backlash Measurement
1 - DIAL INDICATOR
Pinion gear depth
Differential bearing preload and gear backlash
Gear contact pattern analysis
Jeep Cherokee Service Manual
- Lubrication and maintenance
- Suspension
- Differential and driveline
- Brakes
- Clutch
- Cooling system
- Battery
- Starting systems
- Charging system
- Ignition system
- Instrument panel systems
- Audio systems
- Horn systems
- Speed control system
- Turn signal and hazard warning systems
- Wiper and washer systems
- Lamps
- Passive restraint systems
- Electrically heated systems
- Power distribution systems
- Power lock systems
- Vehicle theft/security systems
- Power seat systems
- Power window systems
- Power mirror systems
- Chime/buzzer warning systems
- Overhead console systems
- Engine
- Exhaust system
- Frame and bumpers
- Frame
- Fuel system
- Steering
- Transmission and transfer case
- Tires and wheels
- Body
Categories
