 Jeep Cherokee Service ManualDifferential and driveline » Propeller shafts » Removal and installation
Front propeller shaft
Jeep Cherokee
Service Manual
Front propeller shaft
REMOVAL
- Hoist and support vehicle on safety stands.
- Remove the crossmember/skid plate as necessary to gain access to the propeller shaft.
- Shift the transmission and transfer case, if necessary, into the Neutral position.
- Using a suitable marker, mark a line across the yoke at the transfer case, the link yoke, and propeller shaft yoke at the rear of the front propeller shaft for installation reference (Fig. 13).
- Mark a line across the propeller shaft yoke and the pinion shaft yoke for installation reference.
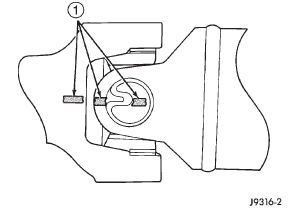
Fig. 13 Reference Marks on Yokes
1 - REFERENCE MARKS
- Remove the U-joint strap bolts at the pinion shaft yoke (Fig. 14).
- Remove bolts holding rear universal joint to the transfer case yoke.
- Separate the rear universal joint from the transfer case yoke.
- Push rear of propeller shaft upward to clear transfer case yoke.
- Separate front universal joint from front axle.
- Separate propeller shaft from vehicle.
INSTALLATION
- Position front propeller shaft under vehicle with rear universal joint over the transfer case yoke.
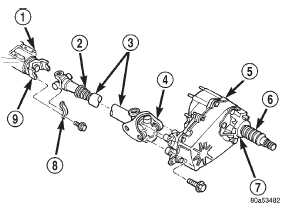
Fig. 14 Front Propeller Shaft
1 - FRONT AXLE
2 - BOOT
3 - PROPELLER SHAFT
4 - CV-JOINT
5 - TRANSFER CASE
6 - BOOT
7 - SLINGER
8 - CLAMP
9 - YOKE
- Place front universal joint into the axle pinion yoke.
- Align mark on the rear link yoke and universal joint to the mark on the transfer case yoke (Fig. 13).
- Loosely install bolts to hold universal joint to transfer case yoke.
- Align mark on front universal joint to the mark on the axle pinion yoke.
- Tighten the U-joint strap/clamp bolts at the axle yoke to 19 N·m (14 ft. lbs.) torque.
- Tighten the universal joint to transfer case bolts to 27 N·m (20 ft. lbs.) torque.
- Lower the vehicle.
More about «Removal and installation»:
Front propeller shaft
Rear propeller shaft
Jeep Cherokee Service Manual / Differential and driveline / Propeller shafts / Removal and installation / Front propeller shaft
Jeep Cherokee Service Manual
- Lubrication and maintenance
- Suspension
- Differential and driveline
- Brakes
- Clutch
- Cooling system
- Battery
- Starting systems
- Charging system
- Ignition system
- Instrument panel systems
- Audio systems
- Horn systems
- Speed control system
- Turn signal and hazard warning systems
- Wiper and washer systems
- Lamps
- Passive restraint systems
- Electrically heated systems
- Power distribution systems
- Power lock systems
- Vehicle theft/security systems
- Power seat systems
- Power window systems
- Power mirror systems
- Chime/buzzer warning systems
- Overhead console systems
- Engine
- Exhaust system
- Frame and bumpers
- Frame
- Fuel system
- Steering
- Transmission and transfer case
- Tires and wheels
- Body
Categories

© 2017-2024 Copyright www.jcherokee.com