Jeep Cherokee (XJ): Kick cover. Mode door vacuum actuator. Refrigerant line coupler
WARNING: ON VEHICLES EQUIPPED WITH AIRBAGS,
REFER TO GROUP 8M - PASSIVE
RESTRAINT SYSTEMS BEFORE ATTEMPTING ANY
STEERING WHEEL, STEERING COLUMN, OR
INSTRUMENT PANEL COMPONENT DIAGNOSIS OR
SERVICE. FAILURE TO TAKE THE PROPER PRECAUTIONS
COULD RESULT IN ACCIDENTAL AIRBAG
DEPLOYMENT AND POSSIBLE PERSONAL
INJURY. REMOVAL (1) Disconnect and isolate the battery negative
cable.
(2) Loosen the two screws that secure the upper
half of the kick cover to the heater-A/C housing under the passenger side end of
the instrument panel
(Fig. 51).
1 - HEATER-A/C HOUSING (3) Remove the two screws that secure the lower
half of the kick cover to the heater-A/C housing.
(4) Pull the kick cover down towards the floor
panel to disengage the slotted upper mounting tabs
from under the two loosened heater-A/C housing
screws.
(5) Remove the kick cover from the heater-A/C
housing. INSTALLATION (1) Position the slotted upper kick cover mounting
tabs under the heads of the two loosened heater-A/C
housing screws. Tighten the screws to 2.2 N·m (20 in.
lbs.).
(2) Install the two screws that secure the lower
kick cover to the heater-A/C housing. Tighten the
screws to 2.2 N·m (20 in. lbs.).
(3) Connect the battery negative cable. WARNING: ON VEHICLES EQUIPPED WITH AIRBAGS,
REFER TO GROUP 8M - PASSIVE
RESTRAINT SYSTEMS BEFORE ATTEMPTING ANY
STEERING WHEEL, STEERING COLUMN, OR
INSTRUMENT PANEL COMPONENT DIAGNOSIS OR
SERVICE. FAILURE TO TAKE THE PROPER PRECAUTIONS
COULD RESULT IN ACCIDENTAL AIRBAG
DEPLOYMENT AND POSSIBLE PERSONAL
INJURY. DEFROST DOOR ACTUATOR (1) Disconnect and isolate the battery negative
cable.
(2) Remove the instrument panel assembly from
the vehicle. Refer to Instrument Panel Assembly in
Group 8E - Instrument Panel Systems for the procedures.
(3) Unplug the two vacuum harness connectors
from the defrost door actuator (Fig. 52).
1 - PANEL/DEMIST DOOR ACTUATOR (4) Insert a trim stick or another suitable wide
flat-bladed tool into the latch hole on the heater-A/C
housing actuator mount (Fig. 53). Gently pry the
actuator latch while pulling firmly outwards on the
actuator to remove the actuator from the mount.
(5) Rotate and tilt the vacuum actuator as
required to disengage the hole on the end of the
actuator link from the hooked pin on the end of the
defrost door lever.
(6) Remove the defrost door vacuum actuator from
the vehicle.
(7) Reverse the removal procedures to install. FLOOR DOOR ACTUATOR (1) Disconnect and isolate the battery negative
cable.
(2) Remove the instrument panel assembly from
the vehicle. Refer to Instrument Panel Assembly i Group 8E - Instrument Panel
Systems for the procedures.
1 - ACTUATOR MOUNT LATCH HOLE (3) Unplug the vacuum harness connector from the
floor door actuator (Fig. 52).
(4) Insert a trim stick or another suitable wide
flat-bladed tool into the latch hole on the heater-A/C
housing actuator mount (Fig. 53). Gently pry the
actuator latch while pulling firmly outwards on the
actuator to remove the actuator from the mount.
(5) Rotate and tilt the vacuum actuator as
required to disengage the hole on the end of the
actuator link from the hooked pin on the end of the
floor door lever.
(6) Remove the floor door vacuum actuator from
the vehicle.
(7) Reverse the removal procedures to install. PANEL/DEMIST DOOR ACTUATOR (1) Remove the defrost door actuator from the
heater-A/C housing. See Defrost Door Actuator in
this group for the procedures.
(2) Unplug the vacuum harness connector from the
panel/demist door actuator (Fig. 52).
(3) Insert a trim stick or another suitable wide
flat-bladed tool into the latch hole on the heater-A/C
housing actuator mount (Fig. 53). Gently pry the
actuator latch while pulling firmly outwards on the
actuator to remove the actuator from the mount.
(4) Rotate and tilt the vacuum actuator as
required to disengage the hole on the end of the
actuator link from the hooked pin on the end of the
panel/demist door lever.
(5) Remove the panel/demist door vacuum actuator
from the vehicle.
(6) Reverse the removal procedures to install. RECIRCULATION AIR DOOR ACTUATOR A recirculation air door and vacuum actuator are
used only on models with the optional air conditioning
system.
(1) Disconnect and isolate the battery negative
cable.
(2) Remove the kick cover from the heater-A/C
housing. See Kick Cover in this group for the procedures.
(3) Unplug the vacuum harness connector from the
recirculation air door actuator (Fig. 54).
1 - HOOK (4) Insert a trim stick or another suitable wide
flat-bladed tool into the latch hole on the heater-A/C
housing actuator mount (Fig. 53). Gently pry the
actuator latch while pulling firmly outwards on the
actuator to remove the actuator from the mount.
(5) Rotate and tilt the vacuum actuator as
required to disengage the hole on the end of the actuator link from the hooked
pin on the end of the
recirculation air door lever.
(6) Remove the recirculation air door vacuum
actuator from the vehicle.
(7) Reverse the removal procedures to install. WARNING: REVIEW THE WARNINGS AND CAUTIONS
IN THE GENERAL INFORMATION SECTION
NEAR THE FRONT OF THIS GROUP BEFORE PERFORMING
THE FOLLOWING OPERATION. REMOVAL (1) Recover the refrigerant from the refrigerant
system. See Refrigerant Recovery in the Service Procedures
section of this group.
(2) Remove the secondary clip from the spring-lock
coupler.
(3) Fit the proper size A/C line disconnect tool
(Special Tool Kit 7193) over the spring-lock coupler
cage (Fig. 55).
(4) Close the two halves of the A/C line disconnect
tool around the spring-lock coupler.
(5) Push the A/C line disconnect tool into the open
side of the coupler cage to expand the garter spring.
Once the garter spring is expanded and while still
pushing the disconnect tool into the open side of the
coupler cage, pull on the refrigerant line attached to
the female half of the coupler fitting until the flange
on the female fitting is separated from the garter
spring and cage on the male fitting within the disconnect
tool.
NOTE: The garter spring may not release if the A/C
line disconnect tool is cocked while pushing it into
the coupler cage opening.
(6) Open and remove the A/C line disconnect tool
from the disconnected spring-lock coupler.
(7) Complete the separation of the two halves of
the coupler fitting. INSTALLATION (1) Check to ensure that the garter spring is
located within the cage of the male coupler fitting,
and that the garter spring is not damaged.
(a) If the garter spring is missing, install a new
spring by pushing it into the coupler cage opening.
(b) If the garter spring is damaged, remove it
from the coupler cage with a small wire hook (DO
NOT use a screwdriver) and install a new garter
spring.
(2) Clean any dirt or foreign material from both
halves of the coupler fitting.
(3) Install new O-rings on the male half of the coupler
fitting.
CAUTION: Use only the specified O-rings as they
are made of a special material for the R-134a system.
The use of any other O-rings may allow the
connection to leak intermittently during vehicle
operation.
(4) Lubricate the male fitting and O-rings, and the
inside of the female fitting with clean R-134a refrigerant
oil. Use only refrigerant oil of the type recommended
for the compressor in the vehicle.
(5) Fit the female half of the coupler fitting over
the male half of the fitting.
(6) Push together firmly on the two halves of the
coupler fitting until the garter spring in the cage on
the male half of the fitting snaps over the flanged
end on the female half of the fitting.
(7) Ensure that the spring-lock coupler is fully
engaged by trying to separate the two coupler halves.
This is done by pulling the refrigerant lines on either
side of the coupler away from each other.
(8) Reinstall the secondary clip over the springlock
coupler cage.Kick cover
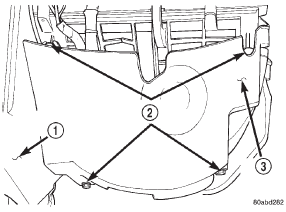
Fig. 51 Kick Cover Remove/Install
2 - MOUNTING SCREWS
3 - KICK COVERMode door vacuum actuator
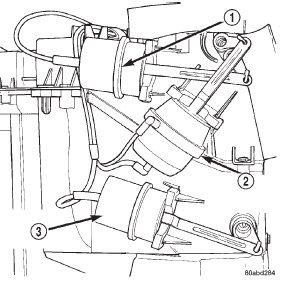
Fig. 52 Defrost, Floor, and Panel/Demist Door Vacuum Actuators
2 - DEFROST DOOR ACTUATOR
3 - FLOOR DOOR ACTUATOR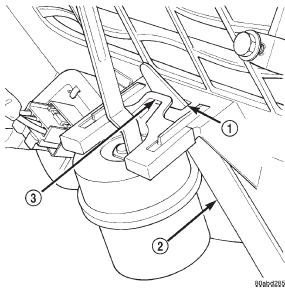
Fig. 53 Vacuum Actuator Remove/Install - Typical
2 - TRIM STICK
3 - ACTUATOR LATCH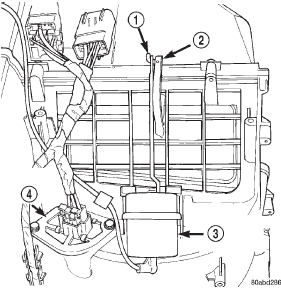
Fig. 54 Recirculation Air Door Vacuum Actuator Remove/Install
2 - LEVER
3 - RECIRCULATION AIR DOOR ACTUATOR
4 - BLOWER MOTOR RESISTORRefrigerant line coupler
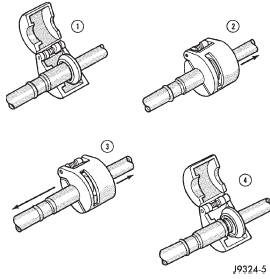
Fig. 55 Refrigerant Line Spring-Lock Coupler Disconnect
Other materials:
Dynamic Steering Torque (DST). Hill Descent Control (HDC). Selec Speed Control (SSC)
Dynamic Steering Torque (DST)
Dynamic Steering Torque is a feature of the ESC and EPS
modules that provides torque at the steering wheel for
certain driving conditions in which the ESC module is
detecting vehicle instability. The torque that the steering
wheel receives is only meant to help the ...