 Jeep Cherokee Service ManualEngine » 2.5L engine » Removal and installation
Oil pan
Oil pan
REMOVAL
(1) Disconnect negative cable from battery.
(2) Raise the vehicle.
(3) Remove the oil pan drain plug and drain the engine oil.
(4) Disconnect the exhaust pipe at the engine exhaust manifold.
(5) Disconnect the exhaust hanger at the catalytic converter and lower the pipe.
(6) Remove the engine starter motor.
(7) Remove the flywheel/torque converter housing access cover.
(8) Position a jack stand directly under the engine vibration damper.
(9) Place a piece of wood (2 x 2) between the jack stand and the engine vibration damper.
(10) Remove the engine mount through bolts.
(11) Using the jack stand, raise the engine until adequate clearance is obtained to remove the oil pan.
(12) If equipped, disconnect the transmission cooler lines and oxygen sensor harness from oil pan mounting studs.
(13) Remove the oil pan bolts and studs. Carefully remove the oil pan and gasket.
INSTALLATION
(1) Clean the block and pan gasket surfaces.
(2) Fabricate 4 alignment dowels from 1/4 x 1 1/2 inch bolts. Cut the head off the bolts and cut a slot into the top of the dowel. This will allow easier installation and removal with a screwdriver (Fig. 80).
(3) Install two dowels in the timing case cover.
Install the other two dowels in the cylinder block (Fig. 81).
(4) Apply Mopart Silicone Adhesive Sealant onto the cylinder block in four location as shown (Fig. 82) (5) Slide the one-piece gasket over the dowels and onto the block and timing case cover.
(6) Position the oil pan over the dowels and onto the gasket.
(7) Install the 1/4 inch oil pan bolts. Tighten these bolts to 9.5 N·m (84 in. lbs.) torque. Install the 5/16 inch oil pan bolts (Fig. 83). Tighten these bolts to 15 N·m (132 in. lbs.) torque.
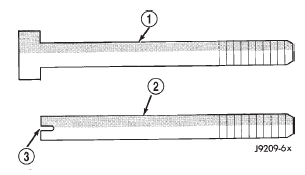
Fig. 80 Fabrication of Alignment Dowels
1 - 1/488 3 1 1/288 BOLT
2 - DOWEL
3 - SLOT
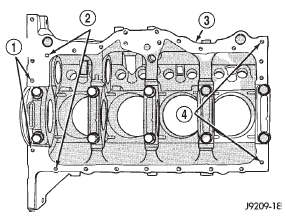
Fig. 81 Position of Dowels in Cylinder Block
1 - 5/1688 HOLES
2 - DOWEL HOLES
3 - CYLINDER BLOCK
4 - 5/1688 HOLES
(8) Remove the dowels. Install the remaining 1/4 inch oil pan bolts. Tighten these bolts to 9.5 N·m (84 in. lbs.) torque.
(9) Lower the engine until it is properly located on the engine mounts.
(10) Install the through bolts and tighten the nuts.
(11) Lower the jack stand and remove the piece of wood.
(12) Install the flywheel and torque converter housing access cover.
(13) Install the engine starter motor.
(14) Connect the exhaust pipe to the hanger and to the engine exhaust manifold.
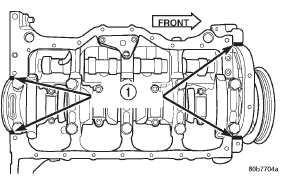
Fig. 82 Location of MoparT Silicone Adhesive Sealant on Cylinder Block
1 - SEALER LOCATIONS
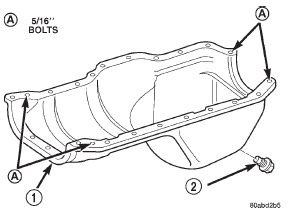
Fig. 83 Position of 5/16 inch Oil Pan Bolts
1 - OIL PAN
2 - OIL PAN DRAIN PLUG
(15) Install the oil pan drain plug (Fig. 83).
Tighten the plug to 34 N·m (25 ft. lbs.) torque.
(16) Lower the vehicle.
(17) Connect negative cable to battery.
(18) Fill the oil pan with engine oil to the specified level.
WARNING: USE EXTREME CAUTION WHEN THE ENGINE IS OPERATING. DO NOT STAND IN A DIRECT LINE WITH THE FAN. DO NOT PUT YOUR HANDS NEAR THE PULLEYS, BELTS OR FAN. DO NOT WEAR LOOSE CLOTHING.
(19) Start the engine and inspect for leaks.
Engine mounts-front
Engine mount-rear
Engine
Intake manifold
Exhaust manifold
Cylinder head cover
Rocker arms and push rods
Valve spring and seal
Cylinder head
Cylinder head
Hydraulic tappets
Vibration damper
Timing case cover oil seal
Timing case cover
Timing chain and sprockets
Camshaft
Camshaft pin replacement
Camshaft bearings
Crankshaft main bearings
Oil pan
Oil pump
Piston and connecting rod
Rear main oil seal
Jeep Cherokee Service Manual
- Lubrication and maintenance
- Suspension
- Differential and driveline
- Brakes
- Clutch
- Cooling system
- Battery
- Starting systems
- Charging system
- Ignition system
- Instrument panel systems
- Audio systems
- Horn systems
- Speed control system
- Turn signal and hazard warning systems
- Wiper and washer systems
- Lamps
- Passive restraint systems
- Electrically heated systems
- Power distribution systems
- Power lock systems
- Vehicle theft/security systems
- Power seat systems
- Power window systems
- Power mirror systems
- Chime/buzzer warning systems
- Overhead console systems
- Engine
- Exhaust system
- Frame and bumpers
- Frame
- Fuel system
- Steering
- Transmission and transfer case
- Tires and wheels
- Body
Categories
