 Jeep Cherokee Service ManualSuspension » Alignment
Service procedures
Service procedures
PRE-ALIGNMENT
Before starting wheel alignment, the following inspection and necessary corrections must be completed.
Refer to Suspension and Steering System Diagnosis Chart for additional information.
- Inspect tires for size and tread wear.
- Set tire air pressure.
- Inspect front wheel bearings for wear.
- Inspect front wheels for excessive radial or lateral runout and balance.
- Inspect ball studs, linkage pivot points and steering gear for looseness, roughness or binding.
- Inspect suspension components for wear and noise.
WHEEL ALIGNMENT
Before each alignment reading, the vehicle should be jounced (rear first, then front). Grasp each bumper at the center and jounce the vehicle up and down several times. Always release the bumper in the down position. Set the front end alignment to specifications with the vehicle at its NORMAL RIDE HEIGHT.
CAMBER
The wheel camber angle is preset. This angle is not adjustable and cannot be altered.
CASTER
Before checking the caster of the front axle for correct angle, be sure the axle is not bent or twisted.
Road test the vehicle, make left and right turns. If the steering wheel returns to the center position unassisted, the caster angle is correct. If steering wheel does not return toward the center position unassisted, an incorrect caster angle is probable.
Caster can be adjusted by installing the appropriate size shims (Fig. 2).
NOTE: Changing caster angle will also change the front propeller shaft angle. The propeller shaft angle has priority over caster. Refer to Group 3 Differential & Driveline for additional information.

Fig. 2 Caster Adjustment
1 - SHIM
2 - SUSPENSION ARM
TOE POSITION (LHD)
NOTE: The wheel toe position adjustment is the final adjustment. The engine must remain running during the entire toe position adjustment.
- Start the engine and turn wheels both ways before straightening the wheels. Secure the steering wheel with the front wheels in the straight-ahead position.
- Loosen the adjustment sleeve clamp bolts (Fig. 3).
- Adjust the right wheel toe position with the drag link. Turn the sleeve until the right wheel is at correct TOE-IN specifications. Position the clamp bolts as shown (Fig. 4) and tighten to 49 N·m (36 ft. lbs.). NOTE: Make sure the toe setting does not change during clamp tightening.
- Adjust the left wheel toe position with the tie rod. Turn the sleeve until the left wheel is at specifications. Position the clamp bolts as shown (Fig. 4) and tighten to 27 N·m (20 ft. lbs.). NOTE: Make sure the toe setting does not change during clamp tightening.
- Verify the right toe setting and turn off engine.
- Road test the vehicle on a flat level road to verify the steering wheel is centered.
NOTE: Once the toe setting is correct, the steering wheel can be re-centered by adjusting only the drag link.
TOE POSITION (RHD)
NOTE: The wheel toe position adjustment is the final adjustment. The engine must remain running during the entire toe position adjustment.
- Start the engine and turn wheels both ways before straightening the wheels. Secure the steering wheel with the front wheels in the straight-ahead position.
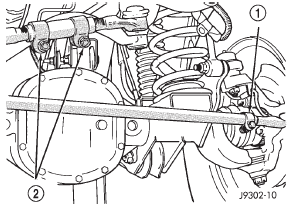
Fig. 4 Drag Link and Tie Rod Clamp (LHD)
- Loosen the adjustment sleeve clamp bolts (Fig. 5).
- Adjust the left wheel toe position with the drag link. Turn the sleeve until the left wheel is at the correct TOE-IN specifications. Position the clamp bolts to their original position and tighten to 49 N·m (36 ft. lbs.).

Fig. 3 Steering Linkage (LHD)
1 - PITMAN ARM
2 - ADJUSTMENT SLEEVE
3 - DRAG LINK
4 - TIE ROD
5 - STEERING DAMPENER

Fig. 5 Steering Linkage (RHD)
1 - PITMAN ARM
2 - DRAG LINK
3 - STEERING DAMPNER
4 - TIE ROD
5 - ADJUSTMENT SLEEVE
NOTE: Make sure the toe setting does not change during clamp tightening.
- Adjust the right wheel toe position with the tie rod. Turn the sleeve until the right wheel is at correct TOE-IN specifications. Position the clamp bolts to their original position and tighten to 27 N·m (20 ft. lbs.).
NOTE: Make sure the toe setting does not change during clamp tightening.
- Verify the right toe setting and turn off engine.
- Road test the vehicle on a flat level road to verify the steering wheel is centered.
NOTE: Once the toe setting is correct, the steering wheel can be re-centered by adjusting only the drag link.
Description and operation
Diagnosis and testing
Service procedures
Specifications
Jeep Cherokee Service Manual
- Lubrication and maintenance
- Suspension
- Differential and driveline
- Brakes
- Clutch
- Cooling system
- Battery
- Starting systems
- Charging system
- Ignition system
- Instrument panel systems
- Audio systems
- Horn systems
- Speed control system
- Turn signal and hazard warning systems
- Wiper and washer systems
- Lamps
- Passive restraint systems
- Electrically heated systems
- Power distribution systems
- Power lock systems
- Vehicle theft/security systems
- Power seat systems
- Power window systems
- Power mirror systems
- Chime/buzzer warning systems
- Overhead console systems
- Engine
- Exhaust system
- Frame and bumpers
- Frame
- Fuel system
- Steering
- Transmission and transfer case
- Tires and wheels
- Body
Categories
