 Jeep Cherokee Service ManualSteering » Power steering gear » Disassembly and assembly
Spool valve
Spool valve
DISASSEMBLY
(1) Remove lock nut (Fig. 8).
(2) Remove adjuster nut with Spanner Wrench C-4381.
(3) Remove thrust support assembly out of the housing (Fig. 9).
(4) Pull stub shaft and valve assembly from the housing (Fig. 10).
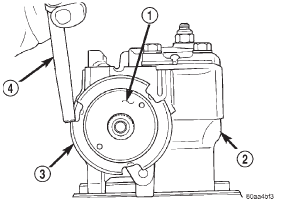
Fig. 8 Lock Nut and Adjuster Nut
1 - ADJUSTER NUT
2 - STEERING GEAR
3 - LOCK NUT
4 - PUNCH
(5) Remove stub shaft from valve assembly by lightly tapping shaft on a block of wood to loosen shaft. Then disengage stub shaft pin from hole in spool valve and separate the valve assembly from stub shaft (Fig. 11).
(6) Remove spool valve from valve body by pulling and rotating the spool valve from the valve body (Fig.
12).
(7) Remove spool valve O-ring and valve body teflon rings and O-rings underneath the teflon rings (Fig. 13).
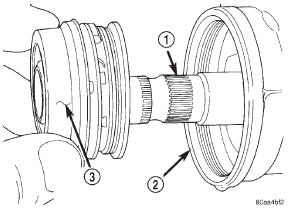
Fig. 9 Thrust Support Assembly
1 - STUB SHAFT
2 - HOUSING
3 - THRUST SUPPORT ASSEMBLY
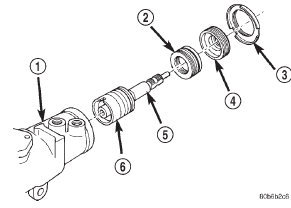
Fig. 10 Valve Assembly With Stub Shaft
1 - GEAR
2 - THRUST SUPPORT
3 - LOCK NUT
4 - ADJUSTER NUT
5 - STUB SHAFT
6 - VALVE ASSEMBLY
(8) Remove the O-ring between the worm shaft and the stub shaft.
ASSEMBLY
NOTE: Clean and dry all components, then lubricate with power steering fluid.
(1) Install spool valve spool O-ring.
(2) Install spool valve in valve body by pushing and rotating. Hole in spool valve for stub shaft pin must be accessible from opposite end of valve body.
 БЮ
Fig. 11 Stub Shaft
БЮ
Fig. 11 Stub Shaft
1 - STUB SHAFT
2 - VALVE BODY
3 - HOLE IN SPOOL
4 - SHAFT PIN
5 - 6mm (1/4")
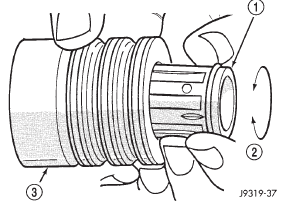
Fig. 12 Spool Valve
1 - SPOOL VALVE
2 - ROTATE VALVE TO REMOVE
3 - VALVE BODY
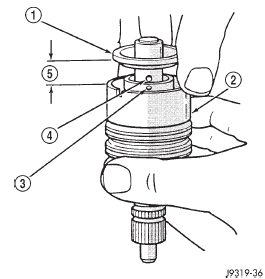
(3) Install stub shaft in valve spool and engage locating pin on stub shaft into spool valve hole (Fig.
14).
NOTE: Notch in stub shaft cap must fully engage valve body pin and seat against valve body shoulder.
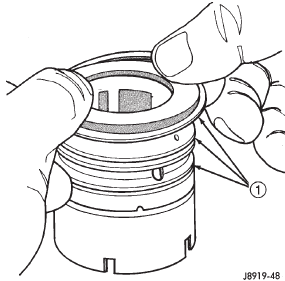
Fig. 13 Valve Seals
1 - O-RING SEALS
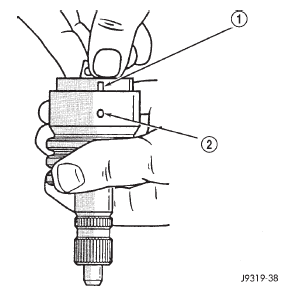
Fig. 14 Stub Shaft Installation
1 - NOTCH IN CAP
2 - VALVE BODY PIN
(4) Install O-rings and teflon rings over the O-rings on valve body.
(5) Install O-ring into the back of the stub shaft cap (Fig. 15).

Fig. 15 Stub Shaft Cap O-Ring
1 - VALVE BODY
2 - STUB SHAFT CAP
3 - O-RING
(6) Install stub shaft and valve assembly in the housing. Line up worm shaft to slots in the valve assembly.
(7) Install thrust support assembly.
NOTE: The thrust support is serviced as an assembly.
If any component of the thrust support is damaged the assembly must be replaced.
(8) Install adjuster nut and lock nut.
(9) Adjust Thrust Bearing Preload and Over-Center Rotating Torque.
Housing end plug
Pitman shaft/seals/bearing
Spool valve
Rack piston and worm shaft
Jeep Cherokee Service Manual
- Lubrication and maintenance
- Suspension
- Differential and driveline
- Brakes
- Clutch
- Cooling system
- Battery
- Starting systems
- Charging system
- Ignition system
- Instrument panel systems
- Audio systems
- Horn systems
- Speed control system
- Turn signal and hazard warning systems
- Wiper and washer systems
- Lamps
- Passive restraint systems
- Electrically heated systems
- Power distribution systems
- Power lock systems
- Vehicle theft/security systems
- Power seat systems
- Power window systems
- Power mirror systems
- Chime/buzzer warning systems
- Overhead console systems
- Engine
- Exhaust system
- Frame and bumpers
- Frame
- Fuel system
- Steering
- Transmission and transfer case
- Tires and wheels
- Body
Categories
