Jeep Cherokee (XJ): Analyzing road test. Hydraulic pressure test. Air testing transmission clutch and band operation
Refer to the Clutch and Band Application chart
and note which elements are in use in the various
gear ranges.
Verify that the rear clutch is applied in all forward
ranges (D, 2, 1). The transmission overrunning clutch
is applied in first gear (D, 2 and 1 ranges) only. The
rear band is applied in 1 and R range only.
Verify that the overdrive clutch is applied only in
fourth gear and the overdrive direct clutch and overrunning
clutch are applied in all ranges except fourth
gear. For example: If slippage occurs in first gear in
D and 2 range but not in 1 range, the transmission
overrunning clutch is faulty. Similarly, if slippage
occurs in any two forward gears, the rear clutch is
slipping.
Applying the same method of analysis, verify that
the front and rear clutches are applied simultaneously
only in D range third gear. If the transmission
slips in third gear, either the front clutch or the
rear clutch is slipping.
If slippage occurs during the third gear and the
direct clutch were to fail, the transmission would lose
both reverse gear and overrun braking in 2 position
(manual second gear). If the transmission slips in
any other forward gears, the transmission rear clutch
is probably slipping.
This process of elimination can be used to identify
a slipping unit and check operation. Proper use of
the Clutch and Band Application Chart is the key.
Although road test analysis will help determine the
slipping unit, the actual cause of a malfunction usually
cannot be determined until hydraulic and air
pressure tests are performed. Practically any condition
can be caused by leaking hydraulic circuits or
sticking valves.
Unless a malfunction is obvious, such as no drive
in D range first gear, do not disassemble the transmission.
Perform the hydraulic and air pressure tests
to help determine the probable cause. Hydraulic test pressures range from a low of one
psi (6.895 kPa) governor pressure, to 300 psi (2068
kPa) at the rear servo pressure port in reverse.
An accurate tachometer and two test gauges are
required for the pressure test. Test Gauge C-3292
has a 100 psi range and is used at the accumulator, governor, and front servo
pressure ports. Test Gauge
C-3293-SP has a 300 psi range and is used at the
rear servo port and overdrive test ports where pressures
are higher. In cases where two test gauges are
required, the 300 psi gauge can be used at any of the
other test ports. Pressure Test Port Locations Pressure test ports locations are provided at the
accumulator, front servo, and rear servo, governor
passage, and overdrive clutch pressure passage (Fig.
57), (Fig. 58) and (Fig. 59).
Line pressure is checked at the accumulator port
on the right side of the case. The front servo pressure
port is at the right side of the case just behind the
filler tube opening.
1 - REAR SERVO PORT
1 - GOVERNOR PRESSURE PORT Connect a tachometer to the engine. Position the
tachometer so it can be observed from under the
vehicle. Raise the vehicle on a hoist that will allow
the wheels to rotate freely.
1 - ADAPTER HOUSING PRESSURE TEST PROCEDURE Test One - Transmission In 1 Range This test checks pump output, pressure regulation,
and condition of the rear clutch and servo circuit.
Test Gauges C-3292 and C-3293-SP are required for
this test. Gauge C-3292 has a 100 psi range. Gauge
C-3293-SP has a 300 psi range.
(1) Connect 100 psi Gauge C-3292 to accumulator
port.
(2) Connect 300 psi Gauge C-3293-SP to rear servo
port (Fig. 57) and (Fig. 58).
(3) Disconnect throttle and gearshift rods from
manual and throttle levers.
(4) Start and run engine at 1000 rpm.
(5) Move shift lever (on manual lever shaft) all the
way forward into 1 range.
(6) Move transmission throttle lever from full forward
to full rearward position and note pressures on
both gauges.
(7) Line pressure at accumulator port should be
54-60 psi (372-414 kPa) with throttle lever forward
and gradually increase to 90-96 psi (621-662 kPa) as
lever is moved rearward.
(8) Rear servo pressure should be same as line
pressure within 3 psi (20.68 kPa). Test Two - Transmission In 2 Range This test checks pump output and pressure regulation.
Use 100 psi Test Gauge C-3292 for this test.
(1) Connect test gauge to accumulator pressure
port (Fig. 57) and (Fig. 58).
(2) Start and run engine at 1000 rpm.
(3) Move shift lever on valve body manual lever
shaft, one detent rearward from full forward position.
This is 2 range.
(4) Move transmission throttle lever from full forward
to full rearward position and read pressure at
both gauges. (5) Line pressure should be 54-60 psi (372-414
kPa) with throttle lever forward and gradually
increase to 90-96 psi (621-662 kPa) as lever is moved
rearward. Test Three - Transmission In D Range This test checks pressure regulation and condition
of the clutch circuits. Use both pressure Test Gauges
C-3292 and C-3293-SP for this test.
(1) Connect test gauges to accumulator and front
servo ports (Fig. 57) and (Fig. 58). Use either test
gauge at the two ports.
(2) Start and run engine at 1600 rpm for this test.
(3) Move selector lever to D range. This is two
detents rearward from full forward position.
(4) Read pressures on both gauges as transmission
throttle lever is moved from full forward to full rearward
position.
(5) Line pressure should be 54-60 psi (372-414
kPa) with throttle lever forward and gradually
increase as lever is moved rearward.
(6) Front servo is pressurized only in D range and
should be same as line pressure within 3 psi (21 kPa)
up to downshift point. Test Four - Transmission In Reverse This test checks pump output, pressure regulation
and the front clutch and rear servo circuits. Use 300
psi Test Gauge C-3293-SP for this test.
(1) Connect 300 psi gauge to rear servo port (Fig.
57) and (Fig. 58).
(2) Start and run engine at 1600 rpm for test.
(3) Move valve body selector lever four detents
rearward from the full forward position. This is
Reverse range.
(4) Move throttle lever all way forward then all
way rearward and note gauge readings.
(5) Pressure should be 145 - 175 psi (1000-1207
kPa) with lever forward and increase to 230 - 280 psi
(1586-1931 kPa) as lever is moved rearward. Test Five - Governor Pressure This test checks governor operation by measuring
governor pressure response to changes in engine
speed. It is usually not necessary to check governor
operation unless shift speeds are incorrect or if the
transmission will not downshift.
(1) Connect 100 psi Test Gauge C-3292 to governor
pressure port (Fig. 57) and (Fig. 58).
(2) Move shift lever to D range.
(3) Start and run engine at curb idle speed and
note pressure. At idle and with vehicle stopped, pressure
should be zero to 1.5 psi maximum. If pressure
exceeds this figure, governor valve or weights are
sticking open.
(4) Slowly increase engine speed and observe
speedometer and pressure test gauge. Governor pressure
should increase in proportion to vehicle speed.
(5) Pressure rise should be smooth and drop back
to 0 to 1.5 psi when wheels stop rotating.
(6) Compare results of pressure tests with analysis
charts (Fig. 60). TEST CONDITION INDICATION Fig. 60 Pressure Test Analysis Air-pressure testing can be used to check transmission
front/rear clutch and band operation. The test
can be conducted with the transmission either in the
vehicle or on the work bench, as a final check, after
overhaul.
Air-pressure testing requires that the oil pan and
valve body be removed from the transmission. The
servo and clutch apply passages are shown (Fig. 61).
1 - REAR SERVO APPLY Front Clutch Air Test Place one or two fingers on the clutch housing and
apply air pressure through front clutch apply passage.
Piston movement can be felt and a soft thump
heard as the clutch applies. Rear Clutch Air Test Place one or two fingers on the clutch housing and
apply air pressure through rear clutch apply passage.
Piston movement can be felt and a soft thump heard
as the clutch applies. Front Servo Apply Air Test Apply air pressure to the front servo apply passage.
The servo rod should extend and cause the
band to tighten around the drum. Spring pressure
should release the servo when air pressure is
removed. Rear Servo Air Test Apply air pressure to the rear servo apply passage.
The servo rod should extend and cause the band to
tighten around the drum. Spring pressure should
release the servo when air pressure is removed.Analyzing road test
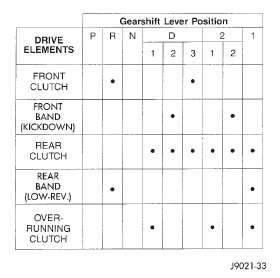
Fig. 56 Clutch And Band ApplicationHydraulic pressure test
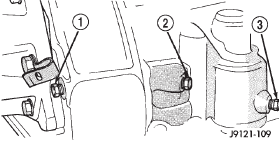
Fig. 57 Pressure Test Ports At Side Of Case
2 - LINE PRESSURE PORT
3 - FRONT SERVO PORT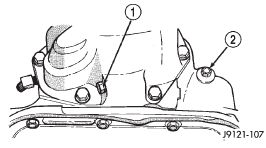
Fig. 58 Pressure Test Ports At Rear Of Case-2WD
2 - REAR SERVO PRESSURE PORT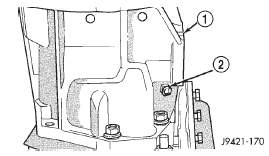
Fig. 59 Pressure Test Ports At Rear Of Case-4WD
2 - GOVERNOR PRESSURE PORT PLUG
Line pressure OK during
any one test
Pump and regulator valve
OK
Line pressure OK in R
but low in D, 2, 1
Leakage in rear clutch
area (servo, clutch seals,
governor support seal
rings on park gear)
Pressure OK in 1, 2 but
low in D3 and R
Leakage in front clutch
area (servo, clutch seals,
retainer bore, pump seal
rings)
Pressure OK in 2 but low
in R and 1
Leakage in rear servo
Front servo pressure in 2
Leakage in servo (broken
servo ring or cracked
servo piston)
Pressure low in all
positions
Clogged filter, stuck
pressure regulator valve,
worn or defective pump
Governor pressure too
high at idle speed
Governor valve sticking
open
Governor pressure low at
all mph figures
Governor valve sticking
closed
Lubrication pressure low
at all throttle positions
Clogged drainback valve,
oil cooler or lines, seal
rings leaking, output shaft
plugged with devris, worn
bushings in pump or
clutch retainer
Air testing transmission clutch and
band operation
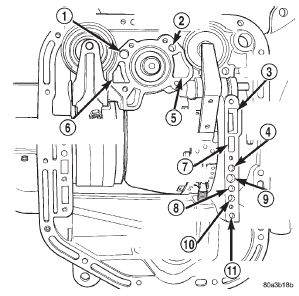
Fig. 61 Air Pressure Test Passages
2 - FRONT SERVO APPLY
3 - PUMP SUCTION
4 - FRONT CLUTCH APPLY
5 - FRONT SERVO RELEASE
6 - LINE PRESSURE TO ACCUMULATOR
7 - PUMP PRESSURE
8 - TO CONVERTER
9 - REAR CLUTCH APPLY
10 - FROM CONVERTER
11 - TO COOLE
 Gearshift cable. Throttle valve cable. Road testing
 Converter housing fluid leak
diagnosis. Diagnosis charts
Converter housing fluid leak
diagnosis. Diagnosis charts
Other materials:
Starting system
DIAGNOSIS
The battery, starting system and charging system
in the vehicle operate with one another, and must be
tested as a complete system. In order for the engine
to start and the battery to charge properly, all of the
components that are used in these systems must perform
within specificati ...