Jeep Cherokee (XJ): Body decals
Small nicks, scratches and other surface marks in a decal can be touched-up with paint.
To eliminate blisters and air bubbles in a decal, pierce them with a needle or pin.
A heat gun can also be used to remove small wrinkles in a decal.
Decal replacement requires that the metal repair and paint refinish be completed first.
The work area temperature should be between 21C (70F) and 32C (90F). A decal should not be replaced if the work area temperature is less than 21C (70F).
The following equipment and material are necessary for removal and installation:
- Liquid dish detergent (for the wetting solution).
- Mixture of wetting solution.
- Commercial wax and silicone removal solution.
- Isopropyl (rubbing) alcohol.
- Small squeegee (plastic or hard rubber).
- Water bucket and sponge.
- Clean wiping rags or paper towels.
- Heat gun (or infra-red heat bulb).
- Wax pencil.
- Sharp knife, single edge razor blade or X-acto knife.
- Pair of scissors.
- Needle or pin.
WARNING: USE DECAL REMOVAL SOLUTION IN A WELL-VENTILATED AREA ONLY.
A decal removal solution can be used for removal at areas where a heat gun is ineffective. Follow the manufacturers instructions whenever this type of product is used.
REMOVAL
(1) Clean the repaired surface as necessary.
(2) Start at one end of the decal and apply heat with a heat gun. Slowly peel the decal from the panel by pulling it back. Do not pull the decal outward from panel.
INSTALLATION
(1) The area that will be covered by the decal must be cleaned with cleaning solution.
(2) Freshly painted surfaces must be thoroughly dry.
(3) Clean the painted surface with a commercial wax and silicone removal solution. Wipe the surface with a clean cloth and allow it to dry.
(4) Prepare a wetting solution by mixing two or three teaspoons of dish detergent with 1 gallon of water. Do not use soap.
NOTE: Too much detergent will reduce the effectiveness of the mixture.
(5) Use a clean sponge and apply the wetting solution to the adhesive side of the decal and to the painted panel surface. The wetting solution will permit ease of decal movement when positioning it.
(6) Align a straight edge with the existing decal ends (Fig. 13).
NOTE: If applicable, the body panel character line can be used as the decal alignment reference.
(7) Position the decal and carrier on the body panel (Fig. 14) and the mark length with a wax pencil.
(8) Position the decal and carrier on the body panel and hold it in-place with masking tape.
(9) Lift the bottom edge of decal and carrier. Use the tape sections as hinges, and reverse the position of decal and carrier.
CAUTION: Always remove the carrier from the decal, never remove the decal from carrier (10) Bend a corner of carrier outward and then, with a flick of the finger, separate the corner of carrier from the decal.
(11) Return the decal back to its original position.
If a solution is being used, position adhesive side of the decal on panel. Apply the solution to the outside of the decal.
(12) Hold the decal against the panel surface while separating the carrier from the decal.
(13) If applicable, remove the cover from face of decal.
(14) Using a squeegee smooth out the decal to remove wrinkles and/or air bubbles.
(15) Inspect the decal with reflected light to find any damage. Remove all the air and/or moisture bubbles.
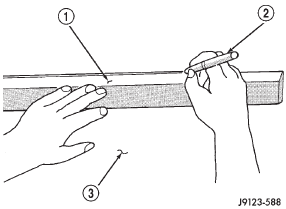
Fig. 13 Decal Alignment Reference Mark
1 - STRAIGHT EDGE
2 - GREASE PENCIL
3 - BODY PANEL
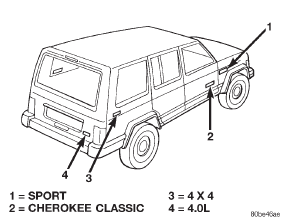
Fig. 14 Body Decals
 Hood silencer pad. Cowl weatherstrip. Cowl grille
 Exterior nameplates. Side view mirror. Front fender flare
Other materials:
Description and operation
Airbag system
DESCRIPTION
A dual front airbag system is standard factory-installed
safety equipment on this model. The primary
passenger restraints in this vehicle are the standard
equipment factory-installed seat belts, which require
active use by the vehicle occupants. The airbag system
is a ...