Jeep Cherokee (XJ): Crankshaft oil seals-rear. Oil pump. Timing case cover oil seal
The crankshaft rear main bearing oil seal consists
of two half pieces of viton with a single lip that effectively
seals the rear of the crankshaft. Replace the
upper and lower seal halves as a unit to ensure leakfree
operation. REMOVAL (1) Remove transmission inspection cover.
(2) Remove oil pan. Refer to procedure in this section
(3) Remove main bearing cap brace.
(4) Remove rear main bearing cap (No.7).
(5) Push upper seal out of the groove. Ensure that
the crankshaft and seal groove are not damaged.
(6) Remove lower half of the seal from the bearing
cap. INSTALLATION (1) Wipe the seal surface area of the crankshaft
until it is clean.
(2) Apply a thin coat of engine oil.
(3) Coat lip of the seal with engine oil.
(4) Carefully position the upper seal into the
groove in the cylinder block. The lip of the seal faces
toward the front of the engine.
(5) Apply Mopart Gasket Maker sealer on both
sides of cylinder block as shown in (Fig. 80). The dab
of sealer should be 3 mm (0.125 in.) in diameter.
(6) Apply Mopart Gasket Maker on the rear bearing
cap (Fig. 80). The bead should be 2.3 mm (0.09
in.) in diameter. DO NOT apply sealer to the lip of
the seal.
(7) Position the lower seal into the bearing cap
recess and seat it firmly. Be sure the seal is flush
with the cylinder block pan rail.
(8) Coat the outer curved surface of the lower seal
with soap and the lip of the seal with engine oil.
(9) Install the rear main bearing cap. DO NOT
strike the cap more than twice for proper engagement.
(10) Tighten all main bearing bolts to 108 N·m (80
ft. lbs.) torque.
(11) Install the main bearing cap brace. Tighten
nuts to 47 N·m (35 ft. lbs.).
(12) Install the oil pan gasket and oil pan. Tighten
1/4 - 20 screws to 14 N·m (120 in. lbs.). Tighten 5/16
- 18 screws to 18 N·m (156 in. lbs.)
1 - DOWEL (13) Apply Mopart Silicone Rubber Adhesive Sealant
on cylinder block to rear main bearing cap corners
and cylinder block to front cover joints (four
places) (Fig. 81)
1 - SEALER LOCATIONS (14) Install transmission inspection cover. A gear-type oil pump is mounted at the underside
of the cylinder block opposite the No.4 main bearing.
The pump incorporates a nonadjustable pressure
relief valve to limit maximum pressure to 517 kPa
(75 psi). In the relief position, the valve permits oil to
bypass through a passage in the pump body to the
inlet side of the pump.
Oil pump removal or replacement will not affect
the distributor timing because the distributor drive
gear remains in mesh with the camshaft gear. REMOVAL (1) Drain the engine oil.
(2) Remove the oil pan.
(3) Remove the pump-to-cylinder block attaching
bolts. Remove the pump assembly with gasket (Fig.
82). CAUTION: If the oil pump is not to be serviced, DO
NOT disturb position of oil inlet tube and strainer
assembly in pump body. If the tube is moved within
the pump body, a replacement tube and strainer
assembly must be installed to assure an airtight
seal.
1 - OIL FILTER ADAPTOR INSTALLATION (1) Install the oil pump on the cylinder block using
a replacement gasket. Tighten the bolts to 23 N·m
(17 ft. lbs.) torque.
(2) Install the oil pan.
(3) Fill the oil pan with oil to the specified level. This procedure is done with the timing case cover
installed. REMOVAL (1) Disconnect negative cable from battery.
(2) Remove the serpentine drive belt.
(3) Remove the vibration damper.
(4) Remove the radiator shroud.
(5) Carefully remove the oil seal. Make sure seal
bore is clean. INSTALLATION (1) Position the replacement oil seal on Timing
Case Cover Alignment and Seal Installation Tool
6139 with seal open end facing inward. Apply a light
film of Perfect Seal, or equivalent, on the outside
diameter of the seal. Lightly coat the crankshaft with
engine oil.
(2) Position the tool and seal over the end of the
crankshaft and insert a draw screw tool into Seal
Installation Tool 6139 (Fig. 83). Tighten the nut
against the tool until it contacts the cover.
1 - SEAL INSTALLATION TOOL (3) Remove the tools. Apply a light film of engine
oil on the vibration damper hub contact surface of
the seal.
(4) Apply Mopar Silicone Rubber Adhesive Sealant
to the keyway in the crankshaft and insert the key.
With the key inserted in the keyway in the crankshaft,
install the vibration damper, washer and bolt.
Lubricate and tighten the bolt to 108 N·m (80 ft. lbs.)
torque.
(5) Install the serpentine belt and tighten to the
specified tension (refer to Group 7, Cooling Systems
for the proper specifications and procedures).
(6) Install the radiator shroud.
(7) Connect negative cable to battery.Crankshaft oil seals-rear
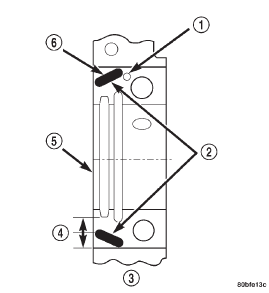
Fig. 80 Location of Sealer
2 - SEALER LOCATIONS
3 - CYLINDER BLOCK
4 - HALFWAY BETWEEN
5 - REAR FACE OF CYLINDER BLOCK
6 - 3mm (0.125 in.)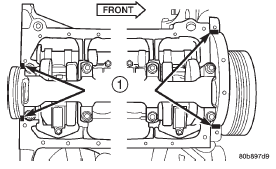
Fig. 81 Oil Pan Sealer LocationOil pump
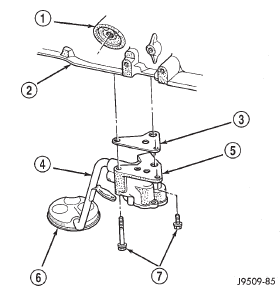
Fig. 82 Oil Pump Assembly
2 - BLOCK
3 - GASKET
4 - OIL INLET TUBE
5 - OIL PUMP
6 - STRAINER ASSEMBLY
7 - ATTACHING BOLTSTiming case cover oil seal
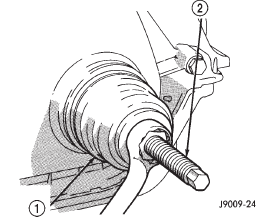
Fig. 83 Timing Case Cover Oil Seal Installation
2 - DRAW SCREW TOOL

 Disassembly and assembly. Cleaning and inspection. Specifications
Other materials:
Windshield wipers and washers
The windshield wiper/washer controls are located on the
windshield wiper/washer lever on the right side of the
steering column. The front wipers are operated by rotating
a switch, located on the end of the lever. For information on
the rear wiper/washer, refer to "RearWindow Features" in
"Under ...