Jeep Cherokee (XJ): Description and operation. Diagnosis and testing. Removal and installation
POWER STEERING GEAR DESCRIPTION The power steering gear is a recirculating ball type
gear with a 14:1 ratio. OPERATION The gear acts as a rolling thread between the
worm shaft and rack piston. The worm shaft is supported
by a thrust bearing at the lower end and a
bearing assembly at the upper end. When the worm
shaft is turned the rack piston moves. The rack piston
teeth mesh with the pitman shaft. Turning the
worm shaft turns the pitman shaft, which turns the
steering linkage. CAUTION: Components attached with a nut and
cotter pin must be torqued to specification. Then if
the slot in the nut does not line up with the cotter
pin hole, tighten nut until it is aligned. Never loosen
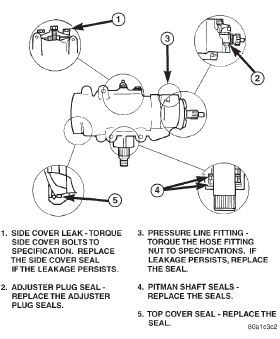
the nut to align the cotter pin hole. POWER STEERING GEAR LEAKAGE
REMOVAL (1) Place the front wheels in the straight ahead
position with the steering wheel centered.
(2) Disconnect and cap the fluid hoses from steering
gear.
(3) Remove the column coupler shaft from the
gear.
(4) Remove pitman arm from gear.
(5) Remove the steering gear retaining bolts and
remove the gear (Fig. 1).
1 - FRAME INSTALLATION (1) Install steering gear (and bracket) on the frame
rail and tighten bolts to 95 N·m (70 ft. lbs.).
(2) Align the column coupler shaft to steering gear.
Install a new pinch bolt and tighten to 49 N·m (36
ft. lbs.).
(3) Align and install the pitman arm and tighten
nut to 251 N·m (185 ft. lbs.).
(4) Connect fluid hoses to steering gear and
tighten to 28 N·m (21 ft. lbs.).
(5) Fill power steering system to proper level.Description and operation
Diagnosis and testing
Removal and installation

Fig. 1 Steering Gear Mounting (LHD)
2 - WASHER
3 - SCREW
4 - ADAPTER
5 - GEAR


Other materials:
Engine mounts-front. Engine mount-rear. Engine
Engine mounts-front
The front mounts support the engine at each side.
These supports are made of resilient rubber.
REMOVAL
(1) Disconnect negative cable from battery.
(2) Raise the vehicle.
(3) Support the engine.
(4) Remove through bolt nut (Fig. 42). DO NOT
remove the through bolt.
...