Jeep Cherokee (XJ): Diagnosis and testing
WARNING: ON VEHICLES EQUIPPED WITH AIRBAGS,
REFER TO GROUP 8M - PASSIVE
RESTRAINT SYSTEMS BEFORE ATTEMPTING ANY
STEERING WHEEL, STEERING COLUMN, OR
INSTRUMENT PANEL COMPONENT DIAGNOSIS OR
SERVICE. FAILURE TO TAKE THE PROPER PRECAUTIONS
COULD RESULT IN ACCIDENTAL AIRBAG
DEPLOYMENT AND POSSIBLE PERSONAL
INJURY Audio System Diagnosis For circuit descriptions and diagrams, refer to
8W-47 - Audio System in Group 8W - Wiring Diagrams.
WARNING: ON VEHICLES EQUIPPED WITH AIRBAGS,
REFER TO GROUP 8M - PASSIVE
RESTRAINT SYSTEMS BEFORE ATTEMPTING ANY
STEERING WHEEL, STEERING COLUMN, OR
INSTRUMENT PANEL COMPONENT DIAGNOSIS OR
SERVICE. FAILURE TO TAKE THE PROPER PRECAUTIONS
COULD RESULT IN ACCIDENTAL AIRBAG
DEPLOYMENT AND POSSIBLE PERSONAL
INJURY.
CAUTION: The speaker output of the radio is a
"floating ground" system. Do not allow any speaker
lead to short to ground, as damage to the radio
may result.
(1) Check the fuse(s) in the junction block and the
Power Distribution Center (PDC). If OK, go to Step
2. If not OK, repair the shorted circuit or component
as required and replace the faulty fuse(s).
(2) Check for battery voltage at the fuse in the
PDC. If OK, go to Step 3. If not OK, repair the open
circuit to the battery as required.
(3) Turn the ignition switch to the On position.
Check for battery voltage at the fuse in the junction
block. If OK, go to Step 4. If not OK, repair the open
circuit to the ignition switch as required.
(4) Turn the ignition switch to the Off position.
Disconnect and isolate the battery negative cable.
Remove the radio, but do not unplug the radio wire
harness connectors. Check for continuity between the
radio chassis and a good ground. There should be
continuity. If OK, go to Step 5. If not OK, repair the
open radio chassis ground circuit as required.
(5) Connect the battery negative cable. Turn the
ignition switch to the On position. Check for battery
voltage at the fused ignition switch output (accessory/
run) circuit cavity of the left (gray) radio wire harness
connector. If OK, go to Step 6. If not OK, repair
the open circuit as required.
(6) Turn the ignition switch to the Off position.
Check for battery voltage at the fused B(+) circuit
cavity of the left (gray) radio wire harness connector.
If OK, replace the faulty radio. If not OK, repair the
open circuit to the Ignition-Off Draw (IOD) fuse as
required. For circuit descriptions and diagrams, refer to
8W-47 - Audio System in Group 8W - Wiring Diagrams.
WARNING: ON VEHICLES EQUIPPED WITH AIRBAGS,
REFER TO GROUP 8M - PASSIVE
RESTRAINT SYSTEMS BEFORE ATTEMPTING ANY
STEERING WHEEL, STEERING COLUMN, OR
INSTRUMENT PANEL COMPONENT DIAGNOSIS OR
SERVICE. FAILURE TO TAKE THE PROPER PRECAUTIONS
COULD RESULT IN ACCIDENTAL AIRBAG
DEPLOYMENT AND POSSIBLE PERSONAL
INJURY.
CAUTION: The speaker output of the radio is a
"floating ground" system. Do not allow any speaker
lead to short to ground, as damage to the radio
may result.
(1) Turn the ignition switch to the On position.
Turn the radio on. Adjust the balance and fader controls
to check the performance of each individual
speaker. Note the speaker locations that are not performing
correctly. Go to Step 2.
(2) Turn the radio off. Turn the ignition switch to
the Off position. Disconnect and isolate the battery
negative cable. Remove the radio from the instrument
panel. If the vehicle is equipped with the Infinity
speaker package, also unplug the wire harness
connectors at the amplifier. Check both the speaker
feed (+) circuit and return (-) circuit cavities for the
inoperative speaker location(s) at the radio wire harness
connectors for continuity to ground. In each
case, there should be no continuity. If OK, go to Step
3. If not OK, repair the shorted speaker circuit(s) as
required.
(3) If the vehicle is equipped with the Infinity
speaker package, go to Step 6. If the vehicle is
equipped with the standard speaker system, check
the resistance between the speaker feed (+) circuit
and return (-) circuit cavities of the radio wire harness
connectors for the inoperative speaker location(
s). The meter should read between 2 and 12
ohms (speaker resistance). If OK, go to Step 4. If not
OK, go to Step 5.
(4) Install a known good radio. Connect the battery
negative cable. Turn the ignition switch to the
On position. Turn on the radio and test the speaker
operation. If OK, replace the faulty radio. If not OK,
turn the radio off, turn the ignition switch to the Off
position, disconnect and isolate the battery negative
cable, remove the test radio, and go to Step 5.
(5) Unplug the speaker wire harness connector at
the inoperative speaker. Check for continuity
between the speaker feed (+) circuit cavities of the
radio wire harness connector and the speaker wire
harness connector. Repeat the check between the
speaker return (-) circuit cavities of the radio wire
harness connector and the speaker wire harness connector.
In each case, there should be continuity. If OK, replace the faulty speaker. If
not OK, repair the
open circuit(s) as required.
(6) For each inoperative speaker location, check for
continuity between the speaker feed (+) circuit cavities
of the radio wire harness connectors and the
amplifier wire harness connectors. Repeat the check
for each inoperative speaker location between the
speaker return (-) circuit cavities of the radio wire
harness connectors and the amplifier wire harness
connectors. In each case, there should be continuity.
If OK, go to Step 7. If not OK, repair the open circuit
as required.
(7) Check for continuity between the two ground
circuit cavities of the amplifier wire harness connector
and a good ground. There should be continuity. If
OK, go to Step 8. If not OK, repair the open circuit(s)
as required.
(8) Check the amplifier fuse in the junction block.
If OK, go to Step 9. If not OK, repair the shorted circuit
or component as required and replace the faulty
fuse.
(9) Install the radio. Connect the battery negative
cable. Check for battery voltage at the amplifier fuse
in the junction block. If OK, go to Step 10. If not OK,
repair the open circuit to the PDC as required.
(10) Check for battery voltage at the two fused
B(+) circuit cavities of the amplifier wire harness
connector. If OK, go to Step 11. If not OK, repair the
open circuit to the fuse in the junction block as
required.
(11) Turn the ignition switch to the On position.
Turn the radio on. Check for battery voltage at the
radio 12 volt output circuit cavity of the amplifier
wire harness connector. If OK, go to Step 12. If not
OK, repair the open circuit to the radio as required.
(12) Turn the radio off. Turn the ignition switch to
the Off position. Disconnect and isolate the battery
negative cable. For each inoperative speaker location,
check both the amplified feed (+) circuit and the
amplified return (-) circuit cavities of the amplifier
wire harness connectors for continuity to ground. In
each case there should be no continuity. If OK, go to
Step 13. If not OK, repair the short circuit as
required.
(13) For each inoperative speaker location, check
the resistance between the amplified feed (+) circuit
and the amplified return (-) circuit cavities of the
amplifier wire harness connectors. The meter should
read between 2 and 12 ohms (speaker resistance). If
OK, replace the faulty amplifier. If not OK, go to
Step 14.
(14) Unplug the speaker wire harness connector at
the inoperative speaker. Check for continuity
between the amplified feed (+) circuit cavities of the
speaker wire harness connector and the amplifier
wire harness connector. Repeat the check between
the amplified return (-) circuit cavities of the speaker
wire harness connector and the amplifier wire harness
connector. In each case there should be continuity.
If OK, replace the faulty speaker. If not OK,
repair the open circuit as required. WARNING: ON VEHICLES EQUIPPED WITH AIRBAGS,
REFER TO GROUP 8M - PASSIVE
RESTRAINT SYSTEMS BEFORE ATTEMPTING ANY
STEERING WHEEL, STEERING COLUMN, OR
INSTRUMENT PANEL COMPONENT DIAGNOSIS OR
SERVICE. FAILURE TO TAKE THE PROPER PRECAUTIONS
COULD RESULT IN ACCIDENTAL AIRBAG
DEPLOYMENT AND POSSIBLE PERSONAL
INJURY.
The following four tests are used to diagnose the
antenna with an ohmmeter: The ohmmeter test lead connections for each test
are shown in Antenna Tests (Fig. 1).
NOTE: This model has a two-piece antenna coaxial
cable. Tests 2 and 4 must be conducted in two
steps to isolate a coaxial cable problem; from the
coaxial cable connection under the right end of the
instrument panel near the right cowl side inner
panel to the antenna base, and then from the coaxial
cable connection to the radio chassis connection.
TEST 1 Test 1 determines if the antenna mast is insulated
from the base. Proceed as follows:
(1) Unplug the antenna coaxial cable connector
from the radio chassis and isolate.
(2) Connect one ohmmeter test lead to the tip of
the antenna mast. Connect the other test lead to the
antenna base. Check for continuity.
(3) There should be no continuity. If continuity is
found, replace the faulty or damaged antenna base
and cable assembly. TEST 2 Test 2 checks the antenna for an open circuit as
follows:
(1) Unplug the antenna coaxial cable connector
from the radio chassis.
(2) Connect one ohmmeter test lead to the tip of
the antenna mast. Connect the other test lead to the
center pin of the antenna coaxial cable connector.
(3) Continuity should exist (the ohmmeter should
only register a fraction of an ohm). High or infinite
resistance indicates damage to the base and cable
assembly. Replace the faulty base and cable, if
required. TEST 3 Test 3 checks the condition of the vehicle body
ground connection. This test should be performed
with the battery positive cable removed from the battery.
Disconnect both battery cables, the negative
cable first. Reconnect the battery negative cable and
perform the test as follows:
(1) Connect one ohmmeter test lead to the vehicle
fender. Connect the other test lead to the battery
negative post.
(2) The resistance should be less than one ohm.
(3) If the resistance is more than one ohm, check
the braided ground strap connected to the engine and
the vehicle body for being loose, corroded, or damaged.
Repair the ground strap connection, if required. TEST 4 Test 4 checks the condition of the ground between
the antenna base and the vehicle body as follows:
(1) Connect one ohmmeter test lead to the vehicle
fender. Connect the other test lead to the outer crimp
on the antenna coaxial cable connector.
(2) The resistance should be less then one ohm.
(3) If the resistance is more then one ohm, clean
and/or tighten the antenna base to fender mounting
hardware. WARNING: ON VEHICLES EQUIPPED WITH AIRBAGS,
REFER TO GROUP 8M - PASSIVE
RESTRAINT SYSTEMS BEFORE ATTEMPTING ANY
STEERING WHEEL, STEERING COLUMN, OR
INSTRUMENT PANEL COMPONENT DIAGNOSIS OR
SERVICE. FAILURE TO TAKE THE PROPER PRECAUTIONS
COULD RESULT IN ACCIDENTAL AIRBAG
DEPLOYMENT AND POSSIBLE PERSONAL
INJURY.
For complete circuit diagrams, see Group 8W -
Wiring Diagrams. Inspect the ground paths and connections
at the following locations: If the source of RFI or EMI noise is identified as a
component on the vehicle (i.e., generator, blower
motor, etc.), the ground path for that component
should be checked. If excessive resistance is found in
any ground circuit, clean, tighten, or repair the
ground circuits or connections to ground as required
before considering any component replacement.
For service and inspection of secondary ignition
components, refer to the Diagnosis and Testing section
of Group 8D - Ignition Systems. Inspect the following
secondary ignition system components: Reroute the spark plug wires or replace the faulty
components as required.
If the source of the RFI or EMI noise is identified
as two-way mobile radio or telephone equipment,
check the equipment installation for the following: Fleet vehicles are available with an extra-cost RFIsuppressed
Powertrain Control Module (PCM). This
unit reduces interference generated by the PCM on
some radio frequencies used in two-way radio communications.
However, this unit will not resolve complaints
of RFI in the commercial AM or FM radio
frequency ranges.Audio system
CONDITION
POSSIBLE CAUSE
CORRECTION
NO AUDIO.
NO DISPLAY.
CLOCK WILL
NOT KEEP SET
TIME.
POOR RADIO
RECEPTION.
NO/POOR TAPE
OPERATION.
NO COMPACT
DISC
OPERATION
Radio
Speaker
Antenna
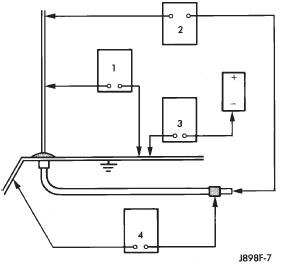
Fig. 1 Antenna TestsRadio frequency interference


Other materials:
Oil pan
REMOVAL
(1) Disconnect negative cable from battery.
(2) Raise the vehicle.
(3) Remove the oil pan drain plug and drain the
engine oil.
(4) Disconnect the exhaust pipe at the exhaust
manifold.
(5) Disconnect the exhaust hanger at the catalytic
converter and lower the pipe.
(6) Remo ...