Jeep Cherokee (XJ): Diagnosis and testing. Removal and installation. Specifications
Diagnosis and testing
SHOCK DIAGNOSIS
A knocking or rattling noise from a shock absorber
may be caused by movement between mounting
bushings and metal brackets or attaching components.
These noises can usually be stopped by tightening
the attaching nuts. If the noise persists,
inspect for damaged and worn bushings, and attaching
components. Repair as necessary if any of these
conditions exist.
A squeaking noise from the shock absorber may be
caused by the hydraulic valving and may be intermittent.
This condition is not repairable and the shock
absorber must be replaced.
The shock absorbers are not refillable or adjustable.
If a malfunction occurs, the shock absorber
must be replaced. To test a shock absorber, hold it in
an upright position and force the piston in and out of
the cylinder four or five times. The action throughout
each stroke should be smooth and even.
The shock absorber bushings do not require any
type of lubrication. Do not attempt to stop bushing
noise by lubricating them. Grease and mineral oilbase
lubricants will deteriorate the bushing.
Removal and installation
Shock absorber
REMOVAL
- Remove the nut, retainer and grommet from
the upper stud in the engine compartment (Fig. 2).
- Remove the lower nuts and bolts from the axle
bracket.
- Remove the shock absorber.
INSTALLATION
- Position the lower retainer and grommet on the
shock stud. Insert the shock absorber through the
shock tower hole.
- Install the lower bolts and nuts. Tighten nuts
to 23 N·m (17 ft. lbs.).
- Install the upper grommet and retainer on the
stud. Install the nut and tighten to 22 N·m (16 ft.
lbs.).
Coil spring/jounce bumper
REMOVAL
- Raise and support the vehicle. Position a
hydraulic jack under the axle to support it.
- Remove the wheel and tire assemblies.
- Mark and disconnect the front propeller shaft
from the axle.
- Remove lower suspension arms mounting nuts
and bolts from the axle (Fig. 2).
- Remove the stabilizer bar link and shock
absorber from the axle.
- Remove the track bar from the body rail
bracket.
- Remove the drag link from the pitman arm.
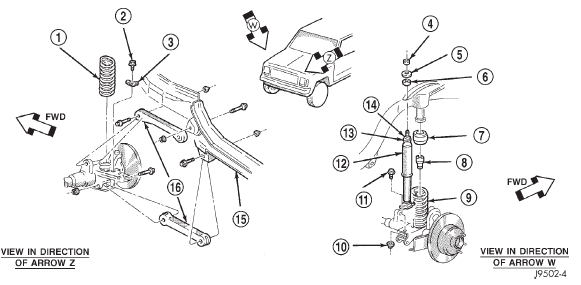
Fig. 2 Coil Spring & Shock Absorber
1 - SPRING
2 - SCREW
3 - SPRING RETAINER
4 - NUT
5 - RETAINER
6 - GROMMET
7 - ISOLATOR
8 - BUMPER
9 - SPRING
10 - NUT
11 - SCREW
12 - SHOCK ABSORBER
13 - RETAINER
14 - GROMMET
15 - FRAME
16 - CONTROL ARM
- Lower the axle until the spring is free from the
upper mount. Remove the coil spring clip and remove
the spring.
- Pull jounce bumper out of mount.
INSTALLATION
- Install jounce bumper into mount.
- Position the coil spring on the axle pad. Install
the spring clip and bolt. Tighten bolt to 21 N·m (16
ft. lbs.).
- Raise the axle into position until the spring
seats in the upper mount.
- Install the stabilizer bar links and shock
absorbers to the axle bracket.
- Install the track bar to the body rail bracket.
- Install the lower suspension arms to the axle.
Install mounting bolts and nuts finger tight.
- Install the front propeller shaft to the axle.
- Install the wheel and tire assemblies.
- Remove the supports and lower the vehicle.
- Tighten lower suspension arms nuts to 115
N·m (85 ft. lbs.).
STEERING KNUCKLE
For service procedures on the steering knuckle and
ball joints refer to Group 3 Differentials And Driveline.
Lower suspension ARM
REMOVAL
- Raise and support the vehicle.
- Remove the lower suspension arm nut and bolt
from the axle bracket.
- Remove the nut and bolt from the rear bracket
and remove the lower suspension arm (Fig. 3).
INSTALLATION
- Position the lower suspension arm at the axle
bracket and rear bracket.
- Install the bolts and finger tighten the nuts.
- Remove support and lower the vehicle.
- Tighten the front and rear nuts to 115 N·m (85
ft. lbs.).
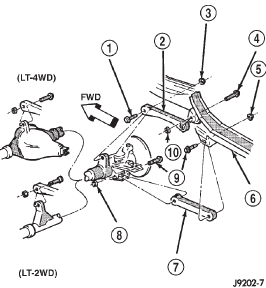
Fig. 3 Upper and Lower Suspension Arms
1 - BOLT
2 - UPPER ARM
3 - NUT
4 - BOLT
5 - NUT
6 - FRAME RAIL
7 - LOWER ARM
8 - NUT
9 - BOLT
10 - NUT
Upper suspension ARM
REMOVAL
- Raise and support the vehicle.
- Remove the upper suspension arm nut and bolt
at the axle bracket.
- Remove the nut and bolt at the frame rail and
remove the upper suspension arm (Fig. 3).
INSTALLATION
- Position the upper suspension arm at the axle
and frame rail.
- Install the bolts and finger tighten the nuts.
- Remove the supports and lower the vehicle.
- Tighten the nut at the axle to 75 N·m (55 ft.
lbs.). Tighten the nut at the frame bracket to 90 N·m
(66 ft. lbs.).
Front axle bushing
REMOVAL
- Remove the upper suspension arm from axle.
- Position Spacer 7932-3 over the axle bushing
on a 4x2 vehicle and right side on a 4x4 vehicle.
- Place Receiver 7932-1 over flanged end of the
bushing. (Fig. 4).
- Place small end of Remover/Install 7932-2
against other side of the bushing.
- Install bolt 7604 through remover, bushing and
receiver.
- Install Long Nut 7603 and tighten nut too pull
bushing out of the axle bracket.
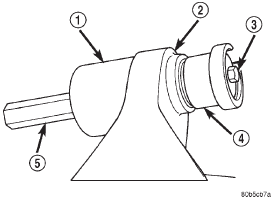
Fig. 4 Bushing Removal
1 - RECEIVER
2 - AXLE BRACKET
3 - BOLT
4 - REMOVER/INSTALLER
5 - LONG NUT
- Remove nut, bolt, receiver, remover and bushing.
NOTE: On 4x2 vehicle and right side of 4x4 vehicle,
leave Spacer 7932-3 in position for bushing installation.
INSTALLATION
- Place Receiver 7932-1 on the other side of the
axle bracket.
- Position new bushing up to the axle bracket.,
and large end of Remover/Install 7932-2 against the
bushing (Fig. 5).
- Install bolt 7604 through receiver, bushing and
installer.
- Install Long Nut 7603 and tighten nut to draw
the bushing into the axle bracket.
- Remove tools and install the upper suspension
arm.
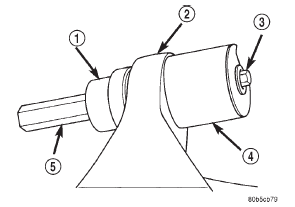
Fig. 5 Bushing Installation
1 - REMOVER/INSTALLER
2 - AXLE BRACKET
3 - BOLT
4 - RECEIVER
5 - LONG NUT
Stabilizer bar
REMOVAL
- Raise and support the vehicle.
- Remove nuts, retainers and grommets from the
links at the stabilizer bar (Fig. 6).
- Remove the links mounting nuts and bolts
from the axle brackets.
- Remove the stabilizer bar clamps from the
body rails. Remove the stabilizer bar.
INSTALLATION
- Inspect stabilizer bar bushings. Replace bushings
if cracked, cut, distorted, or worn.
- Position the stabilizer bar on the body rail and
install the bushings and clamps. Ensure the bar is
centered with equal spacing on both sides. Tighten
the bolts to 75 N·m (40 ft. lbs.).
- Install the links and grommets onto the stabilizer
bar and axle brackets.
- Tighten the link nuts at the axle bracket to 95
N·m (70 ft. lbs.).
- Tighten the link nuts at the stabilizer bar to 36
N·m (27 ft. lbs.).
- Remove the supports and lower the vehicle.
Track bar
REMOVAL
- Raise and support the vehicle.
- Remove the cotter pin and nut from the ball
stud end at the body rail bracket.
- Use a universal puller tool to separate the ball
stud from the frame rail bracket.
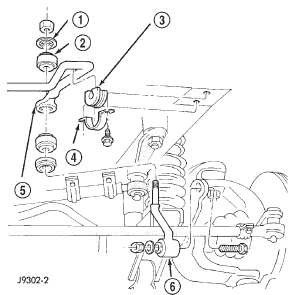
Fig. 6 Stabilizer Bar (LHD)
1 - RETAINER
2 - GROMMET
3 - BUSHING
4 - CLAMP
5 - STABILIZER BAR
6 - LINK
- Remove the bolt and flag nut from the axle
shaft tube bracket (Fig. 7).
- Remove the track bar.
INSTALLATION
- Install the track bar at axle tube bracket.
Loosely install the retaining bolt and flag nut.
- It may be necessary to pry the axle assembly
over to install the track bar at the body rail. Install
track bar at the body rail bracket. Install the retaining
nut on the stud.
- Remove the supports and lower the vehicle.
- Tighten the retaining bolt at the axle shaft
tube bracket to 54 N·m (40 ft. lbs.).
- Tighten the ball stud nut to 81 N·m (60 ft.
lbs.). Install a new cotter pin.
Hub bearing
REMOVAL
- Raise and support the vehicle.
- Remove the wheel and tire assembly.
- Remove the brake caliper, rotor and ABS wheel
speed sensor, refer to Group 5 Brakes.
- Remove the cotter pin, nut retainer and axle
hub nut (Fig. 8).
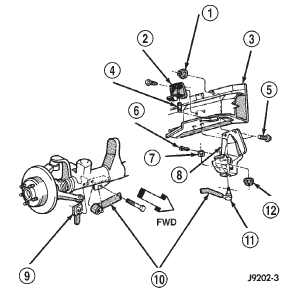
Fig. 7 Track Bar (LHD)
1 - NUT
2 - SUPPORT BRACKET
3 - LEFT FRAME RAIL
4 - STUD
5 - SCREW
6 - COTTER PIN
7 - NUT
8 - FRAME BRACKET
9 - NUT PLATE
10 - TRACK BAR
11 - BALL STUD END
12 - NUT
- Remove the hub bearing mounting bolts from
the back of the steering knuckle. Remove hub bearing
from the steering knuckle and off the axle shaft.
INSTALLATION
- Install the hub bearing and brake dust shield
to the knuckle.
- Install the hub bearing to knuckle bolts and
tighten to 102 N·m (75 ft. lbs.).
- Install the hub washer and nut. Tighten the
hub nut to 237 N·m (175 ft. lbs.). Install the nut
retainer and a new cotter pin.
- Install the brake rotor, caliper and ABS wheel
speed sensor, refer to Group 5 Brakes.
- Install the wheel and tire assembly.
- Remove support and lower the vehicle.
Wheel mounting studs
CAUTION: Do not use a hammer to remove wheel
studs.
REMOVAL
- Raise and support vehicle.
- Remove wheel and tire assembly.
- Remove brake caliper, caliper adapter and
rotor, refer to Group 5 Brakes for procedure.
- Remove stud from hub with Remover C-4150A
(Fig. 9).
INSTALLATION
- Install new stud into hub flange.
- Install three washers onto stud, then install
lug nut with the flat side of the nut against the
washers.
- Tighten lug nut until the stud is pulled into
the hub flange. Verify that the stud is properly
seated into the flange.
- Remove lug nut and washers.
- Install the brake rotor, caliper adapter, and caliper,
refer to Group 5 Brakes for procedure.
- Install wheel and tire assembly, use new lug
nut on stud or studs that were replaced.
- Remove support and lower vehicle.
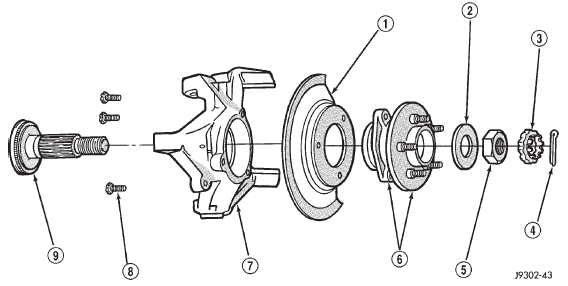
Fig. 8 Hub Bearing & Knuckle
1 - BRAKE SHIELD
2 - WASHER
3 - RETAINER
4 - COTTER PIN
5 - NUT
6 - HUB AND BEARING ASSEMBLY
7 - STEERING KNUCKLE
8 - BOLT
9 - TONE WHEEL (ABS)
Specifications
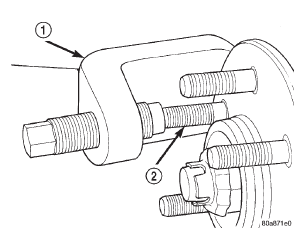
Fig. 9 Wheel Stud Removal
1 - REMOVER
2 - WHEEL STUD
TORQUE CHART
DESCRIPTION TORQUE
Shock Absorber
Upper Nut . . . . . . . . . . . . . . . 22 N·m (16 ft. lbs.)
Lower Nut . . . . . . . . . . . . . . . 23 N·m (17 ft. lbs.)
Suspension Arm Upper
Front Nut . . . . . . . . . . . . . . . 74 N·m (55 ft. lbs.)
Rear Nut . . . . . . . . . . . . . . . . 89 N·m (66 ft. lbs.)
Suspension Arm Lower
Front Nut . . . . . . . . . . . . . . . 115 N·m (85 ft. lbs.)
Rear Nut . . . . . . . . . . . . . . . 115 N·m (85 ft. lbs.)
Stabilizer Bar
Clamp Bolt . . . . . . . . . . . . . . . 54 N·m (40 ft. lbs.)
Link Upper Nut . . . . . . . . . . . 36 N·m (27 ft. lbs.)
Link Lower Nut . . . . . . . . . . . 95 N·m (70 ft. lbs.)
Track Bar
Ball Stud Nut . . . . . . . . . . . . 81 N·m (60 ft. lbs.)
Axle Bracket Bolt . . . . . . . . . . 54 N·m (40 ft. lbs.)
DESCRIPTION TORQUE
Track Bar Bracket
Bolts . . . . . . . . . . . . . . . . . . 125 N·m (92 ft. lbs.)
Nut . . . . . . . . . . . . . . . . . . . 100 N·m (74 ft. lbs.)
Support Bolts . . . . . . . . . . . . . 42 N·m (31 ft. lbs.)
Hub/Bearing
Bolts . . . . . . . . . . . . . . . . . . 102 N·m (75 ft. lbs.)
Axle Nut . . . . . . . . . . . . . . 237 N·m (175 ft. lbs.)
 Description and operation
Suspension components
The front suspension is a link/coil design (Fig. 1).
This suspension is use on Left Hand Drive (LHD)
and Right Hand Drive (RHD) vehicles. The suspension
is comprised of:
...
 Special tools
FRONT SUSPENSION
Remover/Installer Suspension Bushing 7932
Nut, Long 7603
Bolt, Special 7604
Remover C-4150A ...
Other materials:
Spare Tires
NOTE: For vehicles equipped with Tire Service Kit
instead of a spare tire, please refer to "Tire Service Kit" in
"What To Do In Emergencies" for further information.
CAUTION!
Because of the reduced ground clearance, do not take
your vehicle through an automatic car wash with a
compact or limit ...