Jeep Cherokee (XJ): Disassembly and assembly. Cleaning and inspection
DISASSEMBLY (1) Remove the ring gear.
(2) Using a suitable roll pin punch, drive out the
roll pin holding pinion gear mate shaft in the differential
case (Fig. 67).
(3) Remove the pinion gear mate shaft from the
differential case and the pinion mate gears.
(4) Rotate differential side gears and remove the
pinion mate gears and thrust washers (Fig. 68).
(5) Remove the differential side gears and thrust
washers. ASSEMBLY (1) Install the differential side gears and thrust
washers.
1 - DRIFT
1 - THRUST WASHER (2) Install the pinion mate gears and thrust washers. (3) Install the pinion gear mate shaft. Align the
roll pin holes in shaft and the differential case.
(4) Install the roll pin to hold the pinion mate
shaft in the differential case (Fig. 69).
1 - PUNCH (5) Install the ring gear.
(6) Lubricate all differential components with
hypoid gear lubricant. (1) Scrape the residual sealant from the housing
and cover mating surfaces. Clean the mating surfaces
with mineral spirits. Apply a bead of Mopart Silicone
Rubber Sealant, or equivalent, on the housing cover
(Fig. 70).
Install the housing cover within 5 minutes
after applying the sealant.
(2) Install the cover on the differential with the
attaching bolts. Install the identification tag. Tighten
the cover bolts to 41 N·m (30 ft. lbs.) torque.
CAUTION: Overfilling the differential can result in
lubricant foaming and overheating.
(3) Refill the differential housing with gear lubricant.
Refer to the Lubricant Specifications section of
this group for the gear lubricant requirements.
(4) Install the fill hole plug.
1 - SEALING SURFACE Clean all the U-joint yoke bores with cleaning solvent
and a wire brush. Ensure that all the rust and
foreign matter are removed from the bores.
Inspect the yokes for distortion, cracks and worn
bearing cap bores.
Replace the complete U-joint if any of the components
are defective. Wash differential components with cleaning solvent
and dry with compressed air. Do not steam clean
the differential components.
Wash bearings with solvent and towel dry, or dry
with compressed air. DO NOT spin bearings with
compressed air. Cup and bearing must be
replaced as matched sets only.
Clean axle shaft tubes and oil channels in housing.
Inspect for;Disassembly and assembly
Standard differential
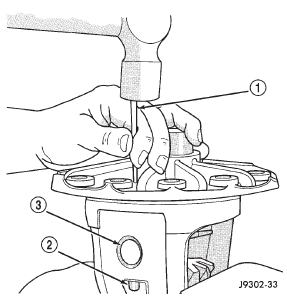
Fig. 67 Mate Shaft Roll Pin Removal
2 - LOCKPIN
3 - MATE SHAFT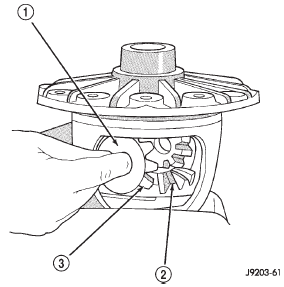
Fig. 68 Pinion Mate Gear Removal
2 - SIDE GEAR
3 - PINION MATE GEAR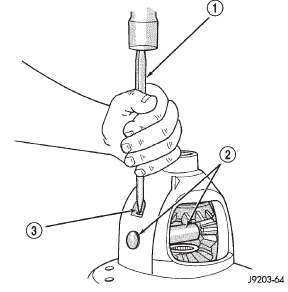
Fig. 69 Mate Shaft Roll Pin Installation
2 - PINION MATE SHAFT
3 - MATE SHAFT LOCKPINFinal assembly
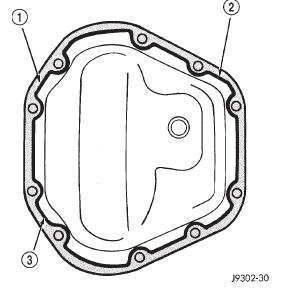
Fig. 70 Typical Housing Cover With Sealant
2 - CONTOUR OF BEAD
3 - BEAD THICKNESS 6.35mm (1/4")Cleaning and inspection
Cardan U-joint
Axle components


Other materials:
Thermostat. Radiator-2.5L. Radiator-4.0L
Thermostat
REMOVAL
WARNING: DO NOT LOOSEN THE RADIATOR
DRAINCOCK WITH THE SYSTEM HOT AND PRESSURIZED.
SERIOUS BURNS FROM THE COOLANT
CAN OCCUR.
DO NOT WASTE reusable coolant. If the solution
is clean, drain the coolant into a clean container for
reuse.
(1) Drain the coolant from the ra ...