Jeep Cherokee (XJ): Engine accessory drive belts
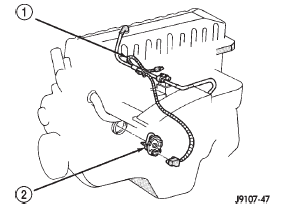
Fig. 46 Heater and Cord-4.0L 6-Cylinder Engine
1 - POWER CORD LOCATION
2 - BLOCK HEATER
Correct drive belt tension is required to ensure optimum performance of the belt driven engine accessories.
There are different types of adjustment gauges for checking either a serpentine or a V-type belt. Refer to the instructions supplied with the gauge. Use the correct gauge when checking belt tension.
Place gauge in the middle of the section of belt being tested (between two pulleys) to check tension.
Do not allow the gauge (or gauge adapter) to contact anything but the belt.
BELT SCHEMATICS
The belt routing schematics are published from the latest information available at the time of publication.
If anything differs between these schematics and the Belt Routing Label, use the schematics on Belt Routing Label. This label is located in the engine compartment.
Refer to (Fig. 47) (Fig. 48) (Fig. 49) (Fig. 50) for proper belt routing on vehicles with conventional left hand drive. Refer to (Fig. 51) (Fig. 52) for proper belt routing on vehicles with right hand drive (RHD). Or, refer to the Belt Routing Label located in the vehicle engine compartment.
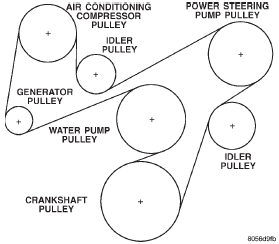
Fig. 47 Models with 2.5L Engine-With A/C
BELT REPLACEMENT OR ADJUSTMENT-LEFT HAND DRIVE
Belt tension is adjusted at the power steering pump bracket and idler pulley assembly.
(1) Disconnect negative battery cable from battery.
(2) Loosen idler pulley bolt at the power steering bracket (Fig. 53).
(3) Loosen adjusting bolt until belt can be removed from pulleys.
(4) Remove belt.
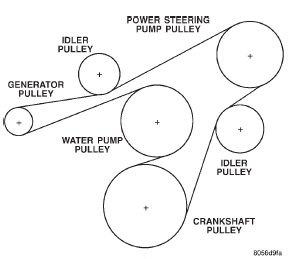
Fig. 48 Models with 2.5L Engine-Without A/C
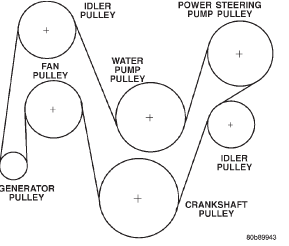
Fig. 49 Models with 4.0L Engine-Without A/C-Except RHD
INSTALLATION
(1) Check condition of all pulleys.
CAUTION: When installing the serpentine accessory drive belt, the belt MUST be routed correctly. If not, the engine may overheat due to the water pump rotating in the wrong direction. Refer to (Fig.
47) (Fig. 48) (Fig. 49) (Fig. 50) for correct belt routing.
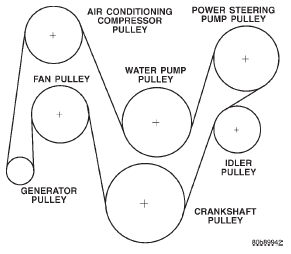
Fig. 50 Models With 4.0L Engine-With A/C-Except RHD
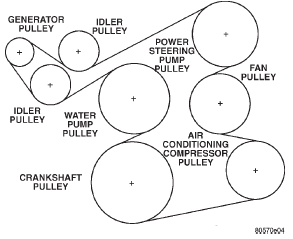
Fig. 51 Models With 4.0L Engine-With A/C-With RHD
(2) Install new belt.
(3) Using serpentine belt tension gauge, tighten adjusting bolt until belt reaches proper tension. Refer to Belt Tension at the rear of this section for proper belt tension.
(4) After belt is tensioned correctly, tighten idler pulley bolt to 47 N·m (35 ft. lbs.) (5) After idler pulley has been tightened into position, recheck belt tension. Adjust if necessary.
BELT REPLACEMENT OR ADJUSTMENT-RIGHT HAND DRIVE (4.0L)
(1) Disconnect negative battery cable from battery.
(2) Loosen lower alternator mounting bolt and nut.
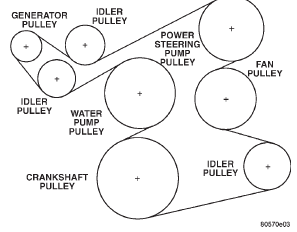
Fig. 52 Models With 4.0L Engine-Without A/C-With RHD
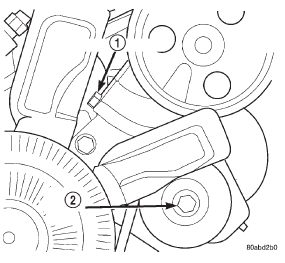
Fig. 53 Power Steering Pump Bracket and Idler Pulley
1 - ADJUSTING BOLT
2 - IDLER PULLEY BOLT
(3) Loosen upper alternator mounting nut.
(4) Loosen adjusting bolt at upper alternator bracket (Fig. 54) until belt can be removed from pulleys.
(5) Remove belt.
INSTALLATION
(1) Check condition of all pulleys.
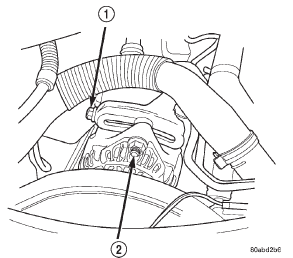
Fig. 54 Generator Belt Tension Adjust Bracket
1 - TENSION ADJUSTMENT BOLT
2 - UPPER ALTERNATOR NUT
CAUTION: When installing the serpentine accessory drive belt, the belt MUST be routed correctly. If not, the engine may overheat due to the water pump rotating in the wrong direction. Refer to (Fig.
51) (Fig. 52) for correct belt routing.
(2) Install new belt.
(3) Using serpentine belt tension gauge, tighten adjusting bolt until belt reaches proper tension. Refer to Belt Tension at the rear of this section for proper belt tension.
(4) Tighten alternator upper and lower mounting bolts.
(5) After generator and adjust bracket have been tightened into position, recheck belt tension. Adjust if necessary.
 Electric cooling fan-2.5L. Electric cooling fan-4.0L. Block heater
 Cooling system fans. Viscous fan drive removal/
installation
Cooling system fans. Viscous fan drive removal/
installation
Other materials:
Transmission cooler. Brake transmission shift interlock
mechanism
Transmission cooler
DESCRIPTION
MAIN COOLER
The transmission main cooler is located in the
radiator. The main cooler can be flushed when necessary,
however, the cooler is not a repairable component.
If the cooler is damaged, plugged, or leaking,
the radiator will have to be replaced.
AUXILI ...