Jeep Cherokee (XJ): Exhaust manifold-4.0L engine. Cylinder head cover. Rocker arms and push rods
The intake and engine exhaust manifolds on the
4.0L engine must be removed and installed together.
The manifolds use a common gasket at the cylinder
head.
Refer to Intake Manifold-4.0L Engine in this section
for the proper removal and installation procedures. The cylinder head cover is isolated from the cylinder
head via grommets and a reusable molded rubber
gasket. The grommet and limiter are retained in the
cylinder head cover.
There are two cylinder head bolts that have a pin
to locate the cylinder head cover gasket, they are
located at position 8 and 9 (Fig. 52) REMOVAL (1) Disconnect negative cable from battery.
(2) Disconnect the Crankcase Ventilation (CCV)
vacuum hose from engine cylinder head cover.
(3) Disconnect the fresh air inlet hose from the
engine cylinder head cover.
(4) Disconnect the accelerator, transmission, and
speed (if equipped) control cables from the throttle
body (Fig. 51).
(5) Remove the three bolts that fasten the control
cable bracket to the intake manifold.
(6) Remove control cables from cylinder head cover
clip.
(7) Position control cables and bracket away from
cylinder head cover secure with tie straps.
(8) Remove the engine cylinder head cover mounting
bolts.
(9) Remove the engine cylinder head cover and
gasket. INSTALLATION (1) If a replacement cover is installed, transfer the
CCV valve grommet and oil filler cap from the original
cover to the replacement cover.
(2) Install cylinder head cover and gasket. Tighten
the mounting bolts to 10 N·m (85 in. lbs.) torque.
(3) Connect the CCV hoses.
(4) Install control cables and bracket on intake
manifold and tighten bolts to 8.7 N·m (77 in. lbs.)
torque.
(5) Connect control cables to throttle body linkage.
(6) Snap control cables into cylinder head cover
clip.
(7) Connect negative cable to battery.
1 - TRANS CONTROL CABLE
This procedure can be done with the engine in or
out of the vehicle. REMOVAL (1) Remove the engine cylinder head cover.
(2) Check for rocker arm bridges which are causing
misalignment of the rocker arm to valve tip area.
(3) Remove the capscrews at each bridge and pivot
assembly (Fig. 53). Alternately loosen the capscrews
one turn at a time to avoid damaging the bridges.
(4) Remove the bridges, pivots and corresponding
pairs of rocker arms (Fig. 53). Place them on a bench
in the same order as removed.
(5) Remove the push rods and place them on a
bench in the same order as removed. INSTALLATION (1) Lubricate the ball ends of the push rods with
Mopar Engine Oil Supplement, or equivalent and
install push rods in their original locations. Ensure that the bottom end of
each push rod is centered in
the tappet plunger cap seat.
1 - CAPSCREWS (2) Using Mopar Engine Oil Supplement, or equivalent,
lubricate the area of the rocker arm that the
pivot contacts. Install rocker arms, pivots and bridge
above each cylinder in their originally position.
(3) Loosely install the capscrews through each
bridge.
(4) At each bridge, tighten the capscrews alternately,
one turn at a time, to avoid damaging the
bridge. Tighten the capscrews to 28 N·m (21 ft. lbs.)
torque.
(5) Install the engine cylinder head cover.Exhaust manifold-4.0L engine
Cylinder head cover
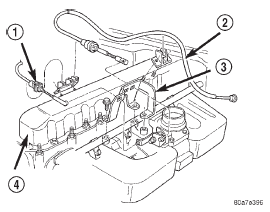
Fig. 51 Engine Cylinder Head Cover
2 - ACCELERATOR CABLE
3 - CONTROL CABLE BRACKET
4 - CYLINDER HEAD COVER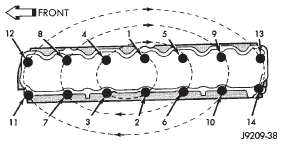
Fig. 52 Cylinder Head Cover Gasket Locator Pins at #8 & #9Rocker arms and push rods
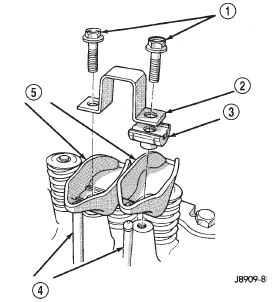
Fig. 53 Rocker Arm Assembly
2 - BRIDGE
3 - PIVOT ASSEMBLY
4 - PUSH RODS
5 - ROCKER ARMS

 Valve springs and oil seals. Cylinder head. Valves and valve springs
Other materials:
Description and operation
AX5 manual transmission
DESCRIPTION
The AX5 is a five speed manual transmission with
fifth gear being the overdrive range. An adapter housing
is used to attach the transmission to the transfer
case on 4-wheel drive applications. A standard style
extension housing is used for the 2-wheel drive a ...