Jeep Cherokee (XJ): Hydraulic tappets. Vibration damper. Timing case cover
Retain all the components in the same order as
removed. REMOVAL (1) Remove the engine cylinder head (Refer to cylinder
head r&i in this section).
(2) Remove the push rods.
(3) Remove the tappets through the push rod openings
in the cylinder block with a Hydraulic Valve
Tappet Removal/Installation Tool (Fig. 57).
1 - HYDRAULIC TAPPET REMOVAL TOOL INSTALLATION It is not necessary to charge the tappets with
engine oil. They will charge themselves within a very
short period of engine operation.
(1) Dip each tappet in Mopar Engine Oil Supplement,
or equivalent.
(2) Use Hydraulic Valve Tappet Removal/Installation
Tool to install each tappet in the same bore from
where it was originally removed.
(3) Install the cylinder head assy (Refer to cylinder
head r&i in this section).
(4) Install the push rods in their original locations. (5) Install the rocker arms and bridge and pivot
assemblies at their original locations. Loosely install
the capscrews at each bridge.
(6) Tighten the capscrews alternately, one turn at
a time, to avoid damaging the bridges. Tighten the
capscrews to 28 N·m (21 ft. lbs.) torque.
(7) Pour the remaining Mopar Engine Oil Supplement,
or equivalent over the entire valve actuating
assembly. The Mopar Engine Oil Supplement, or
equivalent must remain with the engine oil for at
least 1 609 km (1,000 miles). The oil supplement
need not be drained until the next scheduled oil
change.
(8) Install the engine cylinder head cover. REMOVAL (1) Disconnect negative cable from battery.
(2) Remove the serpentine drive belt and fan
shroud. Refer to Group 7, Cooling Systems for the
procedures.
(3) Remove the vibration damper retaining bolt
and washer.
(4) Use Vibration Damper Removal Tool 7697 to
remove the damper from the crankshaft (Fig. 58).
1 - VIBRATION DAMPER REMOVAL TOOL INSTALLATION (1) Apply Mopar Silicone Rubber Adhesive Sealant
to the keyway in the crankshaft and insert the key.
With the key in position, align the keyway on the
vibration damper hub with the crankshaft key and
tap the damper onto the crankshaft.
(2) Install the vibration damper retaining bolt and
washer.
(3) Tighten the damper retaining bolt to 108 N·m
(80 ft. lbs.) torque.
(4) Install the serpentine drive belt. (Refer to
Group 7, Cooling Systems for the proper specifications
and procedures).
(5) Connect negative cable to battery. REMOVAL (1) Disconnect negative cable from battery.
(2) Remove the vibration damper.
(3) Remove the fan and hub assembly and remove
the fan shroud.
(4) Remove the accessory drive brackets that are
attached to the timing case cover.
(5) Remove the A/C compressor (if equipped) and
generator bracket assembly from the engine cylinder
head and move to one side.
(6) Remove the oil pan-to-timing case cover bolts
and timing case cover-to-cylinder block bolts.
(7) Remove the timing case cover and gasket from
the engine.
(8) Pry the crankshaft oil seal from the front of the
timing case cover (Fig. 59).
1 - TIMING CASE COVER INSTALLATION Clean the timing case cover, oil pan and cylinder
block gasket surfaces.
(1) Install a new crankshaft oil seal in the timing
case cover. The open end of the seal should be toward
the inside of the cover. Support the cover at the seal
area while installing the seal. Force it into position
with Seal Installation Tool 6139.
(2) Position the gasket on the cylinder block. (3) Position the timing case cover on the oil pan
gasket and the cylinder block.
(4) Insert Timing Case Cover Alignment and Seal
Installation Tool 6139 in the crankshaft opening in
the cover (Fig. 60).
1 - TIMING CASE COVER ALIGNMENT AND SEAL
INSTALLATION TOOL (5) Install the timing case cover-to-cylinder block
and the oil pan-to-timing case cover bolts.
(6) Tighten the 1/4 inch cover-to-block bolts to 7
N·m (60 in. lbs.) torque. Tighten the 5/16 inch front
cover-to-block bolts to 22 N·m (192 in. lbs.) torque.
Tighten the oil pan-to-cover 1/4 inch bolts to 9.5 N·m
(84 in. lbs.) torque.
(7) Remove the cover alignment tool.
(8) Apply a light film of engine oil on the vibration
damper hub contact surface of the seal.
(9) Apply Mopar Silicone Rubber Adhesive Sealant
to the keyway in the crankshaft and insert the key.
With the key inserted in the keyway in the crankshaft,
install the vibration damper, washer and bolt.
Lubricate and tighten the bolt to 108 N·m (80 ft. lbs.)
torque.
(10) Install the A/C compressor (if equipped) and
generator bracket assembly.
(11) Install the engine fan and hub assembly and
shroud.
(12) Install the serpentine drive belt.
(13) Connect negative cable to battery.Hydraulic tappets
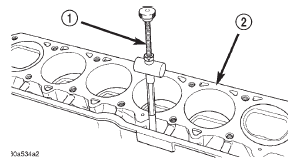
Fig. 57 Hydraulic Valve Tappet Removal-
Installation Tool
2 - CYLINDER BLOCKVibration damper
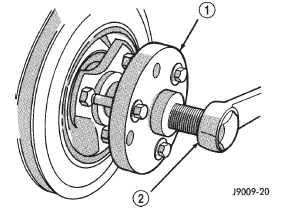
Fig. 58 Vibration Damper Removal Tool 7697
2 - WRENCHTiming case cover
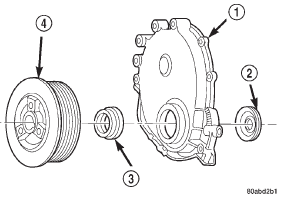
Fig. 59 Timing Case Cover Components
2 - OIL SLINGER
3 - CRANKSHAFT OIL SEAL
4 - VIBRATION DAMPER PULLEY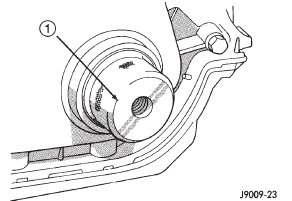
Fig. 60 Timing Case Cover Alignment and Seal Installation Tool 6139
 Valve springs and oil seals. Cylinder head. Valves and valve springs
 Timing chain and sprockets. Camshaft. Camshaft bearings
Other materials:
186 FBI pinion gear depth
GENERAL INFORMATION
Ring gear and pinion are supplied as matched sets
only. The identifying numbers for the ring gear and
pinion are etched into the face of each gear (Fig. 77).
A plus (+) number, minus (-) number or zero (0) is
etched into the face of the pinion gear head. This
number is th ...