Jeep Cherokee (XJ): Oil pump. Overdrive planetary gear and clutch. Overdrive support
DISASSEMBLY (1) Remove pump body O-ring (Fig. 199).
(2) Remove pump seal.
(3) Remove pump seal rings (Fig. 199).
(4) Remove bolts attaching stator shaft to pump
body and separate components.
(5) Remove drive gear and driven gear from pump
body (Fig. 199).
1 - PUMP SEAL ASSEMBLY (1) Measure inside diameter of pump body bushing
with bore gauge or inside micrometer (Fig. 200).
Diameter should be maximum of 38.19 mm (1.5035
in.). Replace pump body if bushing I. D. is greater
than specified.
(2) Measure inside diameter of stator shaft bushing
(Fig. 200). Take measurements at front and rear
of bushing. Diameter should be maximum of 21.58
mm (0.08496 in.) at front and 27.08 mm (1.0661 in.)
at rear. Replace stator shaft if bushing diameter is
greater than specified.
1 - BORE GAUGE (3) Measure oil pump clearances (Fig. 201). (4) Replace pump body and gears if any clearance
is greater than specified.
(5) Install new seal with Seal Installer 7549 (Fig.
202).
1 - SEAL INSTALLER TOOL (6) Lubricate and install gears in pump body.
(7) Assemble stator shaft and pump body. Tighten
shaft-to-body bolts to 10 N·m (7 ft. lbs.) torque.
(8) Install new O-ring on pump body and new seal
rings on stator shaft.
(9) Install pump in torque converter and check
pump gear rotation (Fig. 203). Gears must rotate
smoothly when turned clockwise and counterclockwise.
(10) Lubricate pump O-ring and seal rings with
petroleum jelly.
1 - OIL PUMP DISASSEMBLY (1) Check operation of one-way clutch in clutch
drum (Fig. 204). Hold drum and turn planetary shaft
clockwise and counterclockwise. Shaft should turn clockwise freely but lock when
turned counterclockwise.
Replace one-way clutch if necessary.
1 - CLUTCH DRUM
1 - CLUTCH DRUM (2) Remove overdrive clutch from planetary gear
(Fig. 205).
1 - OVERDRIVE CLUTCH (3) Measure stroke length of overdrive clutch piston
as follows: (a) Mount oil pump on torque converter. Then
mount clutch on oil pump (Fig. 206).
1 - OVERDRIVE CLUTCH (b) Install a suitable threaded bolt/rod into oil
pump for use in mounting Miller Tool C-3339 dial
indicator components securely.
(c) Mount dial indicator on the bolt/rod and position
the dial indicator squarely on the clutch piston.
(d) Apply compressed air through clutch feed
hole in oil pump and note piston stroke length.
Stroke length should be 1.85 - 2.15 mm (0.0728 -
0.0846 in.).
(4) Remove thrust bearing and race assembly from
clutch drum (Fig. 207).
(5) Remove clutch pack snap ring and remove the
clutch pack (Fig. 208).
(6) Measure overdrive clutch disc thickness. Minimum
allowable thickness is 1.84 mm (0.0724 in.).
(7) If the clutch pack stroke length is out of specification
or any clutch disc fails to meet the minimum
thickness, new discs will need to be installed during
assembly.
(8) Compress piston return spring with Tool 7538
(Fig. 209). Remove snap ring and remove compressor
tool.
(9) Remove the piston return springs.
(10) Mount oil pump on converter. Then mount
clutch on oil pump (Fig. 210).
(11) Hold clutch piston by hand and apply compressed
air through oil pump feed hole to ease pis out (Fig. 210). Apply only enough air
pressure to
remove piston
1 - CLUTCH DRUM
1 - SNAP RING (12) Measure free length of piston return springs
with springs in retainer (Fig. 211). Length should be
16.8 mm (0.661 in.). Replace spring and retainer
assembly if necessary.
(13) Check clutch piston check ball (Fig. 212).
Shake piston to see if ball moves freely. Then check
ball sealing by applying low pressure compressed air
to ball inlet as shown. Air should not leak past check
ball.
1 - COMPRESSOR TOOL
1 - CLUTCH RETAINER
1 - PISTON RETURN SPRINGS
1 - CLUTCH PISTON CHECK BALL (14) Check inside diameter of clutch drum bushings
with bore gauge or inside micrometer (Fig. 213).
Maximum inside diameter is 27.11 mm (1.0673 in.).
Replace drum if bushing inside diameter is greater
than specified.
(15) Remove bearing and race from ring gear (Fig.
214).
1 - CLUTCH DRUM
1 - BEARING (16) Remove snap ring from ring gear and remove
ring gear hub (Fig. 215).
1 - SNAP RING (17) Remove race from planetary gear (Fig. 216).
1 - PLANETARY GEAR (18) Remove snap ring and remove retaining plate
(Fig. 217).
1 - SNAP RING (19) Remove one-way clutch and outer race as
assembly. Then separate race from clutch (Fig. 218).
1 - ONE-WAY CLUTCH AND OUTER RACE ASSEMBL (20) Remove thrust washer (Fig. 219).
(21) Check inside diameter of planetary gear bushing
(Fig. 220). Maximum inside diameter is 11.27
mm (0.4437 in.). Replace planetary gear if bushing
inside diameter is greater then specified.
1 - THRUST WASHER
1 - PLANETARY BUSHING ASSEMBLY (1) Install thrust washer in planetary gear (Fig.
221). Grooved side of washer faces up and
toward front.
1 - THRUST WASHER (2) Install clutch race into planetary gear.
(3) Install one-way clutch into the outer race (Fig.
222). Be sure flanged side of clutch is facing upward.
(4) Install clutch retaining plate and snap ring in
planetary gear.
(5) Coat planetary race with petroleum jelly and
install it on planetary gear. Outside diameter of race
should be 41.8 mm (1.646 in.); inside diameter is 27.1
mm (1.067 in.).
(6) Install hub in planetary ring gear and install
snap ring.
(7) Coat race and bearing with petroleum jelly and
install in planetary ring gear (Fig. 223).
(8) Verify bearing/race size. Outside diameter of
race is 47.8 mm (1.882 in.) and inside diameter is
24.2 mm (0.953 in.). Outside diameter of bearing is
46.8 mm (1.843 in.) and inside diameter is 26 mm
(1.024 in.).
(9) Lubricate new clutch piston O-rings with
Mopart Door Ease, or Ru-Glyde. Then install rings
on clutch piston and install piston in clutch drum.
(10) Install piston return springs in clutch piston
(Fig. 224).
(11) Install piston snap ring. Compress piston return
springs with Tool 7538 and shop press (Fig. 225).
1 - FLANGED SIDE OF CLUTCH FACES UP
1 - BEARING (12) Install overdrive clutch pack in drum. Install
steel plate first, then a disc (Fig. 226). Continue installation sequence until
required number of discs
and plates have been installed.
1 - RETURN SPRINGS (13) Install clutch pack retainer with flat side facing
downward. Then install retainer snap ring (Fig.
227). Compress springs with suitable tool.
1 - PRESS RAM
1 - CLUTCH DISC
1 - CLUTCH PACK RETAINER (14) Install clutch drum bearing and race assembly
(Fig. 228). Be sure bearing rollers face upward as
shown. Outside diameter of assembled bearing and
race is 50.2 mm (1.976 in.). Inside diameter is 28.9
mm (1.138 in.).
1 - BEARING AND RACE ASSEMBLY (15) Install clutch on planetary gear.
(16) Verify one-way clutch operation. Hold drum
and turn planetary shaft clockwise and counterclockwise.
Shaft should turn clockwise freely but lock
when turned counterclockwise. DISASSEMBLY (1) Check brake piston operation. Mount support
on clutch (Fig. 229).
(2) Apply compressed air through support feed
hole and observe brake piston movement (Fig. 229).
Piston should move smoothly and not bind or stick. If
operation is incorrect, replace piston and support.
(3) Remove thrust bearing front race, thrust bearing
and rear race (Fig. 230).
(4) Turn overdrive support over and remove bearing
race and clutch drum thrust washer (Fig. 231).
(5) Compress piston return spring with Spring
Compressor 7537 and remove piston snap ring (Fig.
232).
1 - BRAKE PISTON
1 - THRUST BEARING
1 - BEARING RACE
1 - COMPRESSOR TOOL (6) Mount support in direct clutch and remove
brake piston with compressed air. Apply air to same
feed hole used when checking piston operation.
(7) Remove and discard support O-rings (Fig. 233).
(8) Remove support seal rings (Fig. 234).
(9) Measure free length of piston return springs
with springs mounted in retainer (Fig. 235). Length
should be 17.23 mm (0.678 in.).
(10) Clean support components and dry them with
compressed air.
(11) Inspect overdrive support and brake piston.
Replace support and piston if either part is worn or
damaged. ASSEMBLY (1) Lubricate new support seal rings. Then compress
rings and install them on support (Fig. 236).
(2) Lubricate and install new O-rings on brake
piston. Then carefully seat piston in support.
(3) Install return springs on brake piston.
(4) Compress return springs with Spring Compressor
7537 (Fig. 232) and install piston snap ring.
(5) Install support bearing race and clutch drum
thrust washer (Fig. 231).
(6) Install thrust bearing and front and rear bearing
races. Thrust bearing rollers should face upward
as shown (Fig. 236).
(7) Verify thrust bearing/race sizes (Fig. 237). (8) Verify brake piston operation. Use same procedure
described at beginning of disassembly. Piston
should operate smoothly and not bind or stick.
1- PISTON SNAP RING
1 - SEAL RINGS (2)
1 - PISTON RETURN SPRINGS
1 - COMPRESS SEAL RINGS BEFORE INSTALLATION
1 - REAR RACEOil pump
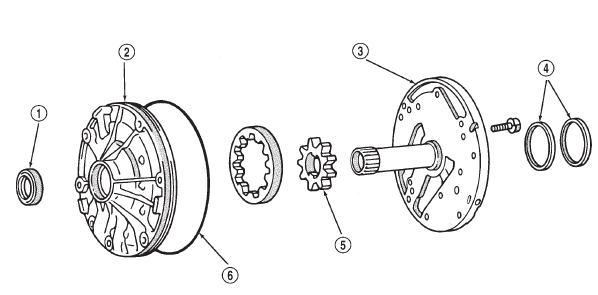
Fig. 199 Oil Pump Components
2 - PUMP BODY
3 - STATOR SHAFT
4 - SEAL RINGS
5 - GEAR
6 - O-RING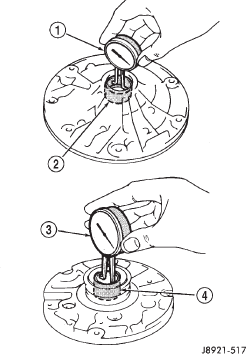
Fig. 200 Checking Pump/Stator Shaft Bushings
2 - PUMP BODY BUSHING
3 - BORE GAUGE
4 - STATOR SHAFT BUSHING
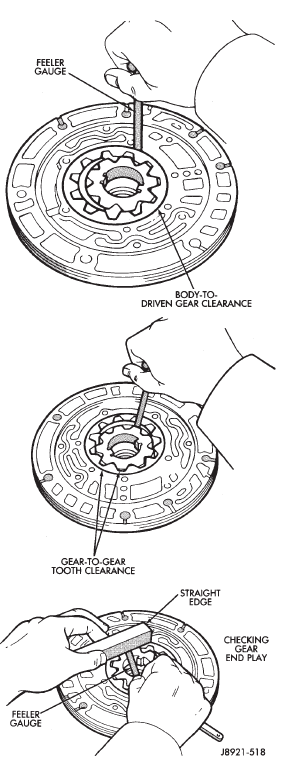
Fig. 201 Checking Pump Gear Clearances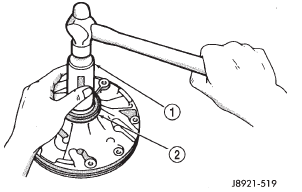
Fig. 202 Installing Pump Seal
2 - PUMP SEAL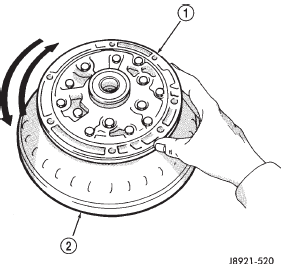
Fig. 203 Checking Pump Gear Rotation
2 - TORQUE CONVERTEROverdrive planetary gear and
clutch
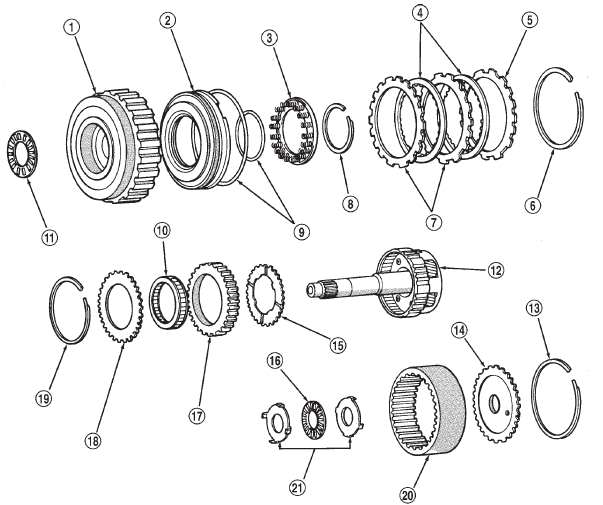
Overdrive Planetary Gear And Clutch Components
2 - CLUTCH PISTON
3 - PISTON RETURN SPRING
4 - CLUTCH DISCS
5 - RETAINER PLATE
6 - CLUTCH PACK SNAP RING
7 - CLUTCH PLATES
8 - PISTON SNAP RING
9 - O-RINGS
10 - ONE-WAY CLUTCH
11 - CLUTCH DRUM BEARING AND RACE ASSEMBLY
12 - PLANETARY GEAR
13 - SNAP RING
14 - RING GEAR HUB
15 - THRUST WASHER
16 - BEARING
17 - ONE-WAY CLUTCH OUTER RACE
18 - RETAINING PLATE
19 - SNAP RING
20 - PLANETARY RING GEAR
21 - RACE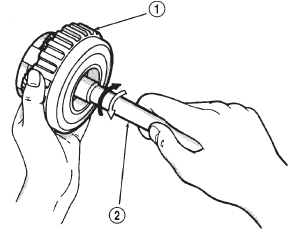
Fig. 204 Checking One-Way Clutch
2 - PLANETARY SHAFT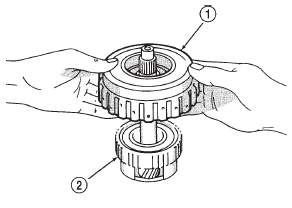
Fig. 205 Removing Overdrive Clutch From Gear
2 - PLANETARY GEAR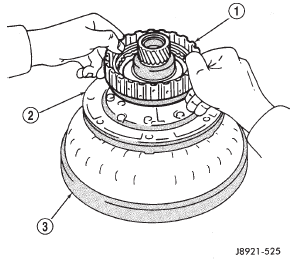
Fig. 206 Assembling Converter, Pump And Clutch For Test
2 - OIL PUMP
3 - TORQUE CONVERTER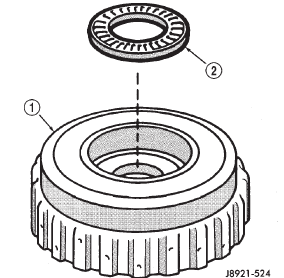
Fig. 207 Removing Clutch Drum Bearing And Race
2 - THRUST BEARING AND RACE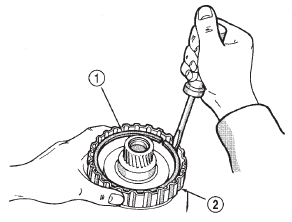
Fig. 208 Removing Clutch Pack Snap Ring
2 - CLUTCH RETAINER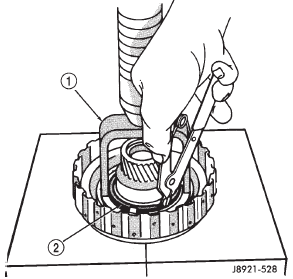
Fig. 209 Removing Clutch Piston Snap Ring
2 - CLUTCH PISTON SNAP RING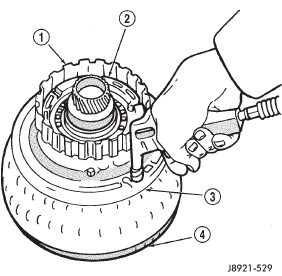
Fig. 210 Removing Overdrive Clutch Piston
2 - CLUTCH PISTON
3 - OIL PUMP
4 - CONVERTER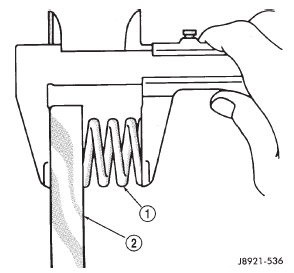
Fig. 211 Checking Piston Return Spring Length
2 - SPRING RETAINER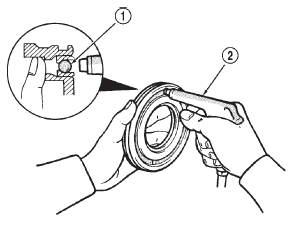
Fig. 212 Testing Clutch Piston Check Ball
2 - USE LOW-PRESSURE COMPRESSED AIR TO TEST BALL
SEATING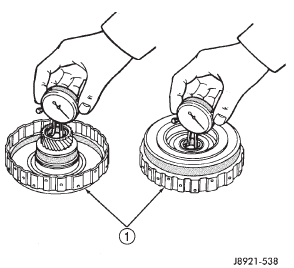
Fig. 213 Checking Clutch Drum Bushings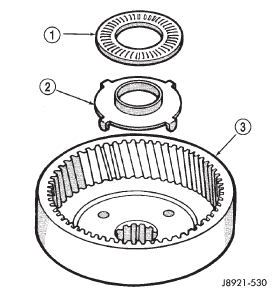
Fig. 214 Removing Ring Gear Bearing And Race
2 - RACE
3 - RING GEAR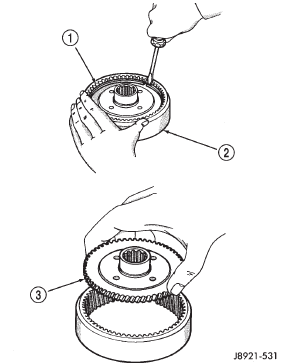
Fig. 215 Removing Ring Gear Hub
2 - RING GEAR
3 - RING GEAR HUB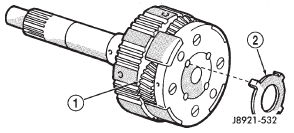
Fig. 216 Remove Planetary Gear Race
2 - RACE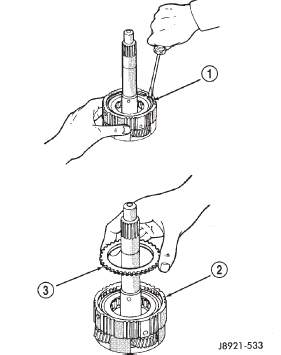
Fig. 217 Removing Snap Ring And Retaining Plate
2 - PLANETARY GEAR
3 - RETAINING PLATE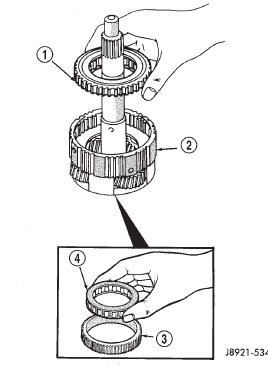
Fig. 218 Removing One-Way Clutch
2 - PLANETARY GEAR
3 - RACE
4 - CLUTCH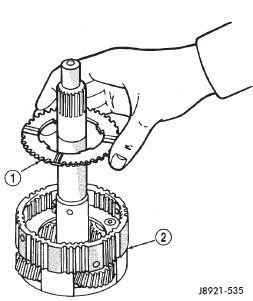
Fig. 219 Removing Planetary Thrust Washer
2 - PLANETARY GEAR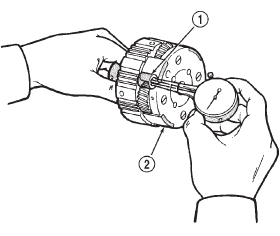
Fig. 220 Checking Planetary Bushing
2 - PLANETARY GEAR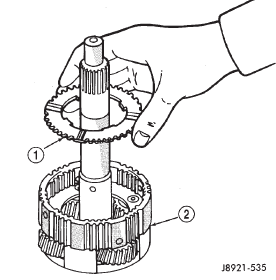
Fig. 221 Install Planetary Thrust Washer
2 - PLANETARY GEAR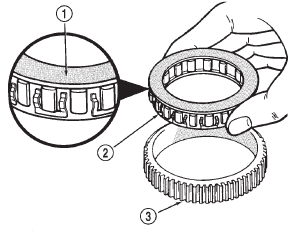
Fig. 222 Assembling One-Way Clutch And Race
2 - ONE-WAY CLUTCH
3 - CLUTCH RACE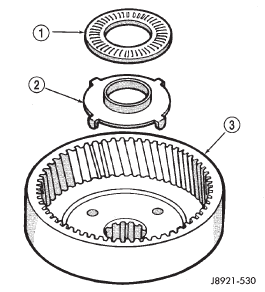
Fig. 223 Install Ring Gear Bearing And Race
2 - RACE
3 - RING GEAR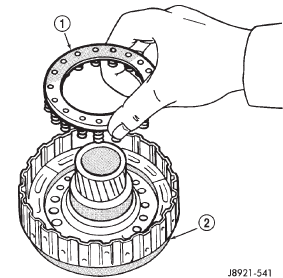
Fig. 224 Installing Piston Return Springs
2 - CLUTCH PISTON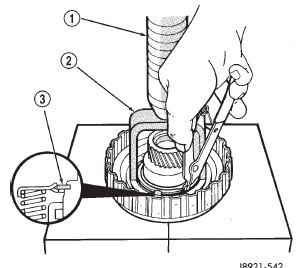
Fig. 225 Installing Clutch Piston Snap Ring
2 - COMPRESSOR TOOL
3 - SNAP RING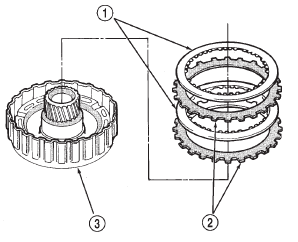
Fig. 226 Installing Overdrive Clutch Discs And Plates
2 - STEEL PLATE
3 - CLUTCH DRUM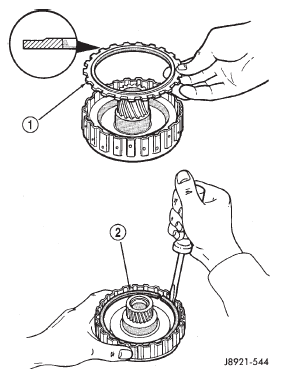
Fig. 227 Installing Retainer And Snap Ring
2 - RETAINER SNAP RING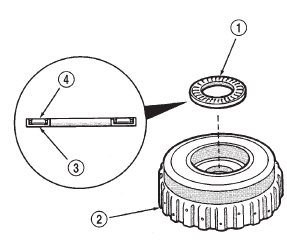
Fig. 228 Installing Clutch Drum Bearing And Race Assembly
2 - CLUTCH DRUM
3 - RACE
4 - ROLLERSOverdrive support
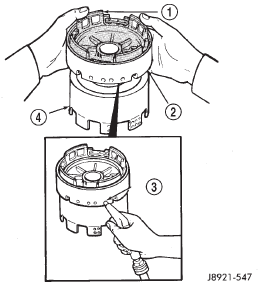
Fig. 229 Checking Brake Piston Movement
2 - OVERDRIVE SUPPORT
3 - SUPPORT FEED HOLE
4 - CLUTCH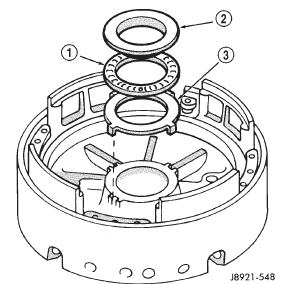
Fig. 230 Removing Support Thrust Bearing And Races
2 - FRONT RACE
3 - REAR RACE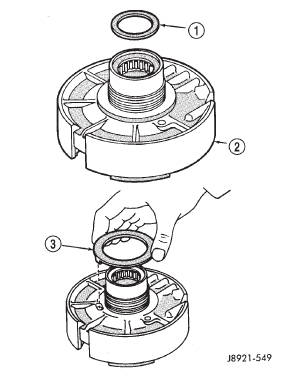
Fig. 231 Removing Clutch Drum Thrust Washer And Race
2 - OVERDRIVE SUPPORT
3 - THRUST WASHER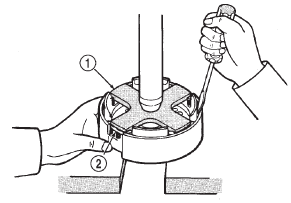
Fig. 232 Removing/Installing Piston Snap Ring
2 - SNAP RING
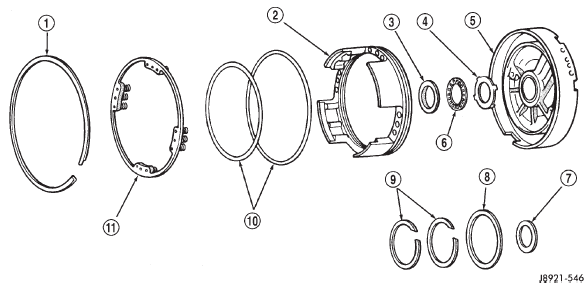
Fig. 233 Overdrive Support Components
2 - BRAKE PISTON
3 - FRONT RACE
4 - REAR RACE
5 - OVERDRIVE SUPPORT
6 - THRUST BEARING
7 - BEARING RACE
8 - CLUTCH DRUM THRUST WASHER
9 - SUPPORT SEAL RINGS
10 - BRAKE PISTON O-RINGS
11 - PISTON RETURN SPRING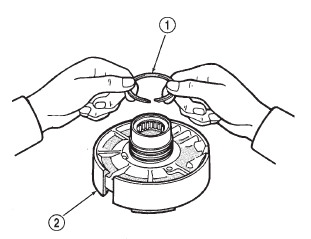
Fig. 234 Removing Support Seal Rings
2 - SUPPORT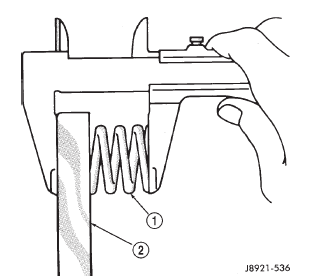
Fig. 235 Checking Piston Return Spring Length
2 - SPRING RETAINER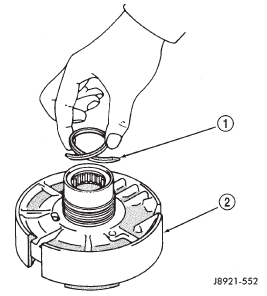
Fig. 236 Installing Support Seal Rings
2 - OVERDRIVE SUPPORT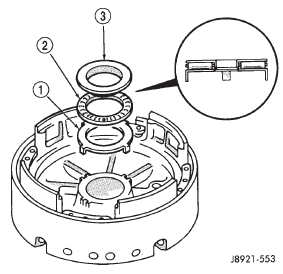
Fig. 237 Installing Support Thrust Bearing And Races
2 - THRUST BEARING
3 - FRONT RACE
Other materials:
Brake System. Automatic Transmission. Appearance Care And Protection From Corrosion
Brake System
In order to assure brake system performance, all brake
system components should be inspected periodically.
Refer to the "Maintenance Schedule" for the proper
maintenance intervals.
WARNING!
Riding the brakes can lead to brake failure and
possibly a collision. Driving with your f ...


