Jeep Cherokee (XJ): Output shaft rear bearing. Governor and park gear. Park lock
REMOVAL (1) Remove extension housing.
(2) Remove snap ring that retains rear bearing on
output shaft (Fig. 84).
(3) Remove bearing from output shaft. INSTALLATION (1) Install bearing on output shaft. Be sure retaining
ring groove in outer circumference of bearing is
toward the governor.
(2) Install rear bearing retaining snap ring (Fig.
84).
(3) Install extension housing.
1 - BEARING SNAP RING GROOVE REMOVAL (1) Hoist and support vehicle on safety stands.
(2) Mark propeller shaft and axle yoke for assembly
reference. Then disconnect and remove shaft.
(3) Disconnect parking brake cable at equalizer
and disconnect exhaust components as necessary.
(4) Support transmission on a suitable lifting
device.
(5) Remove skid plate and rear transmission
mount.
(6) Remove extension housing.
(7) Loosen but do not remove bolts that hold governor
body to park gear.
(8) Rotate transmission output shaft until governor
weight assembly is accessible.
(9) Remove E-clip at end of governor valve shaft
(Fig. 85).
1 - E-CLIP (10) Remove governor valve and shaft from governor
body (Fig. 85).
(11) Remove snap rings and spacer that retain
governor body and park gear assembly on output
shaft (Fig. 86).
(12) Remove bolts holding governor body to park
gear (Fig. 87).
(13) Separate governor from park gear.
(14) Pull park gear from rear support.
1 - GOVERNOR BODY
1 - GOVERNOR/PARK ASSEMBLY INSTALLATION (1) Install park gear into rear support so crown on
curved boss is in line with hole through output shaft.
(2) Install governor filter in park gear.
(3) Slip governor body over output shaft and align
port to filter.
(4) Install bolts to hold governor body to park gear.
Tighten bolts to 11 N·m (95 in. lbs.) torque (Fig. 87).
(5) Install governor body-park gear snap rings and
washer on output shaft as follows:
(a) Install thin snap ring first. Then install
thrust washer second, and thick snap ring last
(Fig. 86).
(b) Verify correct position of snap rings. Be sure
flat side of each snap ring is toward governor
body.
(6) Insert governor valve and shaft through governor
and install E-clip (Fig. 85).
(7) Install extension housing and gasket on transmission.
Tighten housing bolts to 32 N·m (24 ft. lbs.).
(8) Install rear transmission mount and skid plate.
(9) Install speed sensor and speedometer components
and connect speed sensor wires.
(10) Connect exhaust components and brake cable,
if removed.
(11) Install propeller shaft.
(12) Remove supports and lower vehicle.
(13) Check transmission fluid level. Add fluid if
necessary. REMOVAL (1) Raise vehicle and remove propeller shaft.
(2) Remove extension housing.
(3) Slide sprag shaft out of extension housing and
remove sprag and spring (Fig. 88).
(4) Remove snap ring and slide reaction plug and
pin assembly out of housing.
(5) If park rod requires service, it will be necessary
to remove valve body. INSTALLATION (1) Inspect sprag shaft for scores and free movement
in housing and sprag. Inspect sprag and control
rod springs for distortion and loss of tension. replace
worn, damaged parts as necessary.
(2) Inspect square lug on sprag for broken edges.
Check lugs on park gear for damage. Inspect knob on
end of control rod for wear grooves, or being seized
on rod. Replace rod if bent, if knob is worn/grooved,
or it has seized on rod. Replace park gear if lugs are
damaged. Replace the park lock rod if it is suspected
that the rod is not the correct length.
(3) Install reaction plug and pin assembly in housing
and secure with new snap ring (Fig. 88).
(4) Position sprag and spring in housing and insert
sprag shaft. Be sure square lug on sprag is toward
park gear. Also be sure spring is positioned so it
moves sprag away from gear.
(5) Install extension housing.
(6) Install propeller shaft and lower vehicle.
(7) Check transmission fluid level. Add fluid if necessary.Output shaft rear bearing
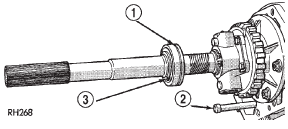
Fig. 84 Output Shaft Rear Bearing-Typical
2 - PARK LOCK CONTROL ROD
3 - REAR SNAP RINGGovernor and park gear
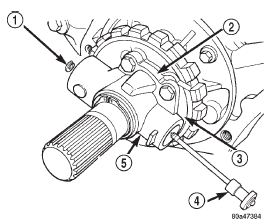
Fig. 85 Governor Valve
2 - PARK GEAR
3 - CURVER BOSS
4 - GOVERNOR VALVE
5 - GOVERNOR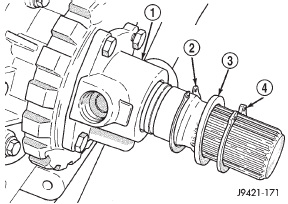
Fig. 86 Snap Rings And Spacer
2 - THIN SNAP RING
3 - THRUST WASHER
4 - THICK SNAP RING
Fig. 87 Governor Body
2 - GOVERNOR VALVE SHAFT BORE
3 - REAR SUPPORT
4 - OUTPUT SHAFT SPLINES
5 - SEAL RINGSPark lock
 Gearshift cable. Brake transmission shift interlock. Valve body

Other materials:
Selec-terrain
Description
Selec-Terrain combines the capabilities of the vehicle
control systems, along with driver input, to provide the
best performance for all terrains.
Rotate the Selec-Terrain knob to select the desired mode.
Selec-Terrain Switch
Selec-Terrain offers the following modes:
Auto ...