Jeep Cherokee (XJ): Removal and installation
REMOVAL (1) Disconnect and isolate the battery negative
cable.
(2) Remove the fuse access panel by unsnapping it
from the right cowl side inner trim panel (Fig. 3).
(3) Remove the push nut that secures the right
cowl side inner trim panel to the junction block stud.
(4) Remove the screw located above the fuse access
opening that secures the trim panel to the right cowl
side inner panel.
(5) Remove the screw that secures the right cowl
side inner trim panel and right front door sill trim to
the door opening sill.
(6) Remove the trim from the right cowl side inner
panel.
(7) Refer to Junction Block in the Contents of
Group 8W - Wiring Diagrams for horn relay identification
and location.
(8) Remove the horn relay from the junction block. INSTALLATION (1) Refer to Junction Block in the Contents of
Group 8W - Wiring Diagrams for proper horn relay
location.
(2) Position the horn relay in the proper receptacle
in the junction block.
(3) Align the horn relay terminals with the terminal
cavities in the junction block receptacle.
1 - RIGHT FRONT DOOR SILL (4) Push down firmly on the horn relay until the
terminals are fully seated in the terminal cavities in
the junction block receptacle.
(5) Position the trim onto the right cowl side inner
panel.
(6) Install and tighten the screw that secures the
right cowl side inner trim panel and right front door
sill trim to the door opening sill. Tighten the screw to
2.2 N·m (20 in. lbs.).
(7) Install and tighten the screw located above the
fuse access opening that secures the trim panel to
the right cowl side inner panel. Tighten the screw to
2.2 N·m (20 in. lbs.).
(8) Install the push nut that secures the right cowl
side inner trim panel onto the junction block stud.
(9) Install the fuse access panel by snapping it
onto the right cowl side inner trim panel.
(10) Reconnect the battery negative cable. REMOVAL (1) Disconnect and isolate the battery negative
cable.
(2) Raise and support the vehicle.
(3) Remove the front underbody splash shield.
NOTE: Remove the horn and its mounting bracket
from the vehicle as a unit. Do not remove the horn
from its mounting bracket.
(4) Remove the screw that secures the horn and
mounting bracket unit to the radiator closure panel
brace (Fig. 4).
1 - MOUNTING BOLT (5) Lower the horn and mounting bracket unit far
enough to access and disconnect the wire harness
connector from the horn connector receptacle.
(6) Remove the horn and mounting bracket unit
from behind the front bumper INSTALLATION (1) Position the horn and mounting bracket unit
behind the front bumper.
(2) Reconnect the wire harness connector to the
horn connector receptacle.
(3) Position the horn and mounting bracket unit to
the radiator closure panel brace.
(4) Install and tighten the screw that secures the
horn and mounting bracket unit to the radiator closure
panel brace. Tighten the screw to 28.5 N·m (21
ft. lbs.).
(5) Install the front underbody splash shield.
(6) Lower the vehicle.
(7) Reconnect the battery negative cable.Horn relay
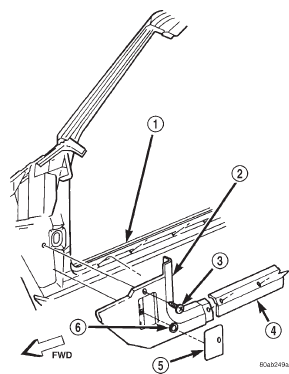
Fig. 3 Right Cowl Side Inner Trim Remove/Install
2 - COWL SIDE TRIM PANEL
3 - SCREW
4 - SILL TRIM
5 - FUSE ACCESS PANEL
6 - PUSH-NUTHorn
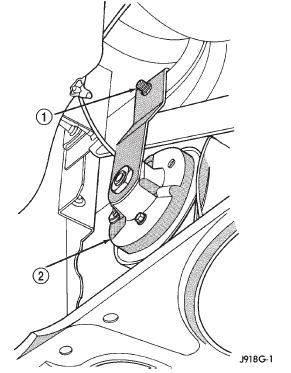
Fig. 4 Horns Remove/Install
2 - HORN


Other materials:
Front door lock cylinder. Lock cylinders. Front door latch
Front door lock cylinder
REMOVAL
(1) Remove the door trim panel.
(2) Peel back waterdam to access lock cylinder.
(3) Disconnect the door latch-to-lock cylinder rod
at the door latch (Fig. 29).
(4) Remove the lock cylinder retainer clip.
(5) Remove the lock cylinder.
(6) If applicabl ...