Jeep Cherokee (XJ): Removal and installation
The Power Distribution Center (PDC) main housing
unit, the PDC fuse wedges, the PDC fuse cassette
and the PDC bus bars cannot be repaired and are
only serviced as a unit with the headlamp and dash
wire harness. If the PDC main housing unit, the fuse
wedge, the fuse cassette or the bus bars are faulty or
damaged, the entire PDC and headlamp and dash
wire harness unit must be replaced. REMOVAL (1) Disconnect and isolate the battery negative
cable.
(2) Disconnect each of the headlamp and dash wire
harness connectors. Refer to Connector Locations
in the index of this service manual for the location of
more information on the headlamp and dash wire
harness connector locations.
(3) Remove all of the fasteners that secure each of
the headlamp and dash wire harness ground eyelets
to the vehicle body and chassis components. Refer to
Connector Locations in the index of this service
manual for the location of more information on the
ground eyelet locations.
(4) Disengage each of the retainers that secure the
headlamp and dash wire harness to the vehicle body
and chassis components. Refer to Connector Locations
in the index of this service manual for the location
of more information on the headlamp and dash
wire harness retainer locations.
(5) Unlatch and remove the B(+) terminal stud
cover from the end of the PDC (Fig. 4).
(6) Remove the nut that secures the eyelets of the
battery wire harness PDC take outs to the PDC B(+)
terminal stud.
1 - COVER (7) Remove the battery wire harness PDC take out
eyelets from the B(+) terminal stud.
(8) Disengage the latches on the PDC mounting
bracket from the tabs on the PDC housing, and pull
the PDC housing upward to disengage the mounting
slots from the stanchions of the mounting bracket
(Fig. 5).
(9) Remove the PDC and the headlamp and dash
wire harness from the engine compartment as a unit.
(10) Remove the two screws that secure the PDC
mounting bracket to the right front inner fender (Fig.
6).
(11) Remove the PDC mounting bracket from the
right front inner fender. INSTALLATION NOTE: If the PDC is being replaced with a new unit,
be certain to transfer each of the fuses and relays
from the faulty PDC to the proper cavities of the
replacement PDC. Refer to Power Distribution in the
index of this service manual for the location of
complete PDC circuit diagrams and cavity assignments.
(1) Position the PDC mounting bracket onto the
right front inner fender.
(2) Install and tighten the two screws that secure
the PDC mounting bracket to the right front inner
fender. Tighten the screws to 8.1 N·m (72 in. lbs.).
1 - RIGHT FENDER
1 - RIGHT FRONT INNER FENDER (3) Position the PDC and the headlamp and dash
wire harness unit in the engine compartment.
(4) Engage the mounting slots on the PDC housing
with the stanchions of the PDC mounting bracket
and push the unit downward until the mounting
bracket latches engage the mounting tabs on the
PDC housing.
(5) Install the eyelets of the battery wire harness
PDC take outs onto the PDC B(+) terminal stud.
(6) Install and tighten the nut that secures the
eyelet of the battery wire harness PDC take outs to
the B(+) terminal stud. Tighten the nut to 10.8 N·m
(95 in. lbs.).
(7) Engage the tabs on the lower edge of the B(+)
terminal stud cover in the slots on the PDC housing,
then engage the latch on the top of the cover with
the latch receptacle on the PDC housing.
(8) Engage each of the retainers that secure the
headlamp and dash wire harness to the vehicle body
and chassis components. Refer to Connector Locations
in the index of this service manual for the location
of more information on the headlamp and dash
wire harness retainer locations.
(9) Install all of the fasteners that secure each of
the headlamp and dash wire harness ground eyelets
to the vehicle body and chassis components. Refer to
Connector Locations in the index of this service
manual for the location of more information on the
ground eyelet locations.
(10) Reconnect each of the headlamp and dash
wire harness connectors. Refer to Connector Locations
in the index of this service manual for the location
of more information on the headlamp and dash
wire harness connector locations.
(11) Reconnect the battery negative cable. The Ignition-Off Draw (IOD) fuse is removed from
Power Distribution Center (PDC) fuse cavity 16 (Fig.
7) when the vehicle is shipped from the assembly
plant. Dealer personnel must install the IOD fuse
when the vehicle is being prepared for delivery in
order to restore full electrical system operation.
NOTE: When removing or installing the IOD fuse, it
is important that the ignition switch be in the Off
position. Failure to place the ignition switch in the
Off position can cause the radio display to become
scrambled when the IOD fuse is installed. Removing
and installing the IOD fuse again with the ignition
switch in the Off position will usually correct
the scrambled radio display condition. REMOVAL (1) Turn the ignition switch to the Off position.
(2) Unlatch and remove the cover from the PDC.
(3) Remove the IOD fuse from fuse cavity 16 of the
PDC.
(4) Store the removed IOD fuse by inserting the
terminal blades of the fuse into the plastic fuse
holder formation that is molded into the underside of
the PDC cover.
(5) Install and latch the cover onto the PDC.
1 - POWER DISTRIBUTION CENTER INSTALLATION (1) Turn the ignition switch to the Off position.
(2) Unlatch and remove the cover from the PDC.
(3) Remove the stored IOD fuse from the plastic
fuse holder formation that is molded into the underside
of the PDC cover.
(4) Align the terminal blades of the IOD fuse with
the terminal receptacles in fuse cavity 16 of the PDC.
(5) Use a thumb to press the IOD fuse firmly down
into PDC fuse cavity 16.
(6) Install and latch the cover onto the PDC. WARNING: ON VEHICLES EQUIPPED WITH AIRBAGS,
DISABLE THE AIRBAG SYSTEM BEFORE
ATTEMPTING ANY STEERING WHEEL, STEERING
COLUMN, OR INSTRUMENT PANEL COMPONENT
DIAGNOSIS OR SERVICE. DISCONNECT AND ISOLATE
THE BATTERY NEGATIVE (GROUND) CABLE,
THEN WAIT TWO MINUTES FOR THE AIRBAG SYSTEM
CAPACITOR TO DISCHARGE BEFORE PERFORMING
FURTHER DIAGNOSIS OR SERVICE. THIS
IS THE ONLY SURE WAY TO DISABLE THE AIRBAG
SYSTEM. FAILURE TO TAKE THE PROPER PRECAUTIONS
COULD RESULT IN ACCIDENTAL AIRBAG
DEPLOYMENT AND POSSIBLE PERSONAL
INJURY. REMOVAL (1) Disconnect and isolate the battery negative
cable.
(2) Remove the fuse access panel by unsnapping it
from the right cowl side inner trim panel (Fig. 8).
1 - RIGHT FRONT DOOR SILL (3) Remove the push nut that secures the right
cowl side inner trim panel to the mounting stud on
the Junction Block (JB).
(4) Remove the screw located above the fuse access
opening that secures the trim panel to the right cowl
side inner panel.
(5) Remove the screw that secures the right cowl
side inner trim panel and right front door sill trim to
the door opening sill.
(6) Remove the trim from the right cowl side inner
panel.
(7) Remove the screw that secures the lower
instrument panel wire harness connector to the JB.
(8) Disconnect all of the wire harness connectors
from the connector receptacles on the JB. (9) Remove the three nuts that secure the JB to
the mounting studs on the right cowl side inner
panel (Fig. 9).
1 - JUNCTION BLOCK (10) Remove the JB from the mounting studs on
the right cowl side inner panel. INSTALLATION NOTE: If the Junction Block (JB) is being replaced
with a new unit, be certain to transfer each of the
fuses, circuit breakers and relays from the faulty JB
to the proper cavities of the replacement JB. Refer
to Junction Block in the index of this service manual
for the location of complete circuit diagrams
and cavity assignments for the JB.
(1) Position the JB onto the mounting studs
located on the right cowl side inner panel.
(2) Install and tighten the three nuts that secure
the JB to the mounting studs on the right cowl side
inner panel. Tighten the nuts to 2.7 N·m (24 in. lbs.).
(3) Reconnect all of the wire harness connectors to
the proper connector receptacles on the JB.
(4) Install and tighten the screw that secures the
lower instrument panel wire harness connector to the
JB connector receptacle. Tighten the screw to 3.5
N·m (31 in. lbs.).
(5) Position the trim onto the right cowl side inner
panel.
(6) Install and tighten the screw that secures the
right cowl side inner trim panel and right front door
sill trim to the door opening sill. Tighten the screw to
2.2 N·m (20 in. lbs.).
(7) Install and tighten the screw located above the
fuse access opening that secures the trim panel to
the right cowl side inner panel. Tighten the screw to
2.2 N·m (20 in. lbs.).
(8) Install the push nut that secures the right cowl
side inner trim panel to the mounting stud on the
JB.
(9) Install the fuse access panel by snapping it
onto the right cowl side inner trim panel.
(10) Reconnect the battery negative cable.Power distribution center
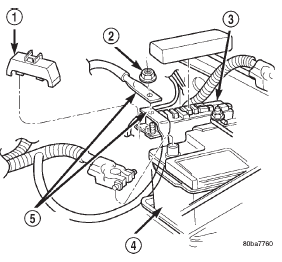
Fig. 4 Power Distribution Center Connections
2 - NUT
3 - POWER DISTRIBUTION CENTER
4 - BATTERY
5 - BATTERY WIRE HARNESS PDC TAKE-OUTS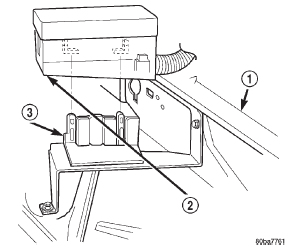
Fig. 5 Power Distribution Center Remove/Install
2 - POWER DISTRIBUTION CENTER
3 - BRACKET
Fig. 6 PDC Mounting Bracket Remove/Install
2 - PDC MOUNTING BRACKET
3 - SCREWIgnition-off draw fuse
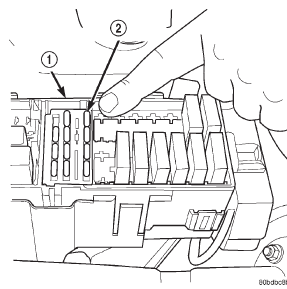
Fig. 7 Ignition-Off Draw Fuse
2 - IGNITION-OFF DRAW FUSEJunction block
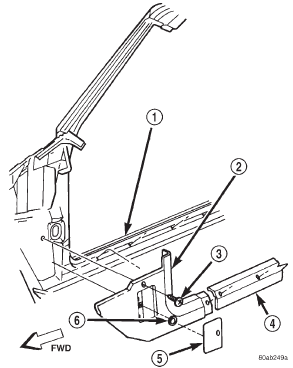
Fig. 8 Right Cowl Side Inner Trim Remove/Install
2 - COWL SIDE TRIM PANEL
3 - SCREW
4 - SILL TRIM
5 - FUSE ACCESS PANEL
6 - PUSH-NUT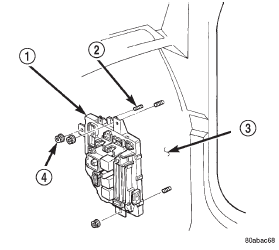
Fig. 9 Junction Block Remove/Install
2 - STUD
3 - RIGHT COWL SIDE INNER PANEL
4 - NUT


Other materials:
Instrument panel cigar lighter. Cigar lighter relay. Instrument panel power outlet
Instrument panel cigar lighter
For complete circuit diagrams, refer to Horn/Cigar
Lighter in the Contents of Group 8W - Wiring
Diagrams.
WARNING: ON VEHICLES EQUIPPED WITH AIRBAGS,
REFER TO GROUP 8M - PASSIVE
RESTRAINT SYSTEMS BEFORE ATTEMPTING ANY
STEERING WHEEL, STEERING COLUMN, OR
INSTRUME ...