Jeep Cherokee (XJ): Seats
REMOVAL NOTE: When replacing a head restraint sleeve, the
retaining tabs on the sleeve will be damaged during
the removal process. Check the availability of
replacement parts before servicing.
(1) Raise head restraint to the full up position.
(2) Turn head restraint lock thumbwheel to release
head restraint and pull head restraint upward to
remove from seat back.
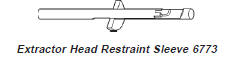
(3) Insert head restraint sleeve extractor (special
tool 6773) (Fig. 1) and (Fig. 2) into the seat back.
(4) The retaining tabs are positioned on each side
of the sleeve, when inserting the extractor, ensure
that the flat of the collar is facing the side of the
seatback (Fig. 3).
(5) Using a small hammer, tap extractor downward
to release sleeve retaining tab.
(6) Remove extractor tool from sleeve, rotate tool
180 degrees (Fig. 4) and repeat steps 3 and 4.
(7) Remove extractor tool from sleeve and remove
sleeve from seat back.
1 - SEAT BACK
1 - SEAT BACK
1 - EXTRACTOR TOOL 6773 INSTALLATION (1) Position the sleeve in the seat back.
(2) Firmly, push sleeve down to snap into place.
(3) Install head restraint. REMOVAL (1) Remove head restraint from the bucket seat.
(2) Remove the screws attaching the bezel and
adjuster bar to the head restraint (Fig. 5).
(3) Pull the adjuster bar from the head restraint.
(4) Roll the cover upward and separate from the
head restraint cushion (Fig. 6).
1 - EXTRACTOR TOOL 6773
1 - HEAD RESTRAINT INSTALLATION (1) Position the cover on the head restraint cushion
and roll the cover downward.
(2) Position the adjuster bar in the head restraint.
(3) Install the screws attaching the bezel and
adjuster bar to the head restraint.
(4) Install head restraint in the bucket seat.
1 - HEAD RESTRAINT COVER REMOVAL (1) Remove bolts attaching seat to floor pan (Fig.
7).
(2) Remove nut attaching seat to floor pan.
(3) For power seat, disconnect wire harness connector.
If equipped, disconnect wire harness for
heated seat.
(4) Disconnect seat belt buckle warning wire harness
connector.
(5) Separate seat from floor panel. INSTALLATION (1) Position seat on floor pan.
(2) Connect seat belt buckle warning wire harness
connector.
(3) For power seats, connect wire harness connector.
If equipped, connect harness for heated seat.
(4) Install front fasteners attaching seat to floor
pan. Tighten to 27 N·m (20 ft. lbs.) torque.
(5) Install rear fasteners attaching seat to floor
pan. Tighten to 27 N·m (20 ft. lbs.) torque.
(6) Install nut attaching seat to floor pan. Tighten
to 40 N·m (30 ft. lbs.) torque. REMOVA NOTE: If the vehicle is equipped with manually
adjusted bucket seats, the inboard or outboard seat
track may be serviced separately.
(1) Remove bucket seat from vehicle.
(2) Remove screws attaching the side shield trim
cover from the seat.
1 - NUT (3) If equipped, disengage the power seat connector
from the power seat switch.
(4) Remove the nuts attaching the seat track to
the bucket seat platform.
(5) When separating the seat track from the platform,
route the power seat switch connector through
the access hole in the seat cushion frame, if
equipped. INSTALLATION (1) While positioning the seat track on the bucket
seat platform, route the power seat switch connector
through the access hole in the seat cushion frame, if
equipped.
(2) Install the nuts attaching the seat track to the
bucket seat platform.
(3) If equipped, engage the power seat connector to
the power seat switch.
(4) Install screws attaching the side shield trim
cover to the seat.
(5) Install bucket seat. Bucket seat platform Bucket seat platforms are not repairable. If the
seat platform is damaged, replace platform as a unit. REMOVAL (1) Remove seat.
(2) Remove head restraint, if equipped.
(3) Remove screws attaching side shield trim cover
to bucket seat.
(4) If equipped, disengage power seat wire connector
from power seat switch.
(5) Remove the inboard seatback pivot bolt and
large plastic washer.
(6) Position the seatback in the full forward or full
recline position.
(7) Remove the seatback cover J straps from the
base of the seatback.
(8) Roll the seatback cover upward, disengage electrical
connectors for heated seat grid, if equipped.
(Fig. 8).
(9) Disengage the hogrings attaching the seatback
cover to the seatback cushion support wires (Fig. 9).
(10) Roll the seatback cover upward and disengage
the hook and loop fastener (Fig. 10).
(11) Roll seatback cover up and over the head
restraint sleeves, if equipped and separate from the
seatback.
1 - SEAT BACK COVER INSTALLATION (1) Position the seatback cover on the seatback
cushion and roll seatback cover down over the head
restraint sleeves. Route the sleeves through the
access holes in the cover, if equipped.
(2) Roll the seatback cover downward and engage
the hook and loop fastener. Engage electrical connectors
for heated seat grid, if equipped.
(3) Continue rolling the cover downward and
engage the hogrings attaching the seatback cover to
the seatback cushion support wires.
1 - SEAT BACK CUSHION
1 - SEAT BACK COVER (4) Engage the seatback cover J straps to the base
of the seatback.
(5) Install the inboard seatback pivot bolt and
large plastic washer.
(6) Install the side shield trim cover.
(7) Install head restraint, if equipped.
(8) Install seat. REMOVAL (1) Remove seat.
(2) Remove side shield trim cover.
(3) Remove inboard seatback pivot bolt and
washer. (4) Remove bolts attaching recliner to seat cushion
frame (Fig. 11).
(5) Separate seatback from vehicle.
1 - SEAT BACK INSTALLATION (1) Position seatback on seat cushion frame.
(2) Install inboard seatback pivot bolt and washer.
(3) Install bolts attaching recliner to seat cushion
frame.
(4) Install side shield trim cover.
(5) Install seat. REMOVAL (1) Remove seat from vehicle.
(2) Remove side shield trim cover.
(3) Remove seatback.
(4) With the cushion side down, disengage the forward,
rearward and inboard J-straps.
(5) Disengage the clips attaching the outboard side
of the cover to the cushion frame.
(6) Turn the cushion over and roll the cover off the
cushion.
(7) Disengage the electrical connectors for the
heated seat, if equipped.
(8) Remove the hog rings attaching the cover to
the cushion support wires (Fig. 12).
(9) Separate the cover from the cushion. INSTALLATION (1) Position the cover on the cushion.
(2) Engage the electrical connectors for the heated
seat, if equipped.
(3) Install the hog rings attaching the cover to the
cushion support wires.
1 - SEAT CUSHION COVER (4) With the cushion side down, engage the forward,
rearward and inboard J-straps.
(5) Engage the clips attaching the outboard side of
the cover to the cushion frame.
(6) Install seatback.
(7) Install side shield trim cover.
(8) Install seat. REMOVAL (1) Remove side shield trim cover.
(2) Disengage seatback cover zipper.
(3) Roll outer seatback cover upward.
(4) Remove bolts attaching recliner to seatback
and seat cushion frames (Fig. 13).
(5) Separate recliner from seat. INSTALLATION (1) Position recliner on seat.
(2) Install bolts attaching recliner to seatback and
seat cushion frames (Fig. 13).
(3) Roll seatback cover downward.
(4) Engage seatback cover zipper.
(5) Install side shield trim cover. REMOVAL (1) Disengage seat cushion at rear by pulling
upward on release strap (Fig. 14).
(2) Tilt seat cushion forward.
(3) Disengage seat cushion latch with right side
release lever. Separate right side latch and left side
seat bracket from floor anchor bolts, and remove
cushion from vehicle (Fig. 15).
1 - SEAT BACK CUSHION
1 - REAR SEAT CUSHION INSTALLATION (1) Position seat cushion in vehicle.
(2) Insert left pivot in anchor grommet.
(3) Force right side latch onto anchor bolt and
pivot seat cushion to horizontal position.
(4) Lock seat cushion in-place by pressin
1 - SEAT BACK LATCH STRIKER BRACKET REMOVAL (1) Disengage the seat cushion at the rear by pulling
upward on the release strap.
(2) Tilt the seat cushion forward.
(3) Remove the shoulder/lap belt buckles from the
elastic straps.
(4) Release the seatback latch from the striker.
(5) Remove the pivot bolts and the washers from
the wheelhouse panel anchors (Fig. 15).
(6) Tilt the seatback forward, lift it upward and
remove it from the vehicle. INSTALLATION (1) Position the seatback in the vehicle.
(2) Install the pivot bolts and the washer. Tighten
the bolts with 33 N·m (25 ft. lbs.) torque.
(3) Engage the seatback latch with the striker.
(4) Insert the shoulder/lap belt buckles in the elastic
straps.
(5) Pivot the seat cushion to the horizontal position
and lock it in-place by pressing firmly on the
center of the cushion until the latch engages. REMOVAL (1) Remove the seat cushion from the vehicle.
(2) Remove the cover side, front and rear retaining
clips from the wire retainers with an appropriate
removal tool (Fig. 16).
(3) Remove the serrated retainers from the front
ends of the cover with a trim panel removal tool (Fig.
17).
(4) Remove the seat cover from the cushion.
1 - REMOVER TOOL
1 - CLIP REMOVER TOOL INSTALLATION (1) Position the replacement cover on the cushion.
(2) Compress the cover and attach the retaining
clips to the front and rear wire retainers.
(3) Install the serrated retainers at the ends of the
cover.
(4) Install the seat cushion in the vehicle. If necessary,
refer to the installation procedure. REMOVAL (1) Disengage seat cushion at the rear by pulling
upward on the release strap.
(2) Tilt seat cushion forward.
(3) Release seatback latch from striker.
(4) Tilt seatback forward for access to striker
bracket.
(5) Remove screws (Fig. 18) attaching latch striker
bracket and shims to trim panel.
1 - SEAT BACK LATCH STRIKER BRACKET INSTALLATION (1) Position shims and latch striker bracket on
trim panel.
(2) Install screws attaching latch striker bracket
and shims to trim panel. Tighten screws to 6 N·m (50
in. lbs.) torque.
(3) Engage seatback latch with striker. (4) Pivot seat cushion to horizontal position and
lock it in-place by pressing firmly on center of the
cushion until latch engages. REMOVAL (1) Remove the seatback from the vehicle.
(2) Remove the seatback latch release handle and
bezel from the seatback.
(3) Disengage the cover zippers.
(4) Disengage the J-strap attaching the cover to
the seat back frame (Fig. 19).
(5) Remove the cover from the seatback pad. INSTALLATION (1) Install the cover on the seatback.
(2) Attach the cover J-strap to the seatback frame.
(3) Engage the cover zippers.
(4) Install the seat latch release bezel and handle.
(5) Install the seatback in the vehicle.
1 - SEAT BACK SPECIAL TOOLS-SEATS
Removal and installation
Head restraint sleeve
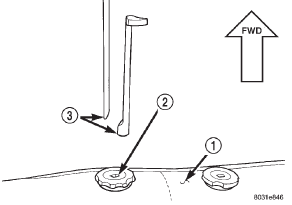
Fig. 1 Head Restraint Sleeve Extractor
2 - HEAD RESTRAINT SLEEVE
3 - EXTRACTOR TOOL 6773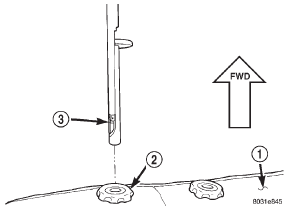
Fig. 2 Head Restraint Sleeve Extractor Installation
2 - HEAD RESTRAINT SLEEVE
3 - EXTRACTOR TOOL 6773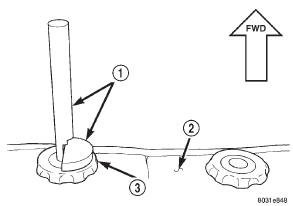
Fig. 3 Head Restraint Sleeve Extractor Positioning
2 - SEAT BACK
3 - LOCK RELEASE THUMBWHEELHead restraint cover
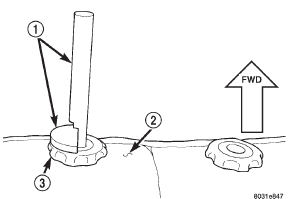
Fig. 4 Head Restraint Sleeve Extractor Positioning
2 - SEAT BACK
3 - LOCK RELEASE THUMBWHEEL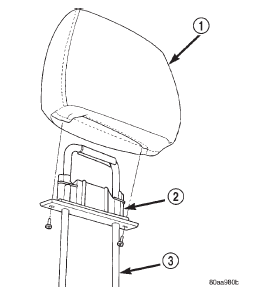
Fig. 5 Head Restraint
2 - BEZEL
3 - ADJUSTER BAR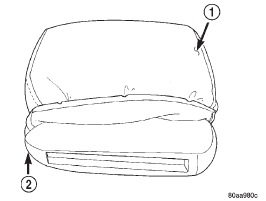
Fig. 6 Head Restraint Cover
2 - HEAD RESTRAINT CUSHIONBucket seat
Bucket seat track
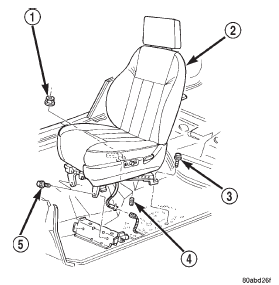
Fig. 7 Bucket Seat-Power Seat
2 - DRIVER SIDE FRONT SEAT
3 - SCREW
4 - STUD
5 - SCREWBucket seatback cover
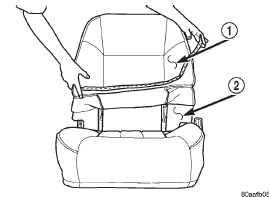
Fig. 8 Seatback Cover
2 - SEAT BACK CUSHION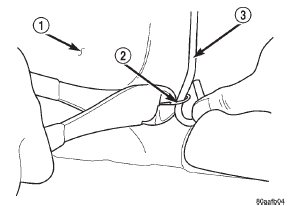
Fig. 9 Hog Ring
2 - HOG RING
3 - SUPPORT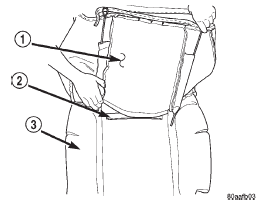
Fig. 10 Hook And Loop Fastener
2 - HOOK AND LOOP FASTENER
3 - SEAT BACK CUSBucket seatback
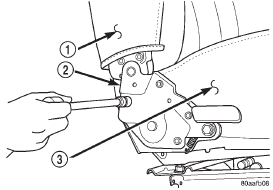
Fig. 11 Bucket Seatback
2 - RECLINER
3 - SEAT CUSHIONBucket seat cushion cover
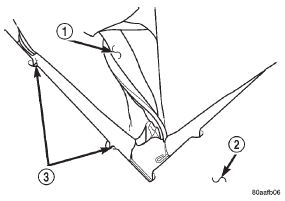
Fig. 12 Seat Cushion Cover Hog Rings
2 - SEAT CUSHION
3 - HOG RINGBucket seat recliner
Rear seat cushion

Fig. 13 Bucket Seat Recliner
2 - SEAT CUSHION
3 - REMOVE
4 - RECLINER HANDLE
5 - RECLINER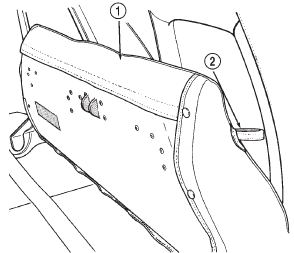
Fig. 14 Seat Cushion Release Strap
2 - RELEASE STRAP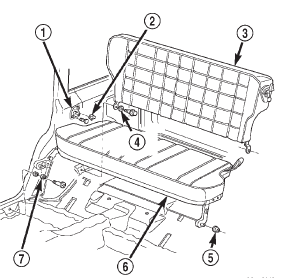
Fig. 15 Rear Seat Cushion/Seat Back
2 - SEAT BACK LATCH STRIKER
3 - SEAT BACK
4 - PIVOT SPACER
5 - GROMMET
6 - SEAT CUSHION
7 - BUSHINGRear seatback
Rear seat cushion cover

Fig. 16 Seat Cushion Cover Retaining Clip Removal
2 - SEAT COVER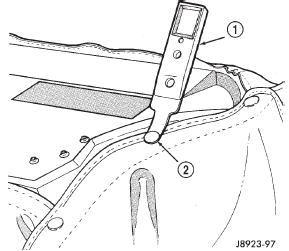
Fig. 17 Seat Cushion Cover Retaining Clip Removal
2 - SEAT COVER CLIPSRear seatback latch striker and
bumper
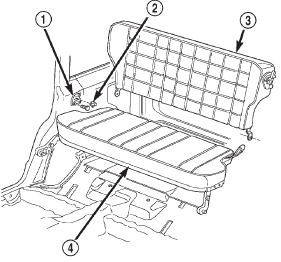
Fig. 18 Seatback Latch Striker Bracket
2 - SEAT BACK LATCH STRIKER
3 - SEAT BACK
4 - SEAT CUSHIONRear seatback cover
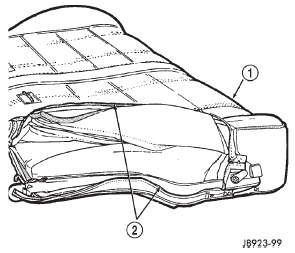
Fig. 19 Seatback Cover Removal
2 - COVER ZIPPERSpecial tools
 Stationary glass. Description and operation. Removal and installation

Other materials:
Removal and installation
Power seat switch
(1) Disconnect and isolate the battery negative
cable.
(2) Remove the three screws that secure the seat
cushion side shield to the outboard seat cushion
frame.
(3) Pull the seat cushion side shield away from the
seat cushion frame far enough to access the power
seat swit ...