Jeep Cherokee (XJ): Steering column opening cover. Knee blocker. Instrument panel center bezel
WARNING: ON VEHICLES EQUIPPED WITH AIRBAGS,
REFER TO GROUP 8M - PASSIVE
RESTRAINT SYSTEMS BEFORE ATTEMPTING ANY
STEERING WHEEL, STEERING COLUMN, OR
INSTRUMENT PANEL COMPONENT DIAGNOSIS OR
SERVICE. FAILURE TO TAKE THE PROPER PRECAUTIONS
COULD RESULT IN ACCIDENTAL AIRBAG
DEPLOYMENT AND POSSIBLE PERSONAL
INJURY. REMOVAL (1) Disconnect and isolate the battery negative
cable.
(2) If the vehicle is so equipped, move the tilt
steering column to the fully raised position.
(3) Remove the three screws that secure the lower
edge of the steering column opening cover to the
lower instrument panel reinforcement (Fig. 4).
1 - INSTRUMENT PANEL (4) Using a trim stick or another suitable wide
flat-bladed tool, gently pry the upper edge of the
steering column opening cover just below the cluster
bezel on each side of the steering column away from
the instrument panel far enough to disengage the
two snap clip retainers from the receptacles in the
instrument panel.
(5) Remove the steering column opening cover
from the instrument panel. INSTALLATION (1) Position the steering column opening cover to
the instrument panel.
(2) Align the snap clip retainers on the steering
column opening cover with the receptacles in the
instrument panel.
(3) Press firmly on the steering column opening
cover over the snap clip locations until each of the
snap clips is fully engaged in its receptacle.
(4) Install and tighten the three screws that secure
the lower edge of the steering column opening cover
to the lower instrument panel reinforcement. Tighten
the screws to 2.2 N·m (20 in. lbs.).
(5) Reconnect the battery negative cable. WARNING: ON VEHICLES EQUIPPED WITH AIRBAGS,
REFER TO GROUP 8M - PASSIVE
RESTRAINT SYSTEMS BEFORE ATTEMPTING ANY
STEERING WHEEL, STEERING COLUMN, OR
INSTRUMENT PANEL COMPONENT DIAGNOSIS OR
SERVICE. FAILURE TO TAKE THE PROPER PRECAUTIONS
COULD RESULT IN ACCIDENTAL AIRBAG
DEPLOYMENT AND POSSIBLE PERSONAL
INJURY. REMOVAL (1) Disconnect and isolate the battery negative
cable.
(2) Remove the steering column opening cover
from the instrument panel. Refer to Steering Column
Opening Cover in the Removal and Installation
section of this group for the procedures.
(3) Remove the two screws that secure the knee
blocker to the instrument panel (Fig. 5).
1 - KNEE BLOCKER (4) Pull the upper edge of the knee blocker away
from the instrument panel far enough to disengage
the two lower mounting tabs from the mounting slots
in the lower instrument panel reinforcement.
(5) Remove the knee blocker from the instrument
panel. INSTALLATION (1) Position the knee blocker to the instrument
panel.
(2) Install and tighten the four screws that secure
the knee blocker to the instrument panel. Tighten
the screws to 2.2 N·m (20 in. lbs.). Be certain that
the mounting screws are located in the screw hole on
each side of the steering column that is closest to the
driver side front door of the vehicle (Fig. 6).
1 - KNEE BLOCKER (3) Install the steering column opening cover onto
the instrument panel. Refer to Steering Column
Opening Cover in the Removal and Installation section
of this group for the procedures.
(4) Reconnect the battery negative cable. WARNING: ON VEHICLES EQUIPPED WITH AIRBAGS,
REFER TO GROUP 8M - PASSIVE
RESTRAINT SYSTEMS BEFORE ATTEMPTING ANY
STEERING WHEEL, STEERING COLUMN, OR
INSTRUMENT PANEL COMPONENT DIAGNOSIS OR
SERVICE. FAILURE TO TAKE THE PROPER PRECAUTIONS
COULD RESULT IN ACCIDENTAL AIRBAG
DEPLOYMENT AND POSSIBLE PERSONAL
INJURY. REMOVAL (1) Disconnect and isolate the battery negative
cable.
(2) Using a trim stick or another suitable wide
flat-bladed tool, gently pry the instrument panel center
bezel away from the instrument panel far enough
to disengage the six snap clip retainers that secure it
from the receptacles in the instrument panel (Fig. 7).
(3) Remove the center bezel from the instrument
panel. INSTALLATION (1) Position the center bezel to the instrument
panel.
(2) Align the snap clips on the center bezel with
the receptacles in the instrument panel.
1 - INSTRUMENT PANEL (3) Press firmly on the center bezel over each of
the snap clip locations until each of the six snap clips
is fully engaged in its receptacle on the instrument
panel.
(4) Reconnect the battery negative cable.Steering column opening cover
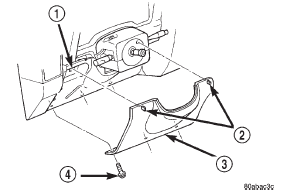
Fig. 4 Steering Column Opening Cover Remove/Install
2 - SNAP CLIPS
3 - STEERING COLUMN OPENING COVER
4 - SCREWKnee blocker
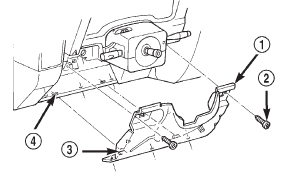
Fig. 5 Knee Blocker Remove/Install
2 - SCREW
3 - TAB
4 - SLOT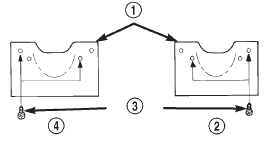
Fig. 6 Knee Blocker Mounting Screw Location
2 - RIGHT-HAND DRIVE
3 - SCREWS
4 - LEFT-HAND DRIVEInstrument panel center bezel
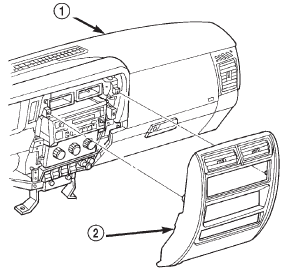
Fig. 7 Instrument Panel Center Bezel Remove/Install
2 - CENTER BEZEL

 Instrument panel accessory switch
bezel. Cigar lighter relay. Cluster bezel
Instrument panel accessory switch
bezel. Cigar lighter relay. Cluster bezel
Other materials:
Cargo area features
Cargo Load Floor
The cargo load floor system has a load capacity of 400 lbs
(181 kg).
To provide additional storage area, each rear seat can be
folded flat. This allows for extended cargo space and still
maintains some rear seating room. Refer to "Seats" in this
section for further informatio ...