Jeep Cherokee (XJ): Timing case cover. Timing chain and sprockets. Camshaft
REMOVAL (1) Disconnect battery negative cable.
(2) Remove accessory drive belt (Refer to Group
07, Cooling System for proper procedure)
(3) Remove the accessory drive brackets that are
attached to the timing case cover.
(4) Remove the fan and hub assembly and remove
the fan shroud.
(5) Remove the A/C compressor (if equipped) and
generator bracket assembly from the engine cylinder
head and move to one side.
(6) Remove the vibration damper (Fig. 63).
(7) Remove the oil pan-to-timing case cover bolts
and timing case cover-to-cylinder block bolts.
(8) Remove the timing case cover and gasket from
the engine.
(9) Pry the crankshaft oil seal from the front of the
timing case cover (Fig. 63).
1 - TIMING CASE COVER INSTALLATION (1) Clean the timing case cover, oil pan and cylinder
block gasket surfaces.
(2) Install a new crankshaft oil seal in the timing
case cover. The open end of the seal should be toward
the inside of the cover. Support the cover at the seal
area while installing the seal. Force it into position
with Seal Installation Tool 6139.
(3) Position the gasket on the cylinder block.
(4) Position the timing case cover on the oil pan
gasket and the cylinder block.
(5) Insert Timing Case Cover Alignment and Seal
Installation Tool 6139 in the crankshaft opening in
the cover (Fig. 64).
1 - TIMING CASE COVER ALIGNMENT AND SEAL
INSTALLATION TOOL (6) Install the timing case cover-to-cylinder block
and the oil pan-to-timing case cover bolts.
(7) Tighten the 1/4 inch cover-to-block bolts to 7
N·m (60 in. lbs.) torque. Tighten the 5/16 inch front
cover-to-block bolts to 22 N·m (192 in. lbs.) torque.
Tighten the oil pan-to-cover bolts to 9.5 N·m (84 in.
lbs.) torque.
(8) Remove the cover alignment tool.
(9) Apply a light film of engine oil on the vibration
damper hub contact surface of the seal.
(10) Apply Mopar Silicone Rubber Adhesive Sealant
to the keyway in the crankshaft and insert the
key. With the key inserted in the keyway in the
crankshaft, install the vibration damper, washer and
bolt. Lubricate and tighten the bolt to 108 N·m (80 ft.
lbs.) torque.
(11) Install the A/C compressor (if equipped) and
generator bracket assembly.
(12) Install the engine fan and hub assembly and
shroud.
(13) Install the accessory drive belt and tighten to
obtain the specified tension.
(14) Connect negative cable to battery. The chain drive system ie equipped with a timing
chain tensioner which reduces noise and prolongs
timing chain life. In addition, it compensates for
wear and temperature changes on the valve train for
proper engine operation. REMOVAL (1) Disconnect negative cable from battery.
(2) Remove the fan and shroud.
(3) Remove the serpentine drive belt.
(4) Remove the crankshaft vibration damper.
(5) Remove the timing case cover.
(6) Rotate crankshaft until the "0" timing mark is
closest to and on the center line with camshaft
sprocket timing mark (Fig. 65).
(7) Remove the oil slinger from the crankshaft.
(8) Remove the camshaft retaining bolt and
remove the sprockets and chain as an assembly (Fig.
66).
(9) To replace the timing chain tensioner, the oil
pan must be removed. INSTALLATION (1) Turn the tensioner lever to the unlocked (down)
position (Fig. 67).
(2) Pull the tensioner block toward the tensioner
lever to compress the spring. Hold the block and turn
the tensioner lever to the lock position (Fig. 67).
(3) Apply Mopar Silicone Rubber Adhesive Sealant
to the keyway in the crankshaft and insert the key.
With the key in the crankshaft keyway, install the
crankshaft, camshaft sprockets and timing chain.
Ensure the timing marks on the sprockets are properly
aligned (Fig. 65).
1 - TIMING MARKS
1 - CAMSHAFT SPROCKET (4) Install the camshaft sprocket retaining bolt
and washer. Tighten the bolt to 108 N·m (80 ft. lbs.)
torque.
(5) To verify correct installation of the timing
chain, turn the crankshaft to position the camshaft
sprocket timing mark as shown in (Fig. 68). Count
the number of chain pins between the timing marks
of both sprockets. There must be 20 pins.
(6) Turn the chain tensioner lever to the unlocked
(down) position (Fig. 67).
(7) Install the oil slinger.
(8) Replace the oil seal in the timing case cover.
(9) Install the timing case cover and gasket.
1 - LOCK
1 - CAMSHAFT SPROCKET (10) With the key inserted in the keyway in the
crankshaft, install the vibration damper, washer and
bolt. Lubricate and tighten the bolt to 108 N·m (80 ft.
lbs.) torque.
(11) Install the fan and shroud.
(12) Connect negative cable to battery. REMOVAL WARNING: THE COOLANT IN A RECENTLY OPERATED
ENGINE IS HOT AND PRESSURIZED.
RELEASE THE PRESSURE BEFORE REMOVING
THE DRAIN COCK, CAP AND DRAIN PLUGS.
(1) Disconnect negative cable from battery.
(2) Drain the cooling system. DO NOT waste reusable
coolant. If the solution is clean, drain it into a
clean container for reuse.
(3) Remove the radiator or radiator and condenser,
if equipped with A/C.
(4) Scribe a mark on the distributor housing in
line with the lip of the rotor.
(5) Scribe a mark on the distributor housing near
the clamp and continue the scribe mark on the cylinder
block in line with the distributor mark.
(6) For ease of installation, note the position of the
rotor and distributor housing in relation to adjacent
engine components.
(7) Remove the distributor and ignition wires.
(8) Remove the engine cylinder head cover.
(9) Remove the rocker arms, bridges and pivots.
(10) Remove the push rods.
(11) Remove the hydraulic valve tappets from the
engine cylinder head.
(12) Remove the vibration damper.
(13) Remove the timing case cover.
(14) Remove the timing chain and sprockets.
(15) Remove the camshaft (Fig. 69).
1 - CAMSHAFT INSTALLATION (1) Inspect the cam lobes for wear. (2) Inspect the bearing journals for uneven wear
pattern or finish.
(3) Inspect the bearings for wear.
(4) Inspect the distributor drive gear for wear.
(5) If the camshaft appears to have been rubbing
against the timing case cover, examine the oil pressure
relief holes in the rear cam journal. The oil
pressure relief holes must be free of debris.
(6) Lubricate the camshaft with Mopar Engine Oil
Supplement, or equivalent.
(7) Carefully install the camshaft to prevent damage
to the camshaft bearings (Fig. 69).
(8) Turn the tensioner lever to the unlocked (down)
position (Fig. 70).
(9) Pull the tensioner block toward the tensioner
lever to compress the spring. Hold the block and turn
the tensioner lever to the lock position (Fig. 70).
(10) Install the timing chain, crankshaft sprocket
and camshaft sprocket with the timing marks
aligned.
(11) Install the camshaft sprocket retaining bolt
and washer. Tighten the bolt to 108 N·m (80 ft. lbs.)
torque.
(12) Release the timing chain tensioner by moving
the lever to the unlock position (Fig. 70).
(13) Install the timing case cover with a replacement
oil seal (Fig. 71). Refer to Timing Case Cover
Installation.
(14) Install the vibration damper.
1 - LOCK (15) Install the hydraulic valve tappets.
(16) Install the push rods.
(17) Install the rocker arms, bridges and pivots.
(18) Install the engine cylinder head cover.
1 - TIMING CASE COVER (19) Position the oil pump gear. Refer to Distributor
in the Component Removal/Installation section of
Group 8D, Ignition Systems.
(20) Install the distributor and ignition wires.
Refer to Distributor in the Component Removal/Installation
section of Group 8D, Ignition Systems.
(21) Install the radiator or radiator and condenser,
if equipped with A/C.
(22) Fill the cooling system.
(23) Connect negative cable to battery.Timing case cover
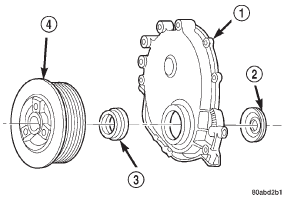
Fig. 63 Timing Case Cover Components
2 - OIL SLINGER
3 - CRANKSHAFT OIL SEAL
4 - VIBRATION DAMPER PULLEY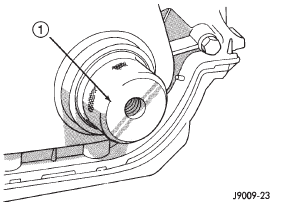
Fig. 64 Timing Case Cover Alignment and Seal Installation Tool 6139Timing chain and sprockets
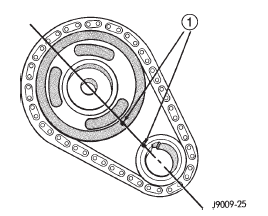
Fig. 65 Crankshaft-Camshaft Alignment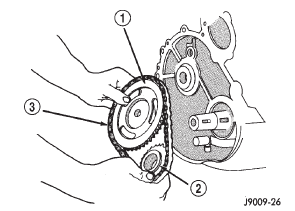
Fig. 66 Camshaft and Crankshaft Sprockets and Chain
2 - CRANKSHAFT SPROCKET
3 - CHAIN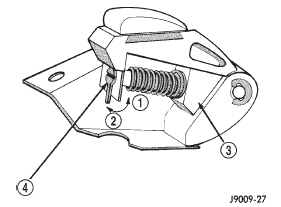
Fig. 67 Loading Timing Chain Tensioner
2 - UNLOCK
3 - TENSIONER BLOCK
4 - TENSIONER LEVER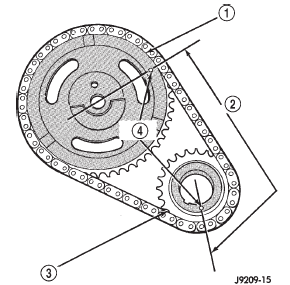
Fig. 68 Verify Sprocket-Chain Installation
2 - 20 PINS
3 - CRANKSHAFT SPROCKET
4 - TIMING MARKSCamshaft
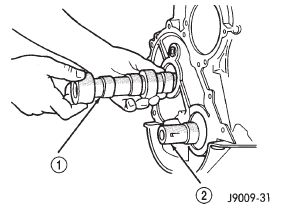
Fig. 69 Camshaft
2 - CRANKSHAFT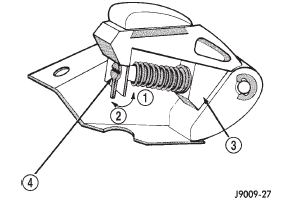
Fig. 70 Loading Timing Chain Tensioner
2 - UNLOCK
3 - TENSIONER BLOCK
4 - TENSIONER LEVER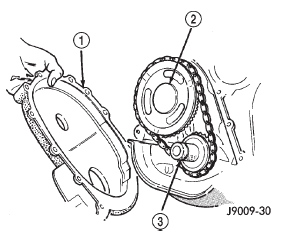
Fig. 71 Timing Case Cover
2 - CAMSHAFT
3 - CRANKSHAFT
 Hydraulic tappets. Vibration damper. Timing case cover oil seal

Other materials:
Maintenance schedules
SERVICE PROCEDURES
DESCRIPTION
Service and maintenance procedures for components
and systems listed in Schedule "A" or "B" can
be found by using the Group Tab Locator index at
the front of this manual. If it is not clear which
group contains the information needed, refer to the
index at the b ...