Jeep Cherokee (XJ): Transmission
DISASSEMBLY
(1) Remove torque converter.
(2) Remove clamps attaching wire harness and throttle cable (Fig. 95) to transmission.
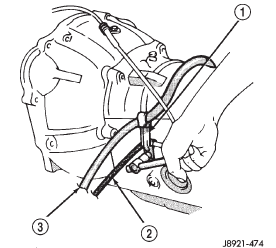
Fig. 95 Typical Harness And Cable Clamp Attachment
1 - CLAMP
2 - THROTTLE CABLE
3 - TRANSMISSION HARNESS
(3) Remove shift lever from manual valve shaft at left side of transmission.
(4) Remove park/neutral position switch.
(5) Remove speed sensor.
(6) Remove converter housing bolts and remove housing (Fig. 96) from case.
(7) Remove adapter housing, speedometer drive gear, and speed sensor rotor.
(8) Remove transmission oil pan, oil screen and screen gaskets (Fig. 97).

Fig. 96 Converter Housing Removal
1 - CONVERTER HOUSING
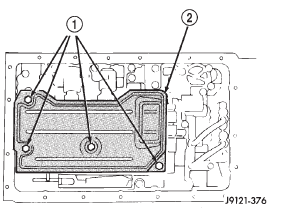
Fig. 97 Removing Oil Screen
1 - OIL SCREEN BOLTS
2 - OIL SCREEN
(9) Remove valve body oil feed tubes (Fig. 98).
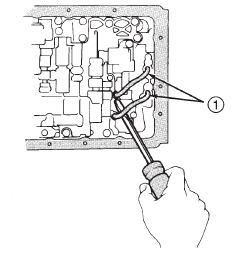
Fig. 98 Valve Body Oil Tube Removal
1 - OIL TUBES
(10) Disconnect valve body solenoid wires (Fig. 99).

Fig. 99 Solenoid Wire Location
1 - SOLENOID WIRE CONNECTORS
(11) Remove harness bracket bolt and remove harness and bracket (Fig. 100).
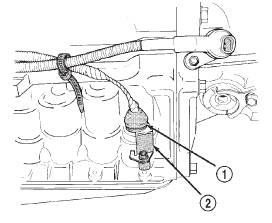
Fig. 100 Removing Bracket And Harness
1 - HARNESS ADAPTER
2 - BRACKET
(12) Remove valve body bolts (Fig. 101).
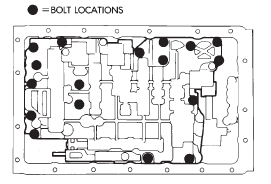
Fig. 101 Valve Body Bolt Locations
(13) Disconnect throttle cable from throttle cam (Fig. 102).
(14) Remove valve body from case. Then remove accumulator springs, check ball, and spring (Fig. 103).
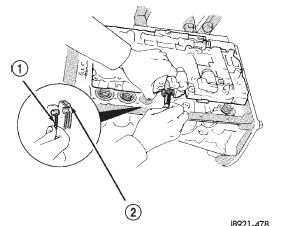
Fig. 102 Disconnecting Throttle Cable
1 - THROTTLE CABLE
2 - THROTTLE CAM
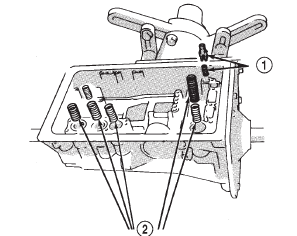
Fig. 103 Removing Accumulator Springs, Spacers
And Check Ball
1 - CHECK BALL AND SPRING
2 - ACCUMULATOR SPRINGS
(15) Remove second brake and clutch accumulator pistons with compressed air (Fig. 104). Apply air pressure through feed port and ease the pistons and springs out of the bore. Note and identify the original location of all springs.
(16) Remove overdrive brake accumulator piston with compressed air (Fig. 104). Note and identify the original location of all springs.
(17) Remove overdrive clutch accumulator piston with compressed air (Fig. 104).
(18) Remove throttle cable.
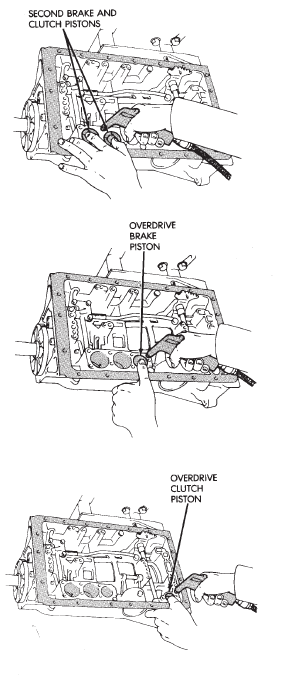
Fig. 104 Accumulator Piston Rem
(19) Remove oil pump bolts and remove pump with bridge-type Puller 7536 (Fig. 105).

Fig. 105 Oil Pump Removal
1 - PULLER TOOL
2 - OIL PUMP
(20) Remove race from oil pump (Fig. 106).
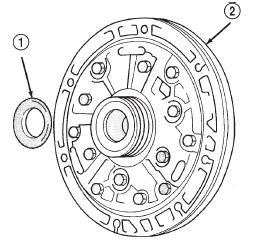
Fig. 106 Oil Pump Race Removal
1 - OIL PUMP RACE
2 - OIL PUMP
(21) Remove overdrive planetary gear and clutch assembly (Fig. 107).
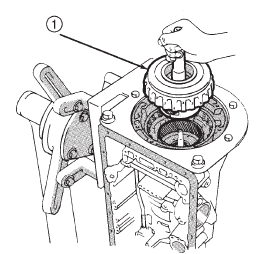
Fig. 107 Removing Overdrive Planetary And Clutch Assembly
1 - PLANETARY AND CLUTCH ASSEMBLY
(22) Remove race from overdrive planetary (Fig.
108).

Fig. 108 Fourth Gear Planetary Race Removal
1 - PLANETARY (OVERDRIVE)
2 - RACE
(23) Remove thrust bearing, race and overdrive planetary ring gear (Fig. 109).
(24) Measure stroke length of overdrive brake piston as follows:
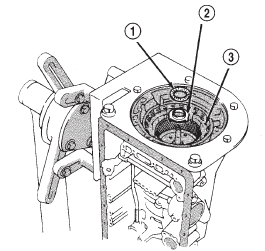
Fig. 109 Removing Bearing, Race And Planetary Ring Gear
1 - THRUST BEARING
2 - RACE
3 - OVERDRIVE PLANETARY RING GEAR
(a) Mount dial indicator on case using Miller Tool C-3339 and a suitable bolt threaded into the transmission case.
(b) Verify that the dial indicator is mounted solidly and square to the direction of the piston travel.
(c) Apply 57-114 psi air pressure through piston apply port and note piston stroke on dial indicator.
Stroke length should be: 1.40 - 1.70 mm (0.055 - 0.0699 in.).
(d) Record the reading for use during re-assembly.
(e) Remove the dial indicator set-up from the transmission.
(25) Measure stroke length of second coast brake piston rod as follows: (a) Install a small wire tie strap around the second coast brake piston rod tight against the transmission case.
(b) Apply 57-114 psi air pressure through piston feed hole and check stroke length with Gauge Tool 7552.
(c) Stroke length should be 1.5 - 3.0 mm (0.059 - 0.118 in.).
(d) Record the reading for use during re-assembly.
(26) Remove the bolt holding the input speed sensor to the transmission case.
(27) Remove the input speed sensor from the transmission case.
(28) Remove overdrive brake pack snap ring (Fig.
110).
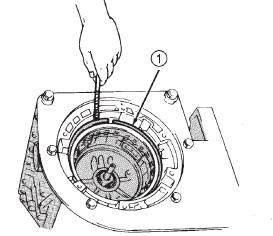
Fig. 110 Removing Overdrive Brake Pack Snap Ring
1 - OVERDRIVE BRAKE SNAP RING
(29) Remove overdrive brake pack discs and plates. Inspect and replace as necessary.
(30) Remove overdrive support lower race and upper bearing and race assembly (Fig. 111).
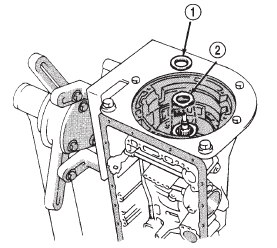
Fig. 111 Overdrive Support Bearing/Race Removal
1 - UPPER BEARING AND RACE
2 - LOWER RACE
(31) Remove overdrive support snap ring with Snap Ring Plier Tool 7540 (Fig. 112).
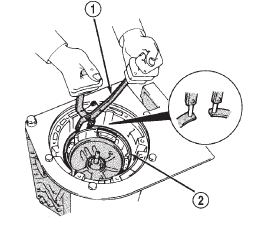
Fig. 112 Overdrive Support Snap Ring Removal/Installation
1 - SNAP RING PLIERS
2 - SUPPORT SNAP RING
(32) Remove overdrive support bolts (Fig. 113).
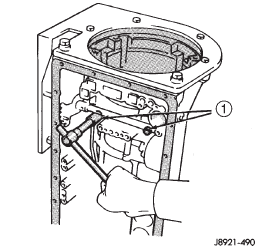
Fig. 113 Overdrive Support Bolt Removal
1 - SUPPORT BOLTS
(33) Remove overdrive support (Fig. 114) with bridge-type Puller 7536.
(34) Remove race from hub of overdrive support (Fig. 115).
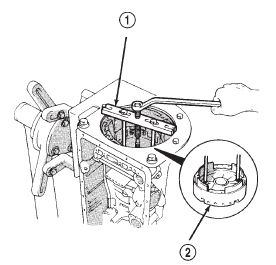
Fig. 114 Removing Overdrive Support
1 - BRIDGE-TYPE PULLER TOOL
2 - OVERDRIVE SUPPORT
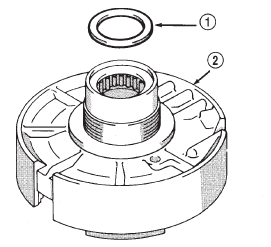
Fig. 115 Remove Overdrive Support Race
1 - RACE
2 - OVERDRIVE SUPPORT
(35) Remove second coast brake piston snap ring with Snap Ring Plier Tool 7540. Then remove piston cover and piston assembly.
(36) Disassemble second coast brake piston (Fig.
116), if necessary.
(37) Remove direct and forward clutch assembly (Fig. 117).
(38) Remove thrust bearing and race from clutch hub (Fig. 118).
(39) Remove second coast brake band E-ring from band pin and remove pin and brake band (Fig. 119).
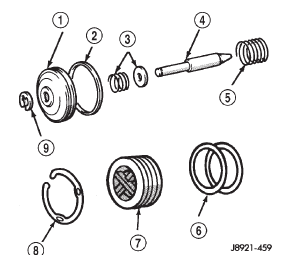
Fig. 116 Second Coast Brake Piston Components
1 - SERVO PISTON
2 - SEAL RING
3 - SPRING AND RETAINER
4 - PISTON ROD
5 - PISTON SPRING
6 - SERVO COVER O-RINGS
7 - SERVO COVER
8 - SNAP RING
9 - E-RING
Fig. 117 Removing Direct And Forward Clutch Assembly
1 - DIRECT AND FORWARD CLUTCH ASSEMBLY
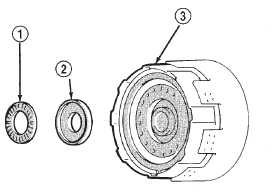
Fig. 118 Bearing And Race Removal From Clutch Hub
1 - BEARING
2 - RACE
3 - DIRECT CLUTCH
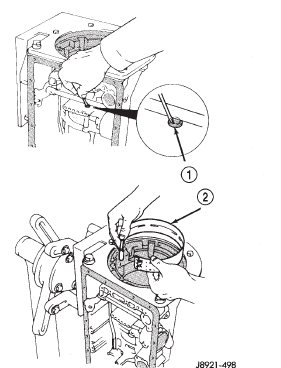
Fig. 119 Second Coast Brake Band Removal
1 - BRAKE BAND E-RING
2 - SECOND COAST BRAKE BAND
(40) Remove front planetary bearing race and remove front planetary ring gear (Fig. 120).
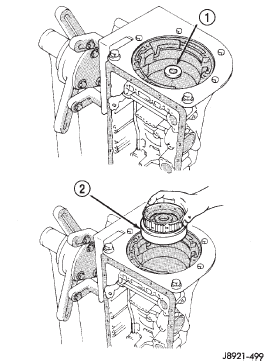
Fig. 120 Front Planetary Ring Gear Removal
1 - RING GEAR BEARING RACE (FRONT)
2 - FRONT PLANETARY RING GEAR
(41) Remove thrust bearing and rear race from ring gear (Fig. 121).
(42) Remove planetary thrust race.
(43) Push forward on output shaft to relieve the load on the planetary snap ring.
(44) Remove planetary snap ring and remove planetary gear (Fig. 122).
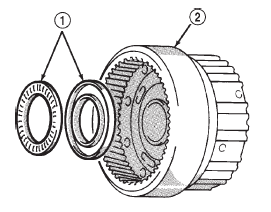
Fig. 121 Removing Ring Gear Bearing And Rear Race
1 - BEARING AND REAR RACE
2 - FRONT PLANETARY RING GEAR
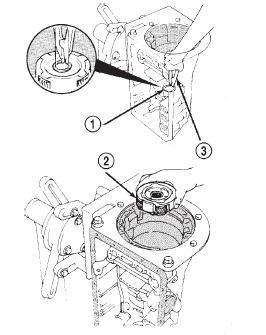
Fig. 122 Removing Planetary Snap Ring And Gear
1 - PLANETARY SNAP RING
2 - PLANETARY GEAR
3 - SNAP RING PLIERS
(45) Remove sun gear, input drum, one-way clutch, and thrust washer as assembly (Fig. 123).

Fig. 123 Removing Sun Gear, Input Drum And One-Way Clutch
1 - SUN GEAR INPUT DRUM, ONE-WAY CLUTCH ASSEMBLY
(46) Measure second brake clutch pack clearance (Fig. 124). Clearance should be 0.62 - 1.98 mm (0.0244 - 0.0780 in.). Record measurement for use during re-assembly.
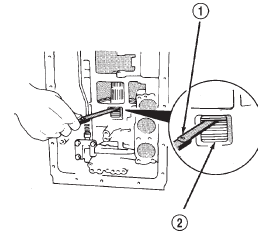
Fig. 124 Checking Second Brake Clutch Pack
Clearance
1 - FEELER GAUGE
2 - SECOND BRAKE CLUTCH PACK
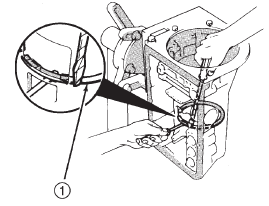
Fig. 125 Removing Second Brake Clutch Pack Snap Ring
1 - CLUTCH PACK SNAP RING
(48) Remove second brake clutch pack (Fig. 126).
Inspect and replace as necessary.

Fig. 126 Removing/Measuring Second Brake Clutch Disc Thickness
(49) Remove bolts attaching park rod bracket to case. Then disconnect park rod from manual shaft lever and remove rod and bracket (Fig. 127).

Fig. 127 Removing Park Rod And Bracket
1 - PARK ROD BRACKET
2 - SHIFT SETOR
(50) Remove park pawl spring, pin and pawl (Fig.
128).
(51) Measure clearance of first-reverse brake clutch pack (Fig. 129). Clearance should be: 0.70 - 1.2 mm (0.028 - 0.047 in.). record measurement for use during re-assembly.
(52) Remove second brake piston sleeve (Fig. 130).
(53) Remove second brake snap-ring.
(54) Remove rear planetary gear, second brake drum and output shaft as an assembly (Fig. 131).
(55) Remove planetary and brake drum thrust bearing and race assembly (Fig. 132).
(56) Remove second brake drum gasket from case with screwdriver.
(57) Measure inside diameter of transmission case rear bushing with bore gauge or inside micrometer (Fig. 133). Maximum allowable diameter is 38.18 mm (1.5031 in.). Replace transmission case if bushing I. D. is greater than specified. Bushing is not serviceable.
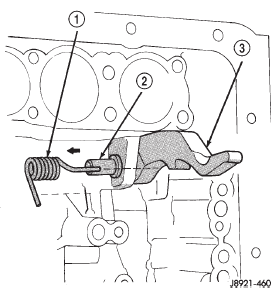
Fig. 128 Removing Park Pawl, Pin And Spring
1 - SPRING
2 - PIN
3 - PARK PAWL
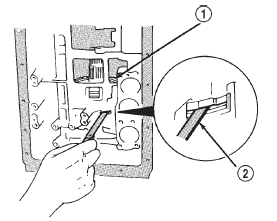
Fig. 129 Checking First-Reverse Brake Clutch Pack Clearance
1 - FIRST-REVERSE CLUTCH PACK
2 - FEELER GAUGE
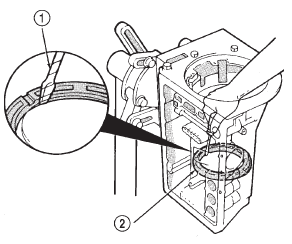
Fig. 130 Removing Second Brake Piston Sleeve
1 - REMOVER TOOL
2 - PISTON SLEEVE
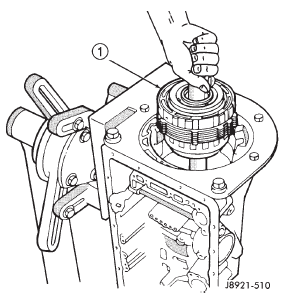
Fig. 131 Removing Rear Planetary, Second Brake Drum And Output Shaft
1 - PLANETARY, BRAKE DRUM AND OUTPUT SHAFT ASSEMBLY
(58) Check first/reverse brake piston operation with compressed air (Fig. 134). Piston should move smoothly and not bind or stick. If piston operation is incorrect, case or piston may require replacement.
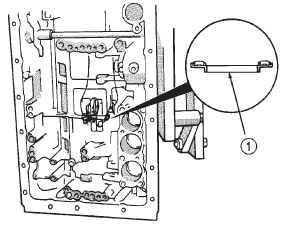
Fig. 132 Removing/Installing Bearing And Race Assembly
1 - BEARING AND RACE ASSEMBLY
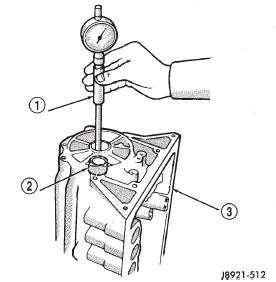
Fig. 133 Checking Rear Bushing Inside Diameter
1 - BORE GAUGE
2 - REAR BUSHING
3 - TRANSMISSION CASE
(59) Compress piston return springs with Tool 7539 and remove piston snap ring (Fig. 135).
(60) Remove Tool 7539 and remove piston return springs.
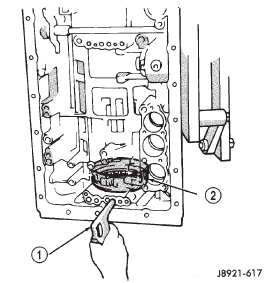
Fig. 134 Checking First-Reverse Brake Piston Operation
1 - LOW-PRESSURE AIR
2 - FIRST-REVERSE BRAKE (IN CASE)
(61) Remove No. 2 first-reverse brake piston with compressed air. Apply air through same transmission feed hole used for checking piston operation.
(62) Remove reaction sleeve with Sleeve Remover Tool 7542 (Fig. 136). Insert tool flanges under sleeve and lift tool and sleeve out of case.
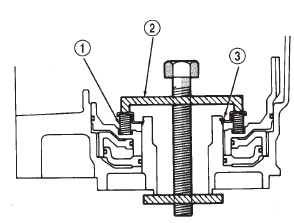
Fig. 135 Removing/Installing Piston Snap Ring
1 - RETURN SPRINGS
2 - COMPRESSOR TOOL
3 - PISTON SNAP RING
Fig. 136 Removing/Installing Reaction Sleeve
1 - REACTION SLEEVE
2 - TOOL
(63) Remove No. 1 first/reverse brake piston with Piston Puller 7543 (Fig. 137). Slip tool under piston and lift tool and piston out of case.
Fig. 137 Removing/Installing First-Reverse Brake No.1 Piston
1 - NO. 1 PISTON
2 - TOOL
ASSEMBLY
(1) During assembly, lubricate components with transmission fluid or petroleum jelly as indicated.
(2) Verify thrust bearing and race installation during assembly. Refer to the Thrust Bearing Chart (Fig. 138) for bearing and race location and correct positioning.
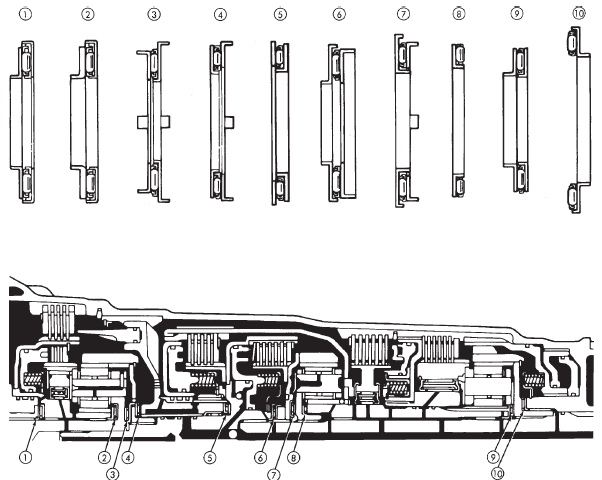
Fig. 138 Thrust Bearing Chart
(3) Install new seals onto the No.1 first-reverse brake piston. Lubricate seals with transmission fluid.
(4) Install the No.1 first-reverse brake piston into the transmission case.
(5) Install new seal onto the first-reverse brake piston reaction sleeve. Lubricate seals with transmission fluid.
(6) Install the first-reverse brake piston reaction sleeve into the transmission case.
(7) Install new seal onto the No.2 first-reverse brake piston. Lubricate seals with transmission fluid.
(8) Install the No.2 first-reverse brake piston into the transmission case.
(9) Install the spring plate into the No.2 first-reverse brake piston.
(10) Install Spring Compressor 7539 onto the firstreverse brake piston.
(11) Compress the first-reverse brake piston spring and install the first-reverse brake piston snap-ring.
(12) Remove Spring Compressor 7539.
(13) Install rear planetary gear, second brake drum and output shaft as outlined in following steps: (14) Verify No. 10 thrust bearing and race (Fig.
138). Bearing and race outer diameter is 57.7 mm (2.272 in.) and inside diameter is 39.2 mm (1.543 in.).
(15) Coat thrust bearing and race assembly with petroleum jelly and install in case (Fig. 139). Race faces down. Bearing rollers face up.
(16) Align teeth of second brake drum and clutch pack (Fig. 140).
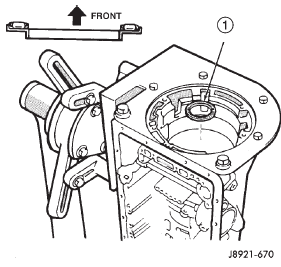
Fig. 139 Installing Thrust Bearing And No. 10 Race
1 - THRUST BEARING AND RACE
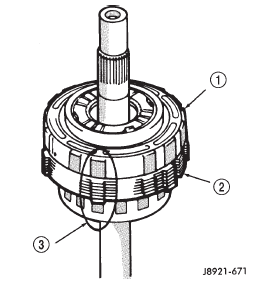
Fig. 140 Aligning Second Brake Drum And Clutch Pack Teeth
1 - SECOND BRAKE DRUM
2 - CLUTCH PACK
3 - ALIGN DRUM AND CLUTCH PACK TEETH
(17) Align rear planetary-output shaft assembly teeth with case slots and install assembly in case (Fig. 141).
(18) Install rear planetary snap ring with snap ring pliers. Chamfered side of snap ring faces up and toward case front (Fig. 142).
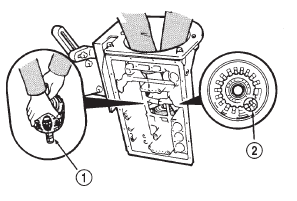
Fig. 141 Output Shaft/Rear Planetary Assembly Installation
1 - ALIGN CLUTCH/DRUM TEETH WITH CASE SLOTS
2 - CASE SLOTS
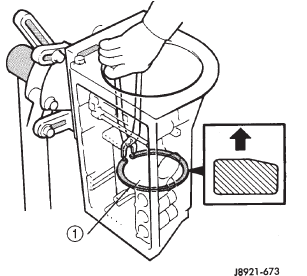
Fig. 142 Planetary Snap Ring Installation
1 - REAR PLANETARY SNAP RING
(19) Check first-reverse brake pack clearance with feeler gauge (Fig. 143). Clearance should be 0.70 - 1.20 mm (0.028 - 0.047 in.). If clearance is incorrect, planetary assembly, thrust bearing or snap ring is not properly seated in case. Remove and reinstall components if necessary.
(20) Install second brake piston sleeve (Fig. 144).
Sleeve lip faces up and toward case front as shown.
(21) Install second brake drum gasket.
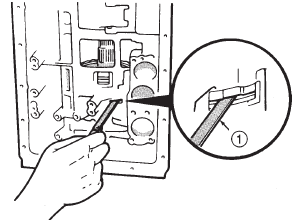
Fig. 143 Checking First-Reverse Brake Pack Clearance
1 - FEELER GAUGE
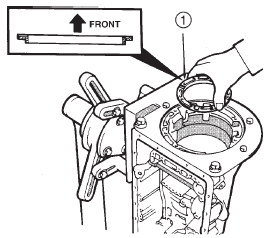
Fig. 144 Second Brake Piston Sleeve Installation
1 - PISTON SLEEVE
(22) Install park lock pawl, spring and pin (Fig.
145).
(23) Install the manual valve shift assembly.
(24) Connect park lock rod to manual valve shift sector (Fig. 146).
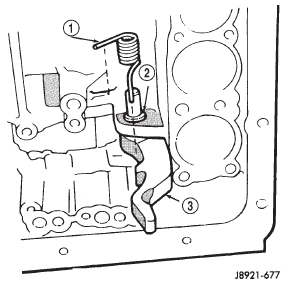
Fig. 145 Park Lock Pin, Spring And Pawl Installation
1 - SPRING
2 - PIN
3 - PAWL
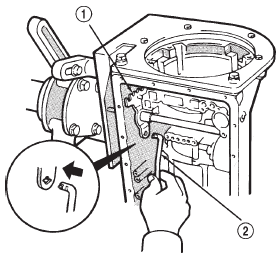
Fig. 146 Park Lock Rod Installation
1 - SHIFT SECTOR
2 - PARK LOCK ROD
(25) Position park lock rod bracket on case and tighten bracket attaching bolts to 10 N·m (7 ft. lbs.) torque (Fig. 147).
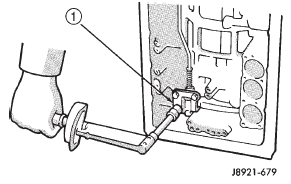
Fig. 147 Park Rod Bracket Installation
1 - PARK ROD BRACKET
(26) Verify park lock operation. Move shift sector to Park position. Park pawl should be firmly engaged (locked) in planetary ring gear (Fig. 148).
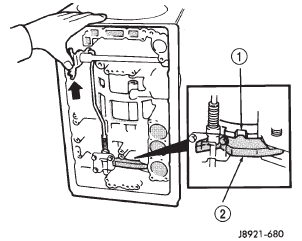
Fig. 148 Checking Park Pawl Engagement
1 - REAR PLANETARY RING GEAR
2 - PARK PAWL
(27) Install No. 1 one-way clutch (Fig. 149). Short flanged side of clutch faces up and toward case front.
(28) Install second brake pack (Fig. 150). Install disc then plate. Continue installation sequence until five discs and five plates are installed.
(29) Install second brake pack retainer with rounded edge of retainer facing disc.
(30) Install second brake pack snap ring.
Fig. 149 Installing No. 1 One-Way Clutch
1 - NO. 1 ONE-WAY CLUTCH
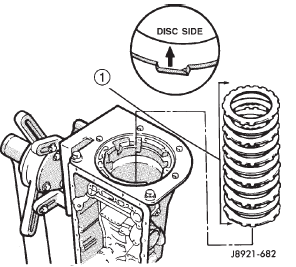
Fig. 150 Second Brake Pack Installation
1 - SECOND BRAKE PA
(31) Check brake pack clearance with feeler gauge (Fig. 151). Clearance should be 0.062 - 1.98 mm (0.024 - 0.078 in.). If brake pack clearance is not correct, brake pack components are not seated. Reassemble brake pack if necessary.
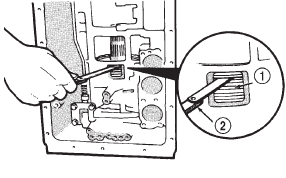
Fig. 151 Checking Second Brake Pack Clearance
1 - BRAKE PACK
2 - FEELER GAUGE
(32) Install planetary sun gear and input drum (Fig. 152). Be sure drum thrust washer tabs are seated in drum. Use petroleum jelly to hold thrust washer in position if necessary.
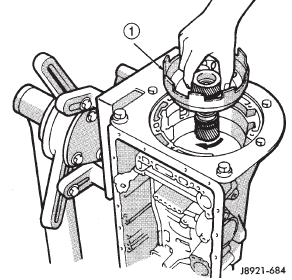
Fig. 152 Installing Sun Gear And Input Drum
1 - SUN GEAR AND INPUT DRUM
(33) Install front planetary gear on sun gear (Fig.
153).
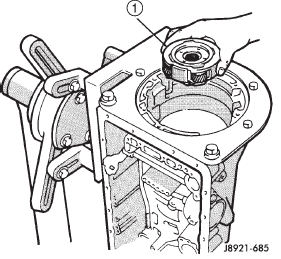
Fig. 153 Installing Front Planetary Gear
1 - FRONT PLANETARY GEAR
(34) Support output shaft with wood blocks (Fig.
154).
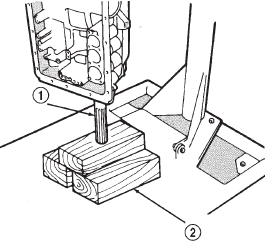
Fig. 154 Supporting Output Shaft
1 - OUTPUT SHAFT
2 - WOOD BLOCKS
(35) Install planetary snap ring on sun gear with snap ring plier tool 7541 (Fig. 155).
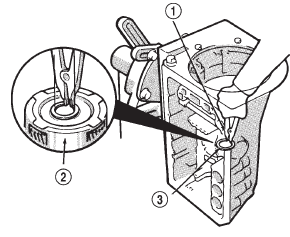
Fig. 155 Installing Front Planetary Snap Ring
1 - SNAP RING PLIER TOOL
2 - FRONT PLANETARY
3 - SNAP RING
(36) Install tabbed thrust race on front planetary gear. Washer tabs face down and toward gear. Race outer diameter is 47.8 mm (1.882 in.). Inside diameter is 34.3 mm (1.350 in.).
(37) Install second coast brake band (Fig. 156).
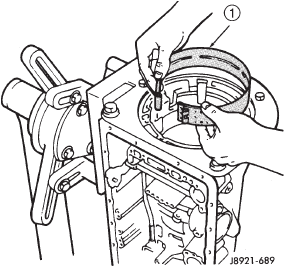
Fig. 156 Installing Second Coast Brake Band
1 - SECOND COAST BRAKE BAND
(38) Install pin in second coast brake band. Then install retaining ring on pin (Fig. 157).
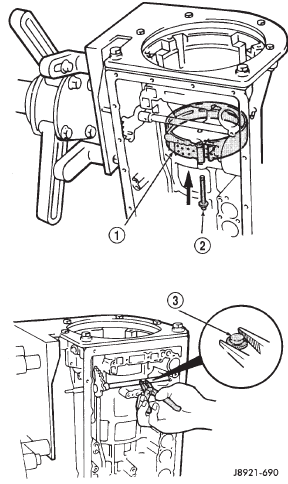
Fig. 157 Installing Second Coast Brake Band Retaining Pin
1 - SECOND COAST BRAKE BAND
2 - BAND RETAINING PIN
3 - RETAINING RING (INSTALL ON PIN)
(39) Install thrust bearing and race in forward-direct clutch (Fig. 158). Coat bearing/race with petroleum jelly to hold them in place.
(40) Verify forward-direct clutch thrust bearing size.
- Race outer diameter is 48.9 mm (1.925 in.) and inside diameter is 26.0 mm (1.024 in.).
- Bearing outer diameter is 46.7 mm (1.839 in.) and inside diameter is 26.0 mm (1.024 in.).
(41) Coat front planetary ring gear race with petroleum jelly and install it in ring gear (Fig. 159).
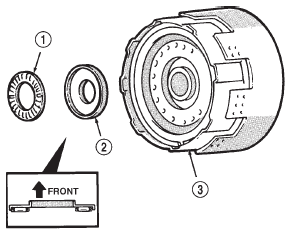
Fig. 158 Installing Forward-Direct Clutch Thrust Bearing And Race
1 - THRUST BEARING
2 - RACE
3 - FORWARD-DIRECT CLUTCH ASSEMBLY
(42) Verify ring gear race size. Outer diameter is 47.0 mm (1.850 in.) and inside diameter is 26.5 mm (1.045 in.).
Fig. 159 Installing Planetary Ring Gear Race
1 - PLANETARY RING GEAR
2 - THRUST RACE
(43) Align forward-direct clutch disc splines with screwdriver (Fig. 160).
(44) Align and install front planetary ring gear in forward-direct clutch (Fig. 161).
(45) Coat bearing and race with petroleum jelly and install them in ring gear (Fig. 162). Verify bearing/ race size.
- Bearing outer diameter is 47.7 mm (1.878 in.) and inside diameter is 32.6 mm (1.283 in.).
- Race outer diameter is 53.6 mm (2.110 in.) and inside diameter is 30.6 mm (1.205 in.).
(46) Install assembled planetary gear/forward-direct clutch (Fig. 163).
Fig. 160 Aligning Forward-Direct Clutch Splines
1 - CLUTCH SPLINE ALIGNING TOOL
2 - FORWARD-DIRECT CLUTCH
Fig. 161 Installing Front Planetary Ring Gear
1 - RING GEAR
2 - FORWARD-DIRECT CLUTCH
(47) Check clearance between sun gear input drum and direct clutch drum (Fig. 164). Clearance should be 9.8 - 11.8 mm (0.386 - 0.465 in.). If clearance is incorrect, planetary gear/forward-direct clutch assembly is not seated or is improperly assembled.
Remove, and correct if necessary.
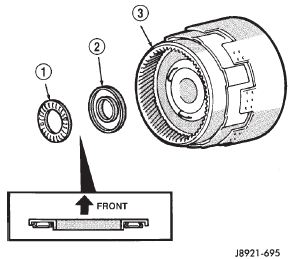
Fig. 162 Installing Ring Gear Bearing And Race
1 - THRUST BEARING
2 - RACE
3 - PLANETARY RING GEAR

Fig. 163 Installing Front Planetary And Forward-Direct Clutch Assembly
1 - FRONT PLANETARY AND FOWARD-DIRECT CLUTCH ASSEMBLY
(48) Coat thrust bearing and race assembly with petroleum jelly and install it on clutch shaft. Bearing faces up and toward case front as shown. Verify bearing/ race size. Bearing and race outer diameter is 47.8 mm (1.882 in.) and inside diameter is 33.6 mm (1.301 in.).
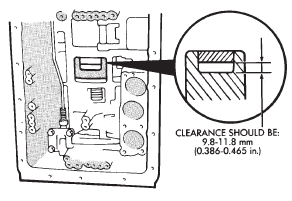
Fig. 164 Checking Input Drum-To-Direct Clutch Drum Clearance
(49) Assemble second coast brake piston components (Fig. 165).
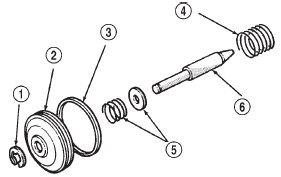
Fig. 165 Assembling Second Coast Brake Piston
1 - E-CLIP
2 - PISTON
3 - O-RING
4 - PISTON SPRING
5 - SPRING AND RETAINER
6 - PISTON ROD
(50) Install assembled second coast brake piston in case. Verify that the piston rod contacts the second coast brake band.
(51) Install replacement seals on second coast brake piston cover and install cover in case.
(52) Install second coast brake piston snap ring with snap ring plier tool (Fig. 166).
(53) Check second coast brake piston stroke as follows:
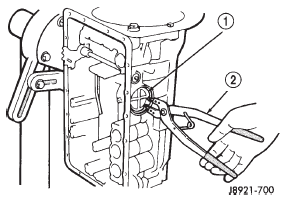
Fig. 166 Installing Second Coast Brake Piston Snap Ring
1 - PISTON SNAP RING
2 - SNAP RING TOOL
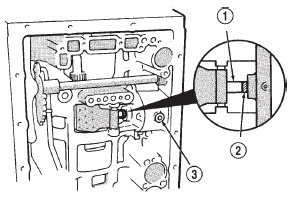
Fig. 167 Marking Brake Piston Rod
1 - BRAKE PISTON ROD
2 - REFERENCE MARK
3 - PISTON FEED HOLE
(a) Install a small wire tie strap around the second coast brake piston rod tight against the transmission case.
(b) Apply 57-114 psi air pressure through piston feed hole and check stroke length with Gauge Tool 7552.
(c) Stroke length should be 1.5 - 3.0 mm (0.059 - 0.118 in.).
(d) If stroke length is incorrect, piston, cover or snap ring is not seated. Reassemble and check stroke again if necessary.
(54) Coat thrust race and tabbed washer with petroleum jelly and install them on overdrive support (Fig. 169). Verify race size. Race outer diameter is 50.9 mm (2.004 in.) and inside diameter is 36.2 mm (1.426 in.).
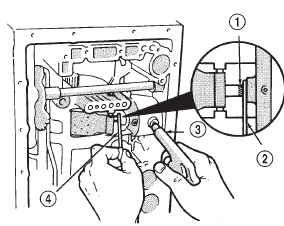
Fig. 168 Checking Second Coast Brake Piston Stroke
1 - PISTON ROD REFERENCE MARK
2 - GAUGE TOOL
3 - AIR GUN
4 - GAUGE TOOL
(55) Install overdrive support in case. Use two long bolts to help align and guide support into position (Fig. 170).
(56) Install overdrive support snap ring with Snap Ring Plier Tool 7540 (Fig. 171). Chamfered side of snap ring faces up and toward case front. Snap ring ends must be aligned with case opening with ring ends approximately 24 mm (0.94 in.) from center line of case opening.
(57) Install and tighten overdrive support bolts to 25 N·m (19 ft. lbs.) torque (Fig. 172).
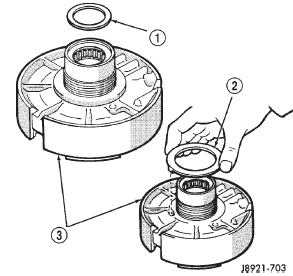
Fig. 169 Installing Overdrive Support Thrust Race And Washer
1 - THRUST RACE
2 - TABBED THRUST WASHER
3 - OVERDRIVE SUPPORT
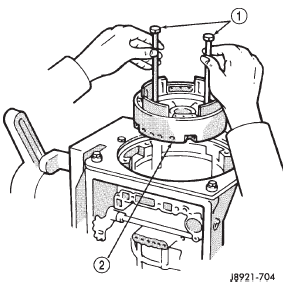
Fig. 170 Installing Overdrive Support
1 - USE LONG BOLTS TO INSTALL SUPPORT
2 - OVERDRIVE SUPPORT
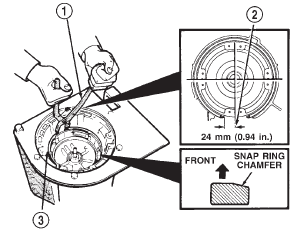
Fig. 171 Installing Overdrive Support Snap Ring
1 - SNAP RING TOOL
2 - SNAP RING ENDS CENTERED IN CASE OPENING
3 - SNAP RING
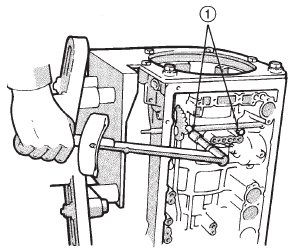
Fig. 172 Installing Overdrive Support Bolts
1 - OVERDRIVE SUPPORT BOLTS
(58) Check output shaft end play with dial indicator (Fig. 173). End play should be 0.27 - 0.86 mm (0.0106 - 0.0339 in.).
(59) If output shaft end play is incorrect, one or more of installed components is not seated. Reassemble as necessary and check end play again.
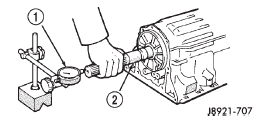
Fig. 173 Checking Output Shaft End Play
1 - DIAL INDICATOR
2 - OUTPUT SHAFT
(60) Install overdrive brake clutch pack (Fig. 174).
Install thickest clutch plate first. Rounded edge of plate faces up. Install first disc followed by another plate until four discs and three plates are installed.
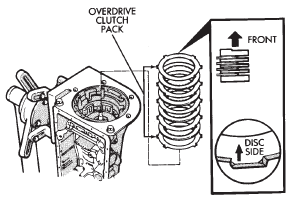
Fig. 174 Installing Overdrive Brake Clutch Pack
(61) Install stepped ring retainer plate with flat side facing disc. Then install brake pack snap ring (Fig. 175).
(62) Check overdrive brake piston stroke as follows: (a) Mount dial indicator on case using Miller Tool C-3339 and a suitable bolt threaded into the transmission case.
(b) Verify that the dial indicator is mounted solidly and square to the direction of the piston travel.
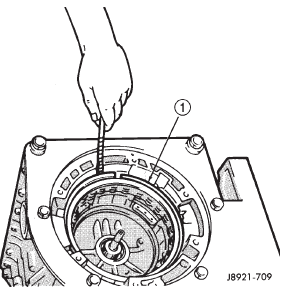
Fig. 175 Installing Overdrive Brake Snap Ring
1 - CLUTCH PACK SNAP RING
(c) Apply 57-114 psi air pressure through piston apply port and note piston stroke on dial indicator.
Stroke length should be: 1.40 - 1.70 mm (0.055 - 0.0699 in.).
(d) If stroke is incorrect, brake pack or piston is installed incorrectly. Check and correct as necessary and measure piston stroke again.
(e) Remove the dial indicator set-up from the transmission.
(63) Coat overdrive lower race, thrust bearing and upper race with petroleum jelly and install them in overdrive support (Fig. 176). Be sure races and bearing are assembled and installed as shown.
(64) Verify bearing/race sizes before proceeding.
Bearing race sizes are:
- Outer diameter of lower race is 47.8 mm (1.882 in.) and inside diameter is 34.3 mm (1.350 in.).
- Outer diameter of bearing is 47.7 mm (1.878 in.) and inside diameter is 32.7 mm (1.287 in.).
- Outer diameter of upper race is 47.8 mm (1.882 in.) and inside diameter is 30.7 mm (1.209 in.).
(65) Install overdrive planetary ring gear in support (Fig. 177).
(66) Coat ring gear thrust race and thrust bearing assembly with petroleum jelly and install them in gear (Fig. 178).
(67) Verify bearing/race size before proceeding.
- Outer diameter of ring gear race-bearing is 47.8 mm (1.882 in.) and inside diameter is 24.2 mm (0.953 in.).

Fig. 176 Installing Overdrive Support Thrust Bearing And Races
1 - THRUST BEARING
2 - UPPER RACE
3 - LOWER RACE
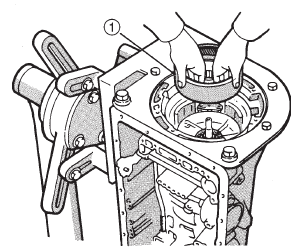
Fig. 177 Installing Overdrive Planetary Ring Gear
1 - OVERDRIVE PLANETARY RING GEAR
- Outer diameter of bearing is 46.8 mm (1.844 in.) and inside diameter is 26.0 mm (1.024 in.).
(68) Coat tabbed thrust race with petroleum jelly and install it on planetary gear (Fig. 179). Race outer diameter is 41.8 mm (1.646 in.) and inside diameter is 27.1 mm (1.067 in.).
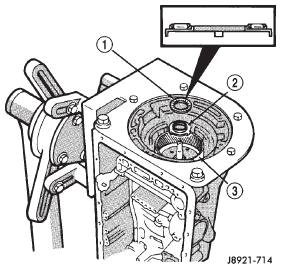
Fig. 178 Installing Ring Gear Thrust Bearing And Race
1 - THRUST BEARING-RACE ASSEMBLY
2 - THRUST RACE (TABBED)
3 - OVERDRIVE PLANETARY RING GEAR
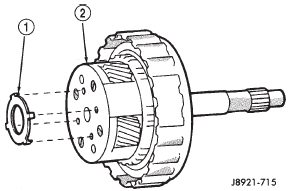
Fig. 179 Installing Planetary Thrust Race
1 - THRUST RACE (TABBED)
2 - OVERDRIVE PLANETARY
(69) Install assembled overdrive planetary gear and clutch (Fig. 180).
(70) Coat thrust bearing and race assembly with petroleum jelly and install it on clutch input shaft (Fig. 181). Bearing and race outer diameter is 50.2 mm (1.976 in.) and inside diameter is 28.9 mm (1.138 in.).
(71) Coat thrust bearing race with petroleum jelly and install it in oil pump (Fig. 182). Bearing race outer diameter is 47.2 mm (1.858 in.) and inside diameter is 28.1 mm (1.106 in.).
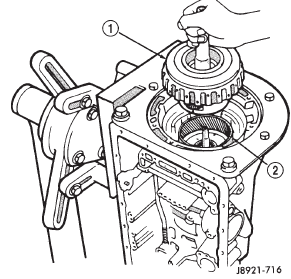
Fig. 180 Installing Overdrive Planetary And Clutch Assembly
1 - OVERDRIVE PLANETARY AND CLUTCH ASSEMBLY
2 - RING GEAR
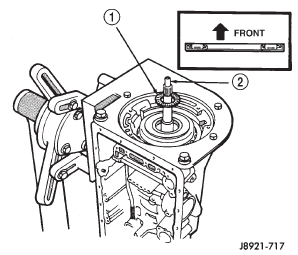
Fig. 181 Installing Input Shaft Thrust Bearing And Race Assembly
1 - THRUST BEARING AND RACE ASSEMBLY
2 - CLUTCH INPUT SHAFT
(72) Lubricate and install replacement O-ring on oil pump body.
(73) Install oil pump in case. Align pump and case bolt holes and carefully ease pump into place.
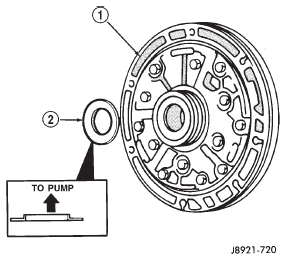
Fig. 182 Installing Oil Pump Thrust Race
1 - OIL PUMP
2 - PUMP THRUST RACE
CAUTION: Do not use force to seat the pump. The seal rings on the stator shaft could be damaged if they bind or stick to the direct clutch drum.
(74) Tighten oil pump bolts to 22 N·m (16 ft. lbs.) torque.
(75) Verify input shaft rotation. Shaft should rotate smoothly and not bind.
(76) Lubricate and install new O-ring on transmission throttle cable adapter and install cable in case (Fig. 183).
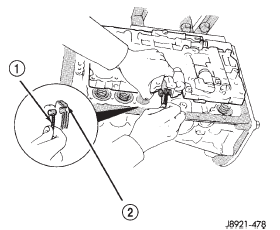
Fig. 183 Installing Transmission Throttle Cable
1 - THROTTLE CABLE
2 - THROTTLE CAM
(77) Check clutch and brake operation. Operate clutches and brakes with compressed air applied through feed holes in case (Fig. 184). Listen for clutch and brake application. If you do not hear a clutch or brake apply, disassemble transmission and repair fault before proceeding. It is necessary to block the overdrive clutch accumulator feed hole No. 8 (Fig. 184) in order to check direct clutch operation.
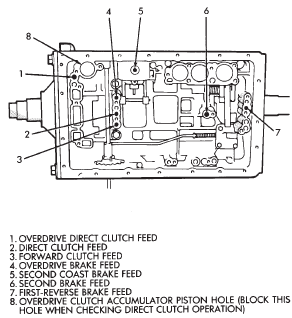
Fig. 184 Clutch And Brake Feed Hole Locations
(78) Lubricate and install new O-rings on accumulator pistons (Fig. 185).
(79) Assemble and install accumulator pistons and springs (Fig. 185).
(80) Install new check ball body and spring (Fig.
186).
(81) Position valve body on case (Fig. 187).
(82) Install detent spring (Fig. 187).
(83) Align manual valve, detent spring and shift sector (Fig. 187).
(84) Connect transmission throttle cable to throttle valve cam (Fig. 188).
(85) Install and tighten valve body-to-case bolts to 10 N·m (7 ft. lbs.) torque.
(86) Connect valve body solenoid wires to solenoids (Fig. 189).
(87) Install new O-ring on solenoid harness adapter and secure adapter to case.
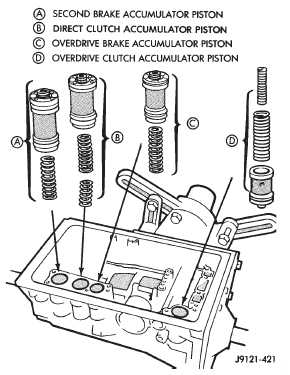
Fig. 185 Accumulator Piston And Spring Installation
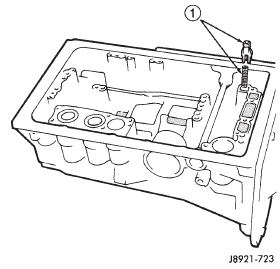
Fig. 186 Installing Check Ball Body And Spring
1 - CHECK BALL BODY AND SPRING
(88) Install valve body oil tubes (Fig. 190). Tap tubes into place with a plastic mallet. Be sure the flanged tube ends and straight tube ends are installed as shown.
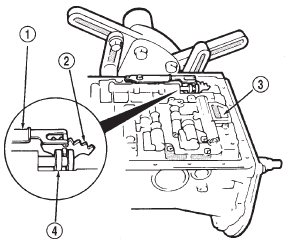
Fig. 187 Aligning Manual Valve, Shift Sector And Detent Spring
1 - DETENT SPRING
2 - SHIFT SECTOR
3 - VALVE BODY
4 - MANUAL VALVE
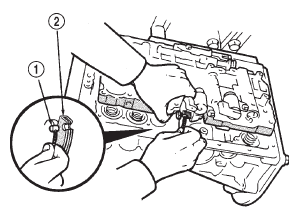
Fig. 188 Connecting Transmission Throttle Cable
1 - THROTTLE CABLE
2 - THROTTLE CAM
(89) Install new gaskets on oil screen and install screen on valve body. Tighten screen bolts to 10 N·m (7 ft. lbs.) torque.
(90) Install magnet in oil pan. Be sure magnet does not interfere with valve body oil tubes.
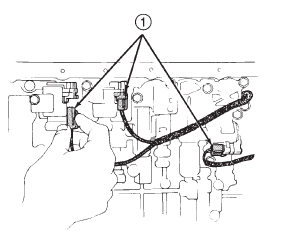
Fig. 189 Connecting Valve Body Solenoid Wires
1 - SOLENOID WIRE CONNECTORS
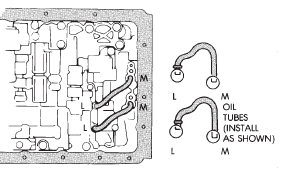
Fig. 190 Installing Valve Body Oil Tubes
(91) Apply Threebondt Liquid Gasket TB1281, P/N 83504038, to sealing surface of oil pan. Sealer bead should be at least 3 mm (1/8 in.) wide. Install pan on case and tighten pan bolts to 7 N·m (65 in.
lbs.) torque.
(92) Install transmission speed sensor rotor and key on output shaft (Fig. 191).
(93) Install spacer and speedometer drive gear on output shaft. Then install retaining snap ring (Fig.
192).
(94) Apply bead of Threebondt Liquid Gasket TB1281, P/N 83504038, to sealing surface at rear of case (Fig. 193).
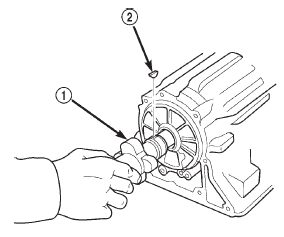
Fig. 191 Installing Transmission Speed Sensor Rotor And Key
1 - SPEED SENSOR ROTOR
2 - ROTOR KEY
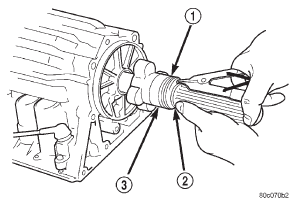
Fig. 192 Installing Spacer And Speedometer Drive Gear
1 - SPEEDOMETER DRIVE GEAR
2 - SNAP RING
3 - SPACER
(95) Install adapter housing on transmission.
Tighten adapter bolts to 34 N·m (25 ft. lbs.) torque.
(96) Install transmission speed sensor (Fig. 194).
Tighten sensor bolt to 7.4 N·m (65 in. lbs.) torque and connect sensor wire harness connector.
(97) Install converter housing (Fig. 195). Tighten 12 mm diameter housing bolts to 57 N·m (42 ft. lbs.) torque. Tighten 10 mm diameter housing bolts to 34 N·m (25 ft. lbs.) torque.
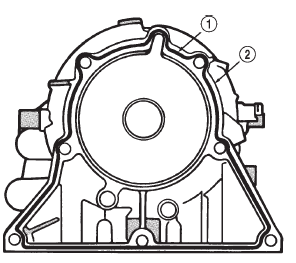
Fig. 193 Applying Sealer To Case Rear Flange
1 - SEALER BEAD
2 - CASE REAR FLANGE
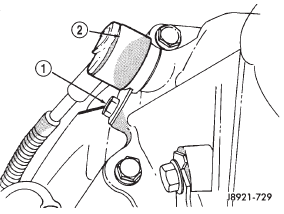
Fig. 194 Installing Transmission Speed Sensor
1 - SENSOR BOLT
2 - SPEED SENSOR
(98) Install transmission shift lever on manual valve shaft. Do not install lever attaching nut at this time.
(99) Move transmission shift lever fully rearward.
Then move lever two detent positions forward.
(100) Mount park/neutral position switch on manual valve shaft and tighten switch adjusting bolt just enough to keep switch from moving (Fig. 196).
(101) Install park/neutral position switch tabbed washer and retaining nut (Fig. 196). Tighten nut to 6.9 N·m (61 in. lbs.) torque, but do not bend any of the washer tabs against the nut at this time
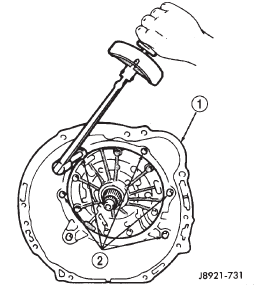
Fig. 195 Installing Converter Housing
1 - CONVERTER HOUSING
2 - HOUSING BOLTS
(102) Align park/neutral position switch standard line with groove or flat on manual shaft (Fig. 196).
(103) Tighten park/neutral position switch adjusting bolt to 13 N·m (9 ft. lbs.) torque.
(104) Install transmission shift lever on manual valve shaft. Tighten lever attaching nut to 16 N·m (12 ft. lbs.) torque.
(105) Install retaining clamp for wire harness and throttle cable (Fig. 197).
(106) Install torque converter.
(107) Verify that converter is seated by measuring distance between converter housing flange and one of the converter mounting pads (Fig. 198). Use straightedge and vernier calipers to measure distance. On 6-cyl. transmissions, distance should be 16.5 mm (0.650 in.).
(108) Secure converter in transmission with C-clamp or metal strapping. Do this before mounting transmission on jack or moving transmission under vehicle.
(109) Install lower half of transmission fill tube (install upper half after transmission is in vehicle).
CAUTION: The transmission cooler and lines must be reverse flushed if overhaul corrected a malfunction that generated sludge, metal particles, or clutch friction material. The torque converter should also be replaced if contaminated by the same malfunction.
Debris and residue not flushed from the cooler and lines will flow back into the transmission and converter. The result will be a repeat failure and shop comeback.
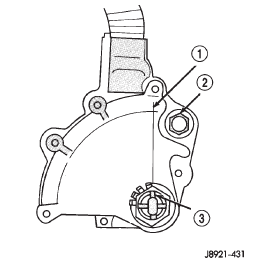
Fig. 196 Park/Neutral Position Switch Installation/Adjustment
1 - NEUTRAL STANDARD LINE
2 - ADJUSTING BOLT
3 - VERTICAL GROOVE ON MANUAL VALVE SHAFT
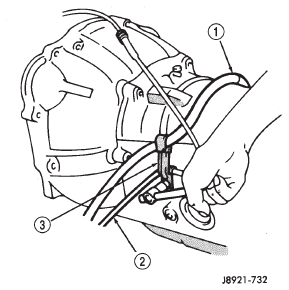
Fig. 197 Installing Cable/Harness Clamps
1 - TRANSMISSION HARNESS
2 - THROTTLE CABLE
3 - RETAINING CLAMPS
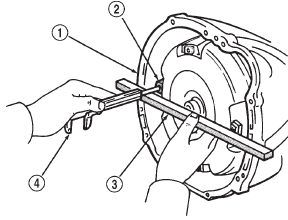
Fig. 198 Checking Converter Installation
1 - HOUSING FLANGE
2 - CONVERTER MOUNTING PAD
3 - STRAIGHTEDGE
4 - VERNIER CALIPERS

 Oil pump. Overdrive planetary gear and
clutch. Overdrive support
Oil pump. Overdrive planetary gear and
clutch. Overdrive support
Other materials:
General information
Introduction
Power operated or power operated and heated outside
rear view mirrors are available factory-installed
options on this model. Refer to 8W-62 - Power Mirrors
in Group 8W - Wiring Diagrams for complete circuit
descriptions and diagrams.
NOTE: This group covers both Left-Hand Drive
...