Jeep Cherokee (XJ): Transmission and torque converter
REMOVAL
(1) Raise vehicle.
(2) Drain transmission fluid and reinstall oil pan drain plug.
(3) On models with 2-piece fill tube, remove upper half of tube (Fig. 45).
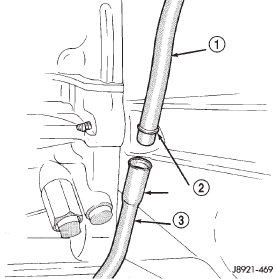
Fig. 45 Transmission Fill Tube (Two-Piece)
1 - UPPER HALF
2 - TRANSMISSION FILL TUBE
3 - LOWER HALF
(4) Disconnect cooler lines at transmission.
(5) Support engine with safety stand and support transmission with jack.
(6) Disconnect transmission and transfer case shift linkage.
(7) Remove necessary exhaust components.
(8) Disconnect vehicle speed sensor wires (9) Mark position of front and rear propeller shafts for alignment reference. Then remove shafts from vehicle.
(10) Remove rear crossmember.
(11) Disconnect transmission shift cable at transmission.
Then disconnect transmission throttle valve cable at engine.
(12) Disconnect necessary vacuum and fluid hoses.
(13) Remove transfer case from transmission.
(14) Disconnect and remove crankshaft position sensor (Fig. 46).
CAUTION: The crankshaft position sensor can be damaged during transmission removal (or installation) if the sensor is still bolted to the engine block.
To avoid damage, remove the sensor before removing the transmission.
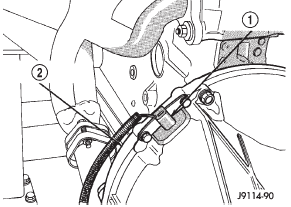
Fig. 46 Crankshaft Position Sensor
1 - CRANKSHAFT POSITION SENSOR
2 - TRANSMISSION HOUSING
(15) Remove starter motor.
(16) Remove bolts attaching converter to drive plate.
(17) Remove bolts attaching converter housing to engine.
(18) Secure transmission to jack with safety chains.
(19) Pull transmission rearward for access to converter.
Then secure converter in pump with C-clamp or strap bolted to converter housing.
(20) Remove transmission from under vehicle.
(21) Remove torque converter if converter or oil pump seal are to be serviced.
INSTALLATION
(1) Mount transmission on transmission jack. Then secure transmission to jack with safety chains.
(2) Lubricate converter drive hub and oil pump seal lip with transmission fluid. Then install converter.
Be sure converter is fully seated in oil pump gears before proceeding. Hold converter in place with C-clamp or strap attached to converter housing.
(3) Lubricate the pocket in the rear of the crankshaft, in which the converter pilot hub rides, with a light coating of Mopart High-Temp Grease.
(4) Align and position transmission and converter on engine.
(5) Remove clamp or strap used to hold torque converter in place.
(6) Move transmission forward seat and it on engine. Be sure torque converter hub is fully seated.
(7) Install converter housing-to-engine bolts (Fig.
47).
(8) Install converter-to-drive plate bolts.
(9) Install and connect starter motor.
(10) Install and connect crankshaft position sensor.
(11) Install transfer case on transmission.
(12) Connect transfer case shift linkage and vacuum hoses.
(13) Connect exhaust components.
(14) Install rear crossmember and remove jack used to support transmission assembly.
(15) Connect speed sensor wire harness to sensor.
(16) Connect wire harness to park/neutral position switch.
(17) Align and connect front and rear propeller shafts.
(18) Connect transmission wire harnesses and transfer case vacuum and wire harnesses.
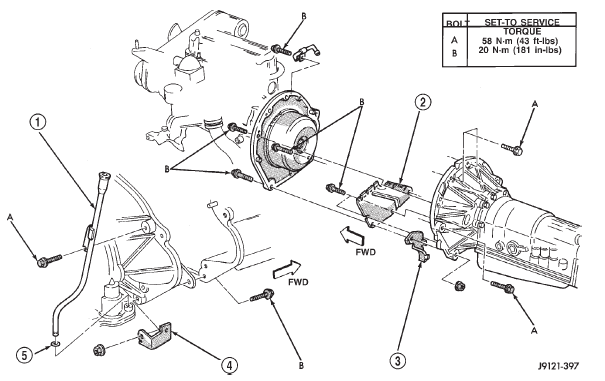
Fig. 47 Transmission Mount
1 - TRANSMISSION FILL TUBE
2 - COVER
3 - BRACKET
4 - BRACKET
5 - FILL TUBE O-RING
(19) Connect transmission cooler lines.
(20) Connect transmission throttle cable at engine.
(21) Install new O-ring seal on upper half of transmission fill tube. Then connect upper and lower tube halves.
(22) Lower vehicle.
(23) Fill transmission with Mopart Dexron IIE/ Mercon automatic transmission fluid.

 Torque converter. Adapter housing seal. Speed sensor
Other materials:
Liftgate support rod cylinder. Liftgate support rod ball stud. Liftgate outside handle
Liftgate support rod cylinder
REMOVAL
WARNING: DO NOT REMOVE A SUPPORT ROD
CYLINDER WITH THE LIFTGATE CLOSED. EACH
SUPPORT ROD PISTON IS OPERATED BY HIGH
PRESSURE GAS. IT CAN CAUSE DAMAGE AND/OR
PERSONAL INJURY IF IT IS REMOVED WITH THE
PISTON COMPRESSED. DO NOT ATTEMPT TO DISASSEMBLE
OR REPA ...