Jeep Cherokee (KL): Windshield Wiper De-icer. Dual Zone Automatic Climate Controls With Touchscreen. Climate Control Functions
The windshield wiper de-icer is a heating element located
at the base of the windshield.
The windshield wiper de-icer operates automatically
once the following conditions are met: The wiper de-icer activates automatically during a cold
weather manual start with full defrost, and when the
ambient temperature is below 33 F (0.6 C). The wiper de-icer activates automatically when the Rear
Defrost is operating and the ambient temperature is
below 33 F (0.6 C). When the Remote Start is activated and the outside
ambient temperature is less than 33 F (0.6 C) the
windshield wiper de-icer is activated. Upon exiting Remote
Start, the climate control functions will resume their
previous operation except, if the de-icer is active, the
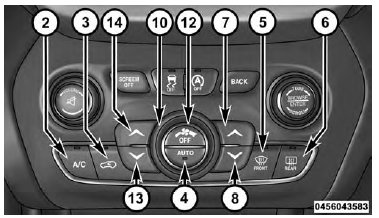
de-icer timer and operation will continue. Buttons On Your Uconnect Faceplate Buttons on the faceplate are located below the Uconnect
screen.
Buttons On Your Uconnect Touchscreen The buttons on your faceplate are also accessible on the
Uconnect system touchscreen.
Button Descriptions (Applies To Both The Buttons On
Your Faceplate And The Buttons On Your Touchscreen) 1. MAX A/C Button Press and release to change the current setting, the
indicator illuminates when MAX A/C is ON. Performing
this function again will cause the MAX A/C operation to
switch into manual mode and the MAX A/C indicator
will turn off. 2. A/C Button Press and release to change the current setting, the
indicator illuminates when A/C is ON. Performing this
function again will cause the A/C operation to switch
into manual mode and the A/C indicator will turn off. 3. Recirculation Button Press and release to change the current setting, the
indicator illuminates when ON. 4. AUTO Operation Button Automatically controls the interior cabin temperature by
adjusting airflow distribution and amount. Performing
this function will cause the system to switch between
manual mode and automatic modes. Refer to "Automatic
Operation" for more information. 5. Front Defrost Button Press and release to change the current airflow setting to
Defrost mode. The indicator illuminates when this feature
is ON. Air comes from the windshield and side window demist outlets. When the
defrost button is
selected, the blower level will increase. Use Defrost mode
with maximum temperature settings for best windshield
and side window defrosting and defogging. Performing
this function will cause the ATC to switch into manual
mode. If the front defrost mode is turned off the climate
system will return to the previous setting. 6. Rear Defrost Button Press and release this button to turn on the rear window
defroster and the heated outside mirrors (if equipped).
An indicator will illuminate when the rear window
defroster is on. The rear window defroster automatically
turns off after 10 minutes. For each additional press of
this button, five additional minutes will be added to the
timer function. CAUTION! 7. Passenger Temperature Control Up Button (Uconnect
8.4 Only) Provides the passenger with independent temperature
control. Push the button on the faceplate for warmer
temperature settings or on the touchscreen, press and
slide the button on the touchscreen temperature bar
towards the red arrow button on the touchscreen for
warmer temperature settings. NOTE: Pressing this button while in Sync mode will
automatically exit Sync. 8. Passenger Temperature Control Down Button
(Uconnect 8.4 Only) Provides the passenger with independent temperature
control. Push the button on the faceplate for cooler
temperature settings or on the touchscreen, press and
slide the button on the touchscreen temperature bar
towards the blue arrow button on the touchscreen for
cooler temperature settings. NOTE: Pressing this button while in Sync mode will
automatically exit Sync. 9. SYNC Press the Sync button on the touchscreen to toggle the
Sync feature On/Off. The Sync indicator is illuminated
when this feature is enabled. Sync is used to synchronize
the passenger temperature setting with the driver temperature
setting. Changing the passenger temperature
setting while in Sync will automatically exit this feature. Blower control is used to regulate the amount of air
forced through the climate system. There are seven
blower speeds available. Adjusting the blower will cause
automatic mode to switch to manual operation. The
speeds can be selected using either the blower control
knob on the faceplate or buttons on the touchscreen as
follows: Blower Control Knob On The Faceplate The blower speed increases as you turn the blower
control knob clockwise from the lowest blower setting.
The blower speed decreases as you turn the blower
control knob counterclockwise. Button On The Touchscreen Use the small blower icon to reduce the blower setting
and the large blower icon to increase the blower setting.
Blower can also be selected by pressing the blower bar
area between the icons. 11. Modes The airflow distribution mode can be adjusted so air
comes from the instrument panel outlets, floor outlets,
and demist outlets. The Mode settings are as follows: Panel Mode Bi-Level Mode NOTE: Bi-Level mode is designed under comfort conditions
to provide cooler air out of the panel outlets and
warmer air from the floor outlets. Floor Mode Mix Mode 12. Climate Control OFF Button Press and release this button to turn the Climate Control
ON/OFF. 13. Driver Temperature Control Down Button (Uconnect
8.4 Only) Provides the driver with independent temperature control.
Push the button on the faceplate for cooler temperature
settings or on the touchscreen, press and slide the
button on the touchscreen temperature bar towards the
blue arrow button on the touchscreen for cooler temperature
settings. NOTE: In Sync mode, this button will also automatically
adjust the passenger temperature setting at the same
time. 14. Driver Temperature Control Up Button (Uconnect 8.4
Only) Provides the driver with independent temperature control.
Push the button on the faceplate for warmer temperature
settings or on the touchscreen, press and slide
the button on the touchscreen temperature bar towards
the red arrow button on the touchscreen for warmer
temperature settings. NOTE: In Sync mode, this button will also automatically
adjust the passenger temperature setting at the same
time. 15. Temperature Control (Uconnect 5.0 Only) Press the temperature button on the touchscreen to regulate
the temperature of the air inside the passenger compartment.
Moving the temperature bar into the red area,
indicates warmer temperatures. Moving the temperature
bar into the blue area indicates cooler temperatures. The Air Conditioning (A/C) button allows the operator
to manually activate or deactivate the air conditioning
system. When the air conditioning system is turned on,
cool dehumidified air will flow through the outlets into
the cabin. For improved fuel economy, push the A/C
button to turn off the air conditioning and manually
adjust the blower and airflow mode settings. Also, make
sure to select only Panel, Bi-Level or Floor modes. NOTE: MAX A/C sets the control for maximum cooling performance.
Press to toggle between MAX A/C and the prior settings.
The button on the touchscreen illuminates when MAX
A/C is ON.
In MAX A/C, the blower level and mode position can be
adjusted to desired user settings. Pushing other settings
will cause the MAX A/C operation to switch to the
selected setting and cause MAX A/C to exit. Recirculation NOTE: In cold weather, use of Recirculation mode may
lead to excessive window fogging. The recirculation
feature may be unavailable (button on the touchscreen
greyed out) if conditions exist that could create fogging
on the inside of the windshield. On systems with Manual
Climate Controls, the Recirculation mode is not allowed
in Defrost mode to improve window clearing operation. Recirculation will be disabled automatically if this mode
is selected. Attempting to use Recirculation while in this
mode will cause the LED in the control button to blink
and then turn off.Windshield Wiper De-icer - If Equipped
Dual Zone Automatic Climate Controls With Touchscreen - If Equipped
Automatic Climate Controls - Buttons On Your Faceplate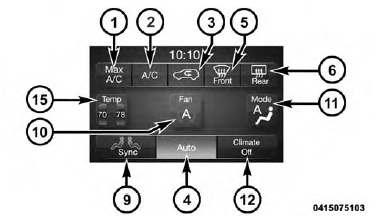
Uconnect 5.0 Automatic Temperature Controls - Buttons On Your Touchscreen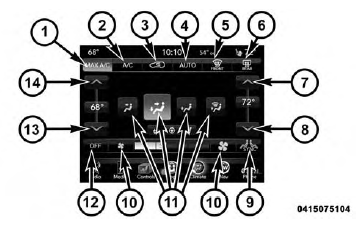
Uconnect 8.4 Automatic Temperature Controls - Buttons On Your Touchscreen
 Air comes from the outlets in the
instrument
panel. Each of these outlets can be individually
adjusted to direct the flow of air. The air vanes of the
center outlets and outboard outlets can be moved up and
down or side to side to regulate airflow direction. There
is a shut off wheel located below the air vanes to shut off
or adjust the amount of airflow from these outlets.
Air comes from the outlets in the
instrument
panel. Each of these outlets can be individually
adjusted to direct the flow of air. The air vanes of the
center outlets and outboard outlets can be moved up and
down or side to side to regulate airflow direction. There
is a shut off wheel located below the air vanes to shut off
or adjust the amount of airflow from these outlets. Air comes from the instrument
panel outlets and
floor outlets. A slight amount of air is directed
through the defrost and side window demister outlets.
Air comes from the instrument
panel outlets and
floor outlets. A slight amount of air is directed
through the defrost and side window demister outlets. Air comes from the floor outlets.
A slight amount
of air is directed through the defrost and side
window demister outlets.
Air comes from the floor outlets.
A slight amount
of air is directed through the defrost and side
window demister outlets. Air comes from the floor, defrost
and side window
demist outlets. This mode works best in cold or
snowy conditions.
Air comes from the floor, defrost
and side window
demist outlets. This mode works best in cold or
snowy conditions.Climate Control Functions
A/C (Air Conditioning)
MAX A/C
 When outside air contains smoke,
odors, or
high humidity, or if rapid cooling is desired,
you may wish to recirculate interior air by
pressing the Recirculation control button. The
recirculation indicator will illuminate when this button is
selected. Press the button a second time to turn off the
Recirculation mode and allow outside air into the vehicle.
When outside air contains smoke,
odors, or
high humidity, or if rapid cooling is desired,
you may wish to recirculate interior air by
pressing the Recirculation control button. The
recirculation indicator will illuminate when this button is
selected. Press the button a second time to turn off the
Recirculation mode and allow outside air into the vehicle.
 Manual Climate Controls With Touchscreen
 Automatic Temperature Control (ATC). Operating Tips
Other materials:
Hub bearing and axle shaft. Steering knuckle and ball studs. Differential
Hub bearing and axle shaft
If the axle shaft and hub bearing are being
removed in order to service another component, the
axle shaft and hub bearing can be removed as an
assembly.
REMOVAL
Raise and support the vehicle.
Remove the wheel and tire assembly.
Remove the brak ...