Jeep Cherokee (XJ): Transmission ranges and shift lever positions. Transmission control module (TCM). Hydraulic system
The AW-4 transmission has six ranges and shift
lever positions. Park, Reverse and Neutral are conventional
and mechanically operated. The 1-2, 3 and
D ranges provide electronically controlled shifting.
The 1-2 position provides first and second gear
only. The 3 position provides first, second and third
gear. The D range provides first through fourth gear.
Overdrive fourth gear range is available only when
the shift lever is in D position (Fig. 35).
DESCRIPTION The module determines shift and converter clutch
engagement timing based on signals from sensors.
The valve body solenoids are activated, or deactivated
accordingly.
The TCM has a self diagnostic program. Component
and circuitry malfunctions can be diagnosed
with the DRB scan tool. Once a malfunction is noted
and stored in control module memory, it is retained
even after the problem has been corrected. To cancel
a stored malfunction, disconnect and reconnect the
"Trans." fuse in the module harness. SENSORS Sensors include: OPERATION The throttle position sensor is mounted on the
throttle body. It electronically determines throttle
position and relays this information to the transmission
control module to determine shift points and
converter clutch engagement.
The transmission speed sensor consists of a rotor
and magnet on the transmission output shaft and a
switch in the extension housing or adapter. The sensor
switch is activated each time the rotor and magnet
complete one revolution. Sensor signals are sent
to the transmission control module.
The park/neutral position switch is mounted on the
valve body manual shaft. The switch signals shift
linkage and manual valve position to the transmission
control module through an interconnecting harness.
The switch prevents engine starting in all gears
other than Park or Neutral.
The brake switch is in circuit with the torque converter
clutch solenoid. The switch disengages the
converter clutch whenever the brakes are applied.
The switch is mounted on the brake pedal bracket
and signals the transmission control module when
the pedal is pressed or released. DESCRIPTION The hydraulic system consists of the pump, valve
body and solenoids, and four hydraulic accumulators.
The oil pump provides lubrication and operating
pressure.
The valve body controls application of the clutches,
brakes, second coast band, and the converter clutch.
The valve body solenoids control sequencing of the
1-2, 2-3 and 3-4 shift valves. The solenoids are activated
by signals from the transmission control module.
The accumulators are used in the clutch and brake
feed circuits to control initial apply pressure. Spring
loaded accumulator pistons modulate the initial
surge of apply pressure for smooth engagement.Transmission ranges and shift lever
positions
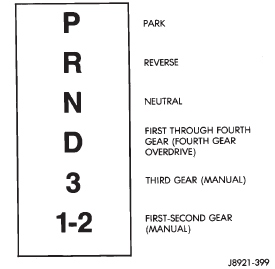
Fig. 35 AW-4 Shift Lever Positions And Transmission RangesTransmission control module (TCM)
Hydraulic system

 Transmission cooler. Brake transmission shift interlock
mechanism
Transmission cooler. Brake transmission shift interlock
mechanism
Other materials:
Service procedures
AIRBAG SYSTEM
NON-DEPLOYED
At no time should any source of electricity be permitted
near the inflator on the back of an airbag
module. When carrying a non-deployed airbag module,
the trim cover or airbag side of the module
should be pointed away from the body to minimize
injury in the event o ...