Jeep Cherokee (XJ): Adapter/extension housing and front bearing retainer
DISASSEMBLY
(1) Drain transmission lubricant, if necessary.
(2) Remove release bearing and lever.
(3) Remove clutch housing bolts and remove housing (Fig. 17).
(4) Remove vehicle speed sensor and speedometer adapter, if necessary.
(5) Remove bolts holding shift tower to transmission case.
(6) Remove shift tower from transmission case (Fig. 15).
(7) Remove shift tower gasket from shift tower or transmission case (Fig. 16).
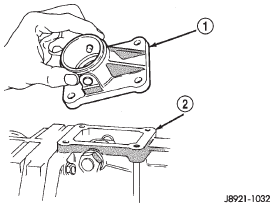
Fig. 15 Remove Shift Tower
1 - SHIFT TOWER
2 - ADAPTER/EXTENSION HOUSING
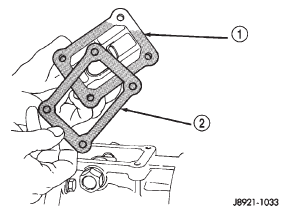
Fig. 16 Remove Shift Tower Gasket
1 - SHIFT TOWER
2 - GASKET
(8) Remove detent ball plug (Fig. 18).
(9) Remove detent spring and ball with pencil magnet (Fig. 19), (Fig. 20).
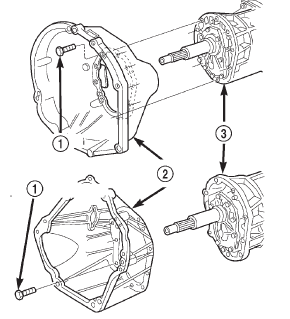
Fig. 17 Clutch Housing
1 - HOUSING-TO-TRANSMISSION BOLTS (46 N·m/34 ft. lbs.)
2 - CLUTCH HOUSING
3 - TRANSMISSION
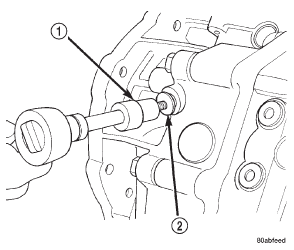
Fig. 18 Remove Detent Ball Plug
1 - TORX BIT
2 - DETENT BALL PLUG
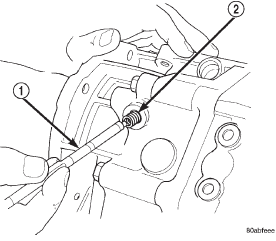
Fig. 19 Remove Detent Spring
1 - PENCIL MAGNET
2 - DETENT BALL SPRING
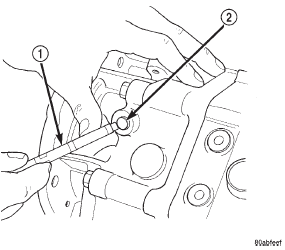
Fig. 20 Remove Detent Ball
1 - PENCIL MAGNET
2 - SHIFT DETENT BALL
(10) Remove shift arm retainer bolt (Fig. 21).
(11) Remove shift arm restrictor pins (Fig. 22).
NOTE: The restrictor pins are not interchangeable and are color coded. Note which color restrictor pin is removed from each side of the transmission and be sure to install it into the same location.
(12) Remove shift lever shaft plug (Fig. 23).
(13) Remove shifter shaft with large magnet (Fig.
24).
(14) Remove the shift arm from the adapter housing.
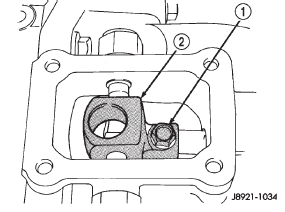
Fig. 21 Shift Arm Retainer Bolt Removal
1 - RETAINER BOLT
2 - SHIFT ARM
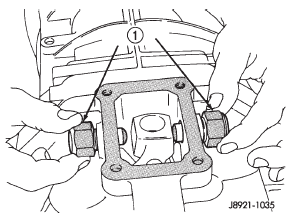
Fig. 22 Shift Arm Restrictor Pins
1 - RESTRICTOR PINS
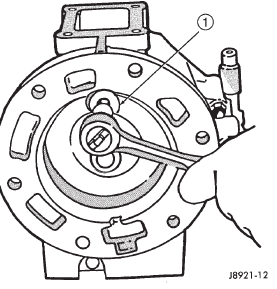
Fig. 23 Removing Shift Lever Shaft Plug
1 - SHIFT LEVER SHAFT PLUG
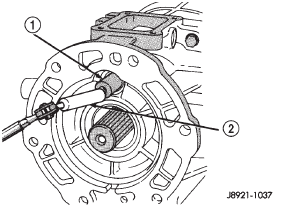
Fig. 24 Remove Shifter Shaft
1 - SHIFT ARM SHAFT
2 - LARGE MAGNET
(15) Remove adapter/extension housing bolts.
(16) Loosen adapter/extension housing by tapping it loose with plastic mallet (Fig. 25).
(17) Remove adapter/extension housing (Fig. 26).
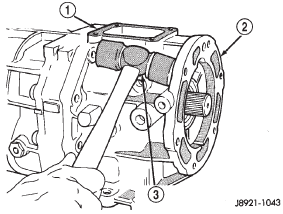
Fig. 25 Loosen Adapter/Extension Housing
1 - INTERMEDIATE PLATE
2 - ADAPTER HOUSING
3 - RUBBER FACED MALLET
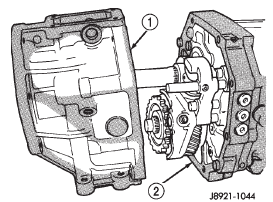
Fig. 26 Remove Adapter/Extension Housing-Typical
1 - ADAPTER HOUSING
2 - INTERMEDIATE PLATE
(18) On 4x2 transmissions; (a) Remove speedometer gear retaining snapring from output shaft.
(b) Remove speedometer gear from output shaft and remove speedometer gear lock ball from output shaft.
(c) Remove speedometer drive gear locating snap-ring (Fig. 27).
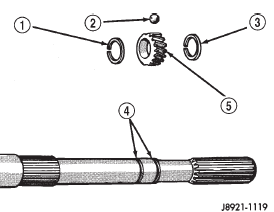
Fig. 27 Speedometer Drive Gear Assembly
1 - SNAP RING
2 - LOCK BALL
3 - SNAP RING
4 - OUTPUT SHAFT GROOVES
5 - SPEEDOMETER GEAR
(19) Remove the bolts holding the front bearing retainer to the transmission case.
(20) Remove the bearing retainer from transmission case (Fig. 28).
(21) Remove input shaft bearing snap-ring (Fig.
29).
(22) Remove countershaft front bearing snap-ring.
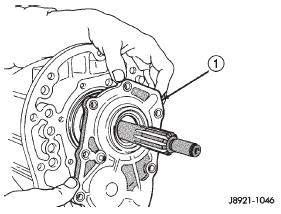
Fig. 28 Remove Front Bearing Retainer
1 - FRONT BEARING RETAINER
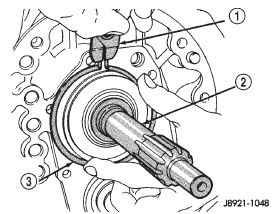
Fig. 29 Remove Input Shaft Bearing Snap-ring
1 - SNAP RING PLIERS
2 - INPUT SHAFT
3 - INPUT SHAFT BEARING SNAP RING
(23) Separate intermediate plate and transmission case by tapping them loose with plastic mallet (Fig.
30).
(24) Separate the intermediate plate from the transmission case (Fig. 31).
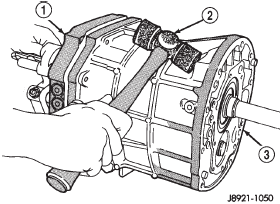
Fig. 30 Separate Intermediate Plate and Transmission Case
1 - INTERMEDIATE PLATE
2 - RUBBER MALLET
3 - GEAR CASE
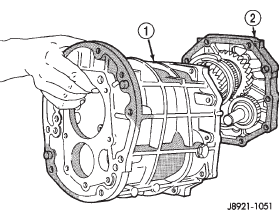
Fig. 31 Remove Intermediate Plate from Transmission Case
1 - GEAR CASE
2 - INTERMEDIATE PLATE
ASSEMBLY
(1) Remove any residual sealer from transmission case, intermediate plate, and adapter/extension housing.
(2) Apply a 1/8 to 3/16 inch wide bead of Threebondt Liquid Gasket TB1281, P/N 83504038, as shown, making sure to keep sealer bead to inside of bolt holes (Fig. 32).
(3) Align geartrain and shift rails with mating holes in transmission case and install transmission case to the intermediate plate (Fig. 33). Verify that the transmission case is seated on the intermediate plate locating pins.
Fig. 32 Apply Sealer to Transmission Gear Case
1 - SEALER BEAD (1/8" - 3/16" WIDE)
2 - GEAR CASE
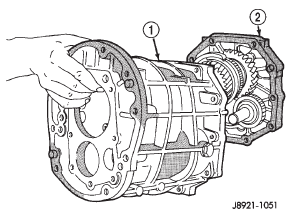
Fig. 33 Install Transmission Gear Case to the Intermediate Plate
1 - GEAR CASE
2 - INTERMEDIATE PLATE
(4) Install new front bearing snap rings (Fig. 34).
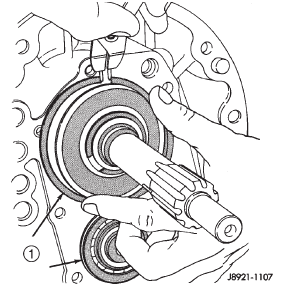
Fig. 34 Install Front Bearing Snap-rings
1 - FRONT BEARING SNAP RINGS
(5) Install front bearing retainer gasket to front bearing retainer.
(6) Install the front bearing retainer (Fig. 35) and tighten bolts to 17 N·m (12 ft. lbs.).
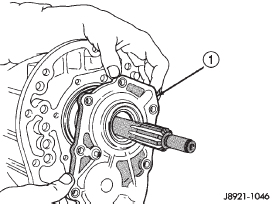
Fig. 35 Install Front Bearing
1 - FRONT BEARING RETAINER
(7) On 4x2 transmissions; (a) Install speedometer drive gear locating snapring (Fig. 36).
(b) Install speedometer gear lock ball in output shaft and install speedometer gear onto output shaft.
(c) Install speedometer gear retaining snap-ring onto output shaft.
(8) Apply a 1/8 to 3/16 inch wide bead of Threebondt Liquid Gasket TB1281, P/N 83504038, to sealing surface of adapter/extension housing, making sure to keep sealer bead to inside of bolt holes.
(9) Install adapter or extension housing on intermediate plate (Fig. 37). Tighten housing bolts to 34 N·m (25 ft. lbs.) torque.
(10) Position shift arm in shifter tower opening of adapter or extension housing (Fig. 38). Be sure that the shifter arm is engaged into the shift rails.
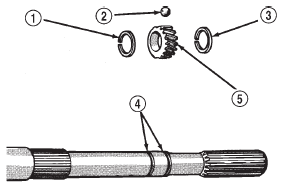
Fig. 36 Speedometer Drive Gear Assembly
1 - SNAP RING
2 - LOCK BALL
3 - SNAP RING
4 - OUTPUT SHAFT GROOVES
5 - SPEEDOMETER GEAR
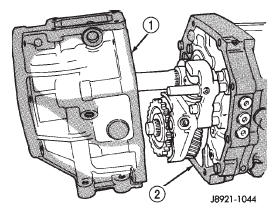
Fig. 37 Install Adapter/Extension Housing-Typical
1 - ADAPTER HOUSING
2 - INTERMEDIATE PLATE
(11) Start shifter arm shaft in hole in back of adapter or extension housing. Align shift arm and shifter arm shaft and insert shifter arm shaft through the shifter arm and into the forward portion of the adapter or extension housing (Fig. 39).
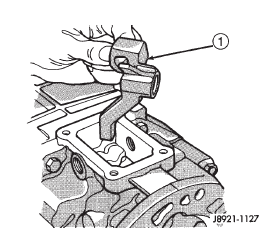
Fig. 38 Position Shift Arm in Adapter or Extension Housing
1 - SHIFT ARM
(12) Rotate the shifter arm shaft until the hole in the shift arm is aligned with the hole in the shaft.
(13) Install the shift arm retainer bolt and tighten to 38 N·m (28 ft. lbs.) (Fig. 40).
(14) Install and tighten shifter arm shaft plug to 18 N·m (13 ft. lbs.) torque (Fig. 41).
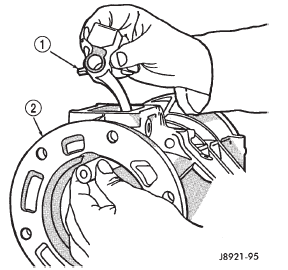
Fig. 39 Install Shifter Arm Shaft
1 - SHIFT ARM
2 - ADAPTER OR EXTENSION HOUSING
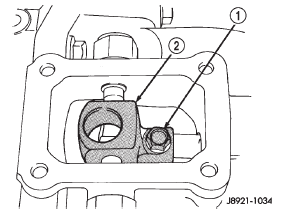
Fig. 40 Install Shift Arm Retainer Bolt
1 - RETAINER BOLT
2 - SHIFT ARM
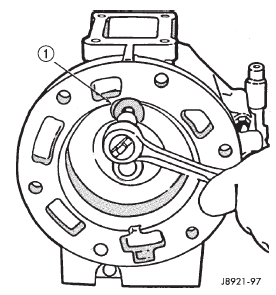
Fig. 41 Shifter Arm Shaft Plug Installation
1 - SHAFT PLUG
(15) Install shift restrictor pins in shift tower and tighten to 27 N·m (20 ft. lbs.) (Fig. 42).
NOTE: The restrictor pins are not interchangeable and are color coded. Be sure to install the pin into the same location from which it was removed.
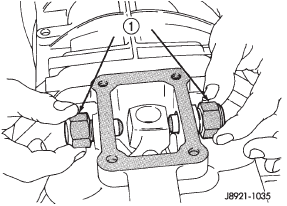
Fig. 42 Install Shifter Restrictor Pins
1 - RESTRICTOR PINS
(16) Install shift detent ball in detent opening of case (Fig. 43).
(17) Install detent spring in case (Fig. 44).
(18) Install detent plug and tighten to 19 N·m (14 ft. lbs.) (Fig. 45).
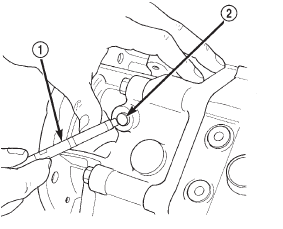
Fig. 43 Install Detent Ball
1 - PENCIL MAGNET
2 - SHIFT DETENT BALL
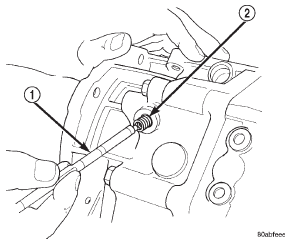
Fig. 44 Install Detent Spring
1 - PENCIL MAGNET
2 - DETENT BALL SPRING
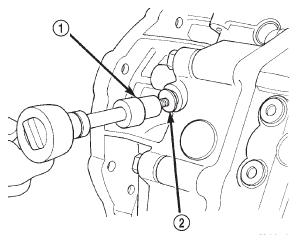
Fig. 45 Install Detent Ball Plug
1 - TORX BIT
2 - DETENT BALL PLUG
(19) Install shift tower gasket onto shift tower.
(20) Install the shift tower oil deflector and gasket onto the adapter or extension housing.
(21) Install shift tower onto transmission case (Fig. 46).
(22) Install bolts to hold shift tower to transmission case. Tighten tower bolts to 18 N·m (13 ft. lbs.) torque.
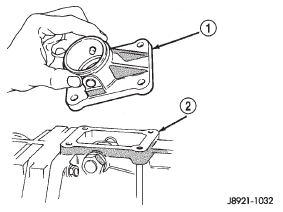
Fig. 46 Install Shift Tower
1 - SHIFT TOWER
2 - ADAPTER/EXTENSION HOUSING
(23) Install new metal o-ring onto the backup lamp switch.
(24) Install backup lamp switch (Fig. 47). Tighten switch to 44 N·m (32.5 ft. lbs.) torque.
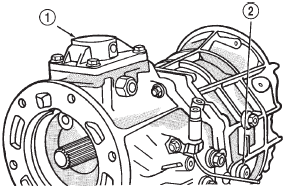
Fig. 47 Install Backup Lamp Switch
1 - SHIFT TOWER
2 - BACKUP LAMP SWITCH
(25) Install new seal in adapter/extension housing.
(26) Install vehicle speed sensor, if necessary.
(27) Install clutch housing, release bearing, release fork and retainer clip.
 Diagnosis and testing. Removal and installation

Other materials:
Instrument cluster - premium
Premium DID Instrument Cluster
1. Tachometer
Indicates the engine speed in revolutions per minute
(RPM x 1000).
2. Driver Information Display (DID)
When the appropriate conditions exist, this display
shows the Driver Information Display (DID) messages.
Refer to "Driver Inform ...