Jeep Cherokee (XJ): Shift mechanism and geartrain
DISASSEMBLY
(1) Install suitable bolts and washers in intermediate plate (Fig. 48). Then clamp plate and gear assembly in vise. Use enough washers to prevent bolts from touching. Also be sure vise jaws are clamped on bolt heads.
Fig. 48 Positioning Intermediate Plate
1 - INTERMEDIATE PLATE
2 - BOLTS
(2) Remove countershaft fifth gear retaining snapring (Fig. 49).
(3) Remove bolt holding fifth gear shift fork to shift rail (Fig. 50).
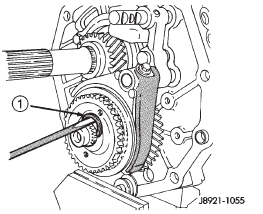
Fig. 49 Remove Fifth Gear Snap-ring
1 - FIFTH GEAR SNAP RING (SELECT FIT)
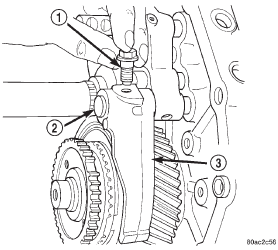
Fig. 50 Remove Shift Fork Retainer Bolt
1 - SHIFT FORK RETAINER BOLT
2 - FIFTH GEAR SHIFT RAIL
3 - FIFTH GEAR SHIFT FORK
(4) Remove fifth gear blocker ring from countershaft assembly with Puller L-4407 (Fig. 51).
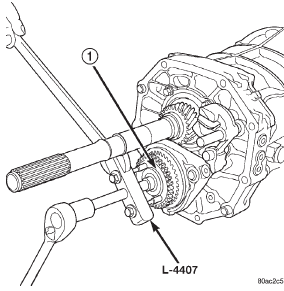
Fig. 51 Remove Fifth Gear Blocker Ring
1 - FIFTH GEAR BLOCKER RING
(5) Remove fifth gear synchro ring (Fig. 52).
(6) Remove the countershaft fifth gear assembly from countershaft (Fig. 53).
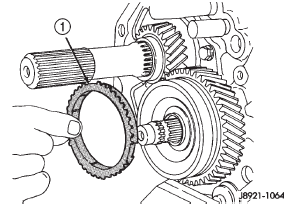
Fig. 52 Remove Fifth Gear Synchro Ring
1 - FIFTH GEAR SYNCHRO RING
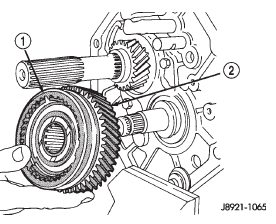
Fig. 53 Remove Fifth Gear and Synchro Assembly
1 - FIFTH GEAR SYNCHRO SLEEVE ASSEMBLY
2 - COUNTER FIFTH GEAR
(7) Remove fifth gear thrust ring from countershaft (Fig. 54).
(8) Remove fifth gear thrust ring lock ball from countershaft (Fig. 55).
NOTE: There are many lock balls, check balls, interlock balls, and interlock pins used in various places in the transmission. Whenever a pin or ball is removed, it should be identified in such a way that it can be reinstalled in the same location from which it was removed.

Fig. 54 Remove Fifth Gear Thrust Ring
1 - LOCK BALL NOTCH
2 - FIFTH GEAR THRUST RING
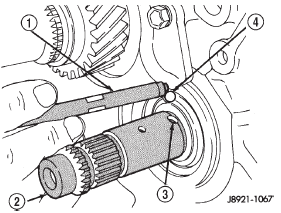
Fig. 55 Remove Fifth Gear Thrust Ring Lock
1 - PENCIL MAGNET
2 - CLUSTER GEAR
3 - LOCK BALL RECESS
4 - THRUST RING LOCK BALL
(9) Remove bolt holding reverse idler gear shaft lock plate to the intermediate plate.
(10) Remove reverse idler gear shaft and reverse idler gear assembly (Fig. 56).
NOTE: Be sure to retrieve the pin and compression spring from the reverse idler shaft.
(11) Remove bolts holding output shaft rear bearing retainer to the intermediate plate and remove retainer (Fig. 57).
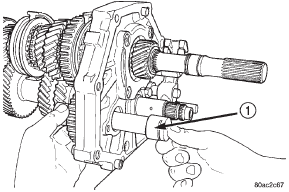
Fig. 56 Remove Reverse Idler Shaft
1 - REVERSE IDLER SHAFT

Fig. 57 Remove Output Shaft Rear Bearing Retainer
1 - OUTPUT SHAFT REAR BEARING RETAINER
(12) Remove bolts holding 1-2 and 3-4 shift forks to the shift rails (Fig. 58) and discard bolts.
(13) Remove bolts holding reverse shift arm bracket to intermediate plate (Fig. 59).
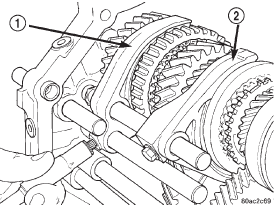
Fig. 58 Remove Shift Fork To Shift Rail Bolts
1 - 1-2 SHIFT FORK
2 - 3-4 SHIFT FORK
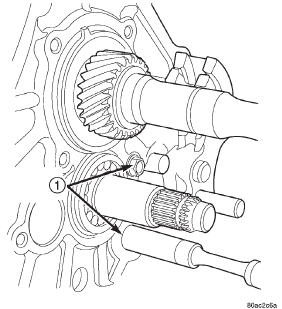
Fig. 59 Remove Reverse Shift Arm Bracket Bolts
1 - REVERSE SHIFT ARM BOLTS
(14) Remove snap-ring holding output shaft rear bearing into the intermediate plate (Fig. 60).
(15) Remove countershaft rear bearing snap-ring.

Fig. 60 Remove Output Shaft Rear Bearing Snap-ring
1 - OUTPUT SHAFT REAR BEARING SNAP-RING
2 - COUNTERSHAFT REAR BEARING SNAP-RING
(16) With aid of an assistant, support the mainshaft and countershaft. Tap on the rear of the mainshaft and countershaft with a suitable plastic mallet.
This will release the countershaft from the countershaft rear bearing and the mainshaft rear bearing from the intermediate plate. The countershaft will release from the countershaft bearing first and can be removed by moving the countershaft rearward and downward (Fig. 61).
(17) Remove the mainshaft by moving the mainshaft forward until the mainshaft rear bearing is clear of the intermediate plate and then rotating the mainshaft downward out of the shift forks (Fig. 62).

Fig. 61 Remove Countershaft and Countershaft Rear Bearing
1 - INPUT SHAFT
2 - INTERMEDIATE PLATE
3 - OUTPUT SHAFT
4 - COUNTERSHAFT
5 - COUNTERSHAFT REAR BE
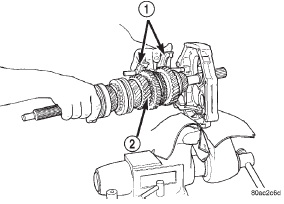
Fig. 62 Remove Mainshaft
1 - SHIFT FORKS
2 - MAINSHAFT
(18) Remove the 3-4 shift fork from the 3-4 shift rail (Fig. 63).
(19) Remove the snap-ring from near the end of the 1-2 shift rail to allow the removal of the 1-2 shift fork.
(20) Remove the 1-2 shift fork from the 1-2 and the 3-4 shift rails (Fig. 64).
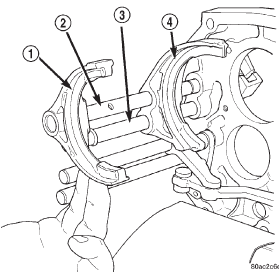
Fig. 63 Remove 3-4 Shift Fork
1 - 3-4 SHIFT FORK
2 - 3-4 SHIFT RAIL
3 - 1-2 SHIFT RAIL
4 - 1-2 SHIFT FORK
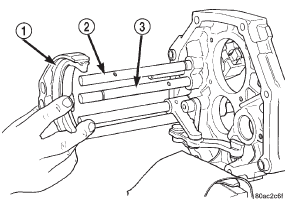
Fig. 64 Remove 1-2 Shift Fork
1 - 1-2 SHIFT FORK
2 - 3-4 SHIFT RAIL
3 - 1-2 SHIFT RAIL
(21) Remove threaded plugs from intermediate plate. Then remove lock ball and spring from plug holes with pencil magnet (Fig. 65). Note that the bottom spring is shorter in length than the other two springs.
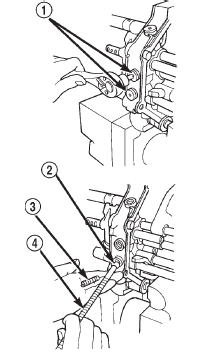
Fig. 65 Remove Lock Ball And Spr
1 - THREADED PLUGS
2 - LOCK BALL
3 - SPRING
4 - PENCIL MAGNET
(22) Remove the intermediate plate from the vise, rotate the plate 180, and reinstall the plate in the vise using the same bolt and washer mounting setup.
CAUTION: The interlock balls and pins are different sizes and shapes. Be sure to correctly identify which position an item is removed from to ensure that it is reinstalled in the same location.
(23) Remove fifth gear shift rail (Fig. 66).
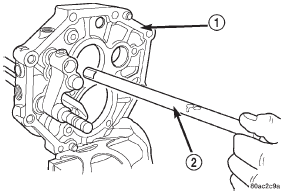
Fig. 66 Remove Fifth Gear Shift Rail
1 - INTERMEDIATE PLATE
2 - FIFTH GEAR SHIFT RAIL
(24) Remove fifth gear check ball (Fig. 67) and interlock pin.
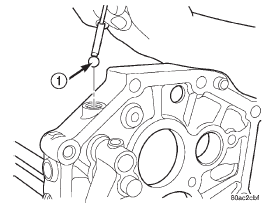
Fig. 67 Remove Fifth Gear Check Ball
1 - FIFTH GEAR CHECK BALL
(25) Remove reverse shift head and rail assembly (Fig. 68).
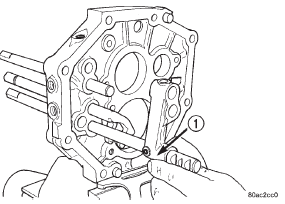
Fig. 68 Remove Reverse Shift Head And Rail Assembly
1 - REVERSE SHIFT HEAD AND RAIL ASSEMBLY
(26) Remove snap-ring holding reverse shift rail into intermediate plate.
(27) Remove reverse shift rail and reverse shift fork and arm assembly from intermediate plate (Fig.
69).
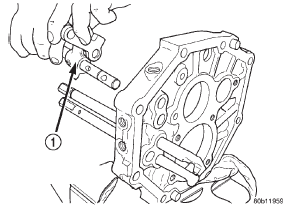
Fig. 69 Remove Reverse Shift Rail
1 - REVERSE SHIFT RAIL AND REVERSE FORK ASSEMBLY
(28) Remove interlock pin from reverse shift rail (Fig. 70).
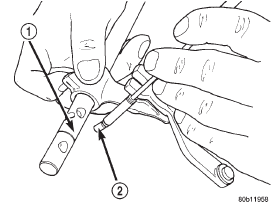
Fig. 70 Remove Interlock Pin From Reverse Shift Rail
1 - REVERSE SHIFT RAIL
2 - INTERLOCK PIN
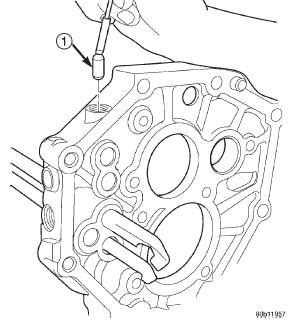
Fig. 71 Remove Reverse Check Ball
1 - REVERSE CHECK BALL
(30) Remove snap-ring on 3-4 shift rail.
(31) Remove 1-2 shift rail from intermediate plate.
(32) Remove interlock pin from 1-2 shift rail (Fig.
72).
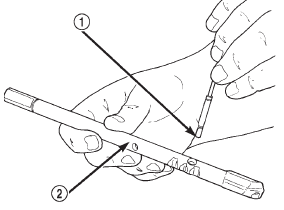
Fig. 72 Remove 1-2 Shift Rail Interlock Pin
1 - INTERLOCK PIN
2 - 1-2 SHIFT RAIL
(33) Remove 1-2 shift rail elongated check ball from intermediate plate (Fig. 73).
(34) Remove 3-4 shift rail from intermediate plate.
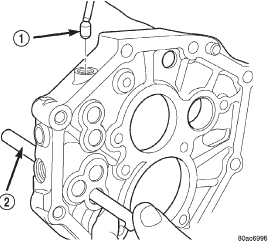
Fig. 73 Remove 1-2 Check Ball
1 - 1-2 CHECK BALL
2 - 3-4 SHIFT RAIL
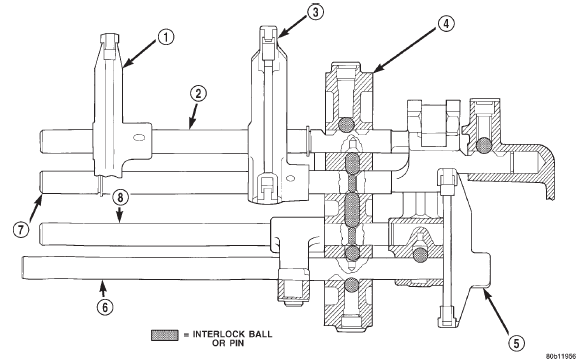
Fig. 74 Shift Rail Components
1 - 3-4 FORK
2 - 3-4 SHIFT RAIL
3 - 1-2 FORK
4 - INTERMEDIATE PLATE
5 - FIFTH GEAR FORK
6 - FIFTH GEAR SHIFT RAIL
7 - 1-2 SHIFT RAIL
8 - REVERSE SHIFT RAIL
ASSEMBLY
Refer to (Fig. 74) while assembling and installing the shift rail components. Also, verify that all shift rail components are in their neutral position when installing the check balls and interlock pins.
(1) Install the 3-4 shift rail into the intermediate plate.
(2) Install the 1-2 elongated check ball into the intermediate plate (Fig. 75).
(3) Install the interlock pin into the 1-2 shift rail (Fig. 76).
(4) Install the 1-2 shift rail into the intermediate plate
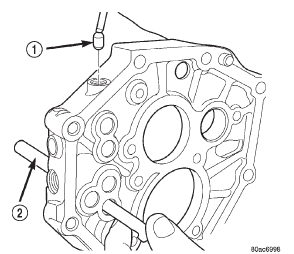
Fig. 75 Install 1-2 Check Ball
1 - 1-2 CHECK BALL
2 - 3-4 SHIFT RAIL
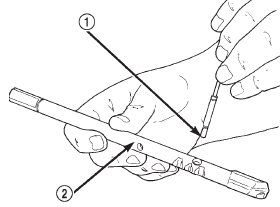
Fig. 76 Install 1-2 Shift Rail Interlock Pin
1 - INTERLOCK PIN
2 - 1-2 SHIFT RAIL
(5) Install snap-ring onto 3-4 shift rail.
(6) Install the reverse check ball into the intermediate plate (Fig. 77).
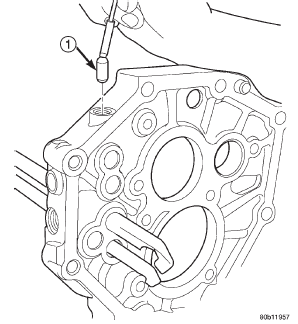
Fig. 77 Install Reverse Check Ball
1 - REVERSE CHECK BALL
(7) Install the interlock pin into the reverse shift rail (Fig. 78).
(8) Assemble the reverse arm bracket to the reverse fork (Fig. 79).
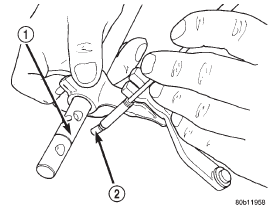
Fig. 78 Install Reverse Interlock Pin
1 - REVERSE SHIFT RAIL
2 - INTERLOCK PIN
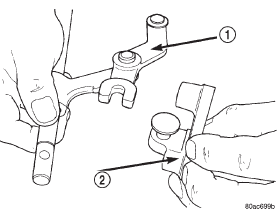
Fig. 79 Install Reverse Arm Bracket to Fork
1 - REVERSE SHIFT FORK
2 - REVERSE ARM BRACKET
(9) Install reverse shift rail into intermediate plate and position reverse arm bracket to intermediate plate (Fig. 80).
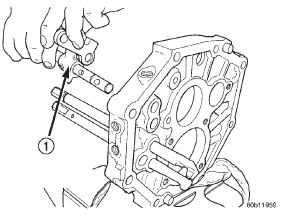
Fig. 80 Install Reverse Shift Rail
1 - REVERSE SHIFT RAIL AND REVERSE FORK ASSEMBLY
(10) Install snap-ring onto reverse shift rail (Fig.
81).
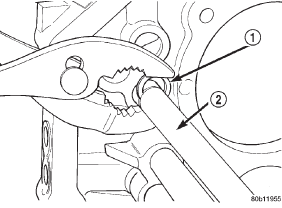
Fig. 81 Install Reverse Snap-ring
1 - SNAP RING
2 - REVERSE SHIFT RAIL
(11) Install reverse shift head and rail assembly into the intermediate plate.
(12) Install the fifth gear interlock ball and check ball (Fig. 82).
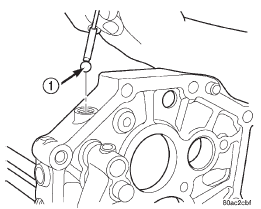
Fig. 82 Install Fifth Gear Check Ball
1 - FIFTH GEAR CHECK BALL
(13) Install fifth gear shift rail (Fig. 83).
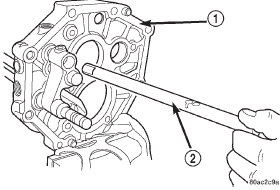
Fig. 83 Install Fifth Gear Shift Rail
1 - INTERMEDIATE PLATE
2 - FIFTH GEAR SHIFT RAIL
(14) Remove the intermediate plate from the vise, rotate the plate 180, and reinstall the plate in the vise using the same bolt and washer mounting setup.
(15) Install the shift rail detent balls in the intermediate plate.
(16) Install the shift rail detent springs in the intermediate plate. Note that the bottom detent spring is shorter than the others.
(17) Install the shift rail detent plugs in the intermediate plate.
(18) Install the 1-2 shift fork onto the 1-2 and 3-4 shift rails (Fig. 84).
(19) Install the snap-ring onto the 1-2 shift rail.
(20) Install the 3-4 shift fork onto the 3-4 shift rail (Fig. 85).
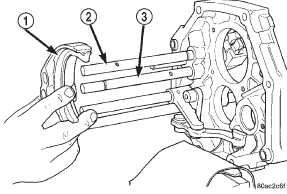
Fig. 84 Install 1-2 Shift Fork
1 - 1-2 SHIFT FORK
2 - 3-4 SHIFT RAIL
3 - 1-2 SHIFT RAIL
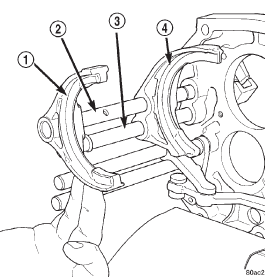
Fig. 85 Install 3-4 Shift Fork
1 - 3-4 SHIFT FORK
2 - 3-4 SHIFT RAIL
3 - 1-2 SHIFT RAIL
4 - 1-2 SHIFT FORK
(21) Install mainshaft into the intermediate plate by guiding the output shaft through opening in intermediate plate until the shift forks are aligned with the appropriate synchronizer sleeves. The mainshaft rear bearing will be started in the intermediate plate but not fully driven in at this point.
(22) While an assistant supports the mainshaft, align rear of countershaft with inner race of countershaft rear bearing.
(23) Raise countershaft upward until gears mesh with the mating gears on the mainshaft.
(24) Using a suitable rubber mallet, tap on the input shaft and the front of the countershaft equally to install the mainshaft rear bearing into the intermediate plate and the rear of the countershaft into the rear countershaft bearing. It may be necessary to occasionally hold the countershaft into the intermediate plate and tap the countershaft rear bearing onto the countershaft and into the intermediate plate.
(25) Install snap-rings onto the rear mainshaft and countershaft bearings.
(26) Install the bolts to hold the reverse shift arm bracket to the intermediate plate.
(27) Install new bolts to hold the shift forks to the shift rails (Fig. 86).
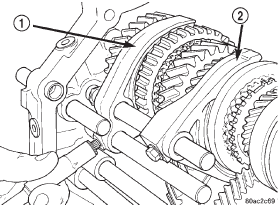
Fig. 86 Install Shift Fork Bolts
1 - 1-2 SHIFT FORK
2 - 3-4 SHIFT FORK
(28) Position the mainshaft rear bearing retainer over the output shaft and onto the intermediate plate.
(29) Install new bolts to hold the bearing retainer to the intermediate plate.
(30) Move the reverse shift arm into the reverse gear position. The reverse gear position is with the arm moved away from the intermediate plate (Fig.
87).
(31) Install the reverse idler gear assembly into position on the mainshaft and reverse shift arm.
(32) Install the compression spring and pin into the reverse idler gear shaft (Fig. 88).
(33) Install the reverse idler shaft through the intermediate plate and reverse idler gear assembly (Fig. 89) until the idler shaft pin contacts the gear assembly. Make sure that the notched cut-out in the idler shaft is to the rear of the transmission.
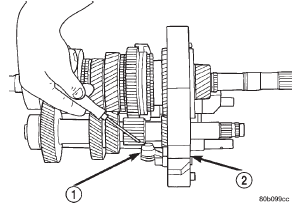
Fig. 87 Reverse Shift Arm Position
1 - REVERSE SHIFT ARM
2 - INTERMEDIATE PLATE
Fig. 88 Install Compression Spring And Pin
1 - REVERSE IDLER GEAR SHAFT
2 - PIN
3 - COMPRESSION SPRING
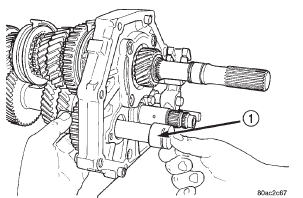
Fig. 89 Install Reverse Idler Shaft
1 - REVERSE IDLER SHAFT
(34) Align the pin with the alignment notch in the reverse idler gear assembly (Fig. 90). The alignment notch in the reverse idler gear race/hub is a small relief cut above one of the main longitudinal slots. Be sure that the pin is aligned with the proper slot, the opposite slot has an oil drain hole which the pin will drop into. The assembly will then be locked onto the shaft and will need to be disassembled in order to be removed.
(35) Depress compression spring and pin in reverse idler gear shaft (Fig. 91).
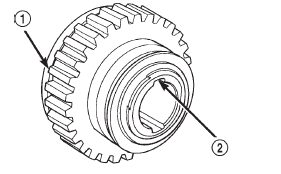
Fig. 90 Align Idler Shaft Pin
1 - REVERSE IDLER GEAR ASSEMBLY
2 - ALIGNMENT NOTCH
(36) Install the reverse idler gear shaft the remainder of the way through the reverse idler gear assembly.
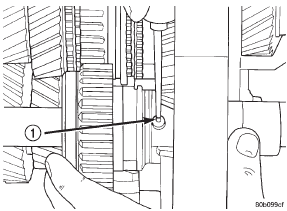
Fig. 91 Depress Pin In Reverse Idler Gear Shaft
1 - DEPRESS PIN
(37) Position the reverse idler gear shaft lock plate onto the intermediate plate.
(38) Install a new bolt to hold the idler gear shaft lock plate to the intermediate plate.
(39) Install the fifth gear thrust ring lock ball to the countershaft (Fig. 92).
(40) Install the fifth gear thrust ring onto the countershaft and over the lock ball (Fig. 93).
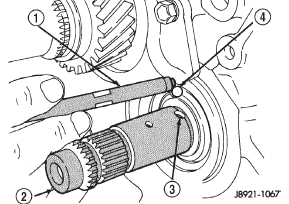
Fig. 92 Install Fifth Gear Thrust Ring Lock Ball
1 - PENCIL MAGNET
2 - CLUSTER GEAR
3 - LOCK BALL RECESS
4 - THRUST RING LOCK BALL
(41) Install fifth gear shift fork to the countershaft fifth gear assembly.
(42) Install the countershaft fifth gear bearings into the countershaft fifth gear assembly.
(43) Position the countershaft fifth gear assembly on the countershaft. Ensure that the fifth gear fork is installed onto the fifth gear shift rail.
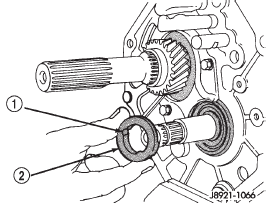
Fig. 93 Install Fifth Gear Thrust Ring
1 - LOCK BALL NOTCH
2 - FIFTH GEAR THRUST RING
(44) Install the fifth gear synchro ring.
(45) Position the fifth gear blocker ring onto the countershaft.
(46) Using a suitable mallet and spacer, tap the fifth gear blocker ring onto the countershaft.
(47) Install new bolt to hold fifth gear shift fork to the fifth gear shift rail (Fig. 94).
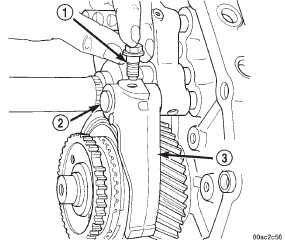
Fig. 94 Install Fifth Gear Retainer Bolt
1 - SHIFT FORK RETAINER BOLT
2 - FIFTH GEAR SHIFT RAIL
3 - FIFTH GEAR SHIFT FORK
(48) Measure countershaft fifth gear thrust clearance.
(49) Select a snap-ring so that the thrust clearance is 0.10-0.30 mm (0.004-0.010 in.).
(50) Install snap-ring to hold fifth gear blocker ring onto countershaft.
(51) Remove intermediate plate from vise and remove bolts and washers from intermediate.
 Adapter/extension housing and
front bearing retainer
Adapter/extension housing and
front bearing retainer
 Countershaft. Input shaft. Output shaft
Other materials:
Oil pump. Overdrive planetary gear and
clutch. Overdrive support
Oil pump
DISASSEMBLY
(1) Remove pump body O-ring (Fig. 199).
(2) Remove pump seal.
(3) Remove pump seal rings (Fig. 199).
(4) Remove bolts attaching stator shaft to pump
body and separate components.
(5) Remove drive gear and driven gear from pump
body (Fig. 199).
Fig. 199 Oil Pu ...