Jeep Cherokee (XJ): Driver side airbag module trim cover
The horn switch is integral to the driver side airbag module trim cover. If either component is faulty or damaged, the entire driver side airbag module trim cover and horn switch unit must be replaced.
WARNING:
- THE AIRBAG SYSTEM IS A SENSITIVE, COMPLEX ELECTROMECHANICAL UNIT. BEFORE ATTEMPTING TO DIAGNOSE OR SERVICE ANY AIRBAG SYSTEM OR RELATED STEERING WHEEL, STEERING COLUMN, OR INSTRUMENT PANEL COMPONENTS YOU MUST FIRST DISCONNECT AND ISOLATE THE BATTERY NEGATIVE (GROUND) CABLE. THEN WAIT TWO MINUTES FOR THE SYSTEM CAPACITOR TO DISCHARGE BEFORE FURTHER SYSTEM SERVICE. THIS IS THE ONLY SURE WAY TO DISABLE THE AIRBAG SYSTEM. FAILURE TO DO THIS COULD RESULT IN ACCIDENTAL AIRBAG DEPLOYMENT AND POSSIBLE PERSONAL INJURY.
- THE HORN SWITCH IS INTEGRAL TO THE AIRBAG MODULE TRIM COVER. SERVICE OF THIS COMPONENT SHOULD BE PERFORMED ONLY BY CHRYSLER-TRAINED AND AUTHORIZED DEALER SERVICE TECHNICIANS. FAILURE TO TAKE THE PROPER PRECAUTIONS OR TO FOLLOW THE PROPER PROCEDURES COULD RESULT IN ACCIDENTAL, INCOMPLETE, OR IMPROPER AIRBAG DEPLOYMENT AND POSSIBLE OCCUPANT INJURIES.
REMOVAL
(1) Disconnect and isolate the battery negative cable. If either of the airbags has not been deployed, wait two minutes for the system capacitor to discharge before further service.
(2) Remove the driver side airbag module from the steering wheel. Refer to Driver Side Airbag Module in the Removal and Installation section of this group for the procedures.
(3) Remove the plastic horn switch feed wire retainer from the stud on the back of the driver side airbag housing (Fig. 5).
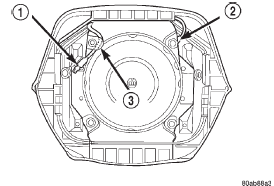
Fig. 5 Horn Switch Feed Wire Remove/Install
1 - HORN SWITCH FEED WIRE
2 - HORN SWITCH GROUND WIRE
3 - WIRE RETAINER
(4) Remove the four nuts that secure the upper and lower trim cover retainers to the studs on the back of the driver side airbag housing (Fig. 6).
(5) Remove the upper and lower trim cover retainers from the airbag housing studs.
(6) Remove the horn switch ground wire eyelet from the upper airbag housing stud.
(7) Disengage the four trim cover locking blocks from the lip around the outside edge of the driver side airbag housing and remove the housing from the cover (Fig. 7).
INSTALLATION
WARNING:
- USE EXTREME CARE TO PREVENT ANY FOREIGN MATERIAL FROM ENTERING THE DRIVER SIDE AIRBAG MODULE, OR BECOMING ENTRAPPED BETWEEN THE AIRBAG CUSHION AND THE DRIVER SIDE AIRBAG TRIM COVER. FAILURE TO OBSERVE THIS WARNING COULD RESULT IN OCCUPANT INJURIES UPON AIRBAG DEPLOYMENT.
- THE DRIVER SIDE AIRBAG MODULE TRIM COVER MUST NEVER BE PAINTED. REPLACEMENT TRIM COVERS ARE SERVICED IN THE ORIGINAL COLORS. PAINT MAY CHANGE THE WAY IN WHICH THE MATERIAL OF THE TRIM COVER RESPONDS TO AN AIRBAG DEPLOYMENT. FAILURE TO
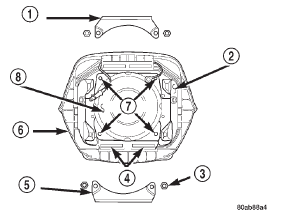
Fig. 6 Driver Side Airbag Trim Cover Retainers Remove/Install
1 - UPPER RETAINER
2 - AIRBAG HOUSING
3 - NUT (4)
4 - RETAINER SLOTS
5 - LOWER RETAINER
6 - TRIM COVER
7 - STUDS
8 - INFLATOR

Fig. 7 Driver Side Airbag Trim Cover Remove/Install
1 - RETAINER SLOTS
2 - TRIM COVER
3 - LOCKING BLOCKS
4 - RETAINER SLOTS
5 - HORN SWITCH
OBSERVE THIS WARNING COULD RESULT IN OCCUPANT INJURIES UPON AIRBAG DEPLOYMENT.
(1) Carefully position the driver side airbag module in the trim cover. Be certain that the horn switch feed and ground wires are not pinched between the airbag housing and the trim cover locking blocks.
(2) Engage the upper and lower trim cover locking blocks with the lip of the driver side airbag housing, then engage the locking blocks on each side of the trim cover with the lip of the housing. Be certain that each of the locking blocks is fully engaged on the lip of the airbag housing (Fig. 8).
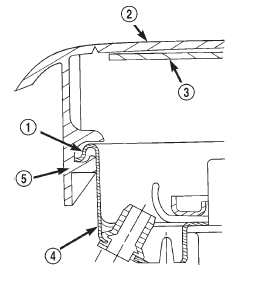
Fig. 8 Driver Side Airbag Trim Cover Locking Blocks Engaged
1 - LIP
2 - TRIM COVER
3 - HORN SWITCH
4 - AIRBAG HOUSING
5 - LOCKING BLOCK
(3) Install the horn switch ground wire eyelet over the upper airbag housing stud.
(4) Install the upper and lower airbag trim cover retainers over the airbag housing studs. Be certain that the tabs on each retainer are engaged in the retainer slots of the upper and lower trim cover locking blocks (Fig. 7).
(5) Install and tighten the trim cover retainer mounting nuts on the airbag housing studs. Tighten the nuts to 10 N·m (90 in. lbs.).
(6) Install the driver side airbag module onto the steering wheel. Refer to Driver Side Airbag Module in the Removal and Installation section of this group for the procedures.


Other materials:
Accumulator. Pistons. Front clutch
Accumulator
DESCRIPTION
The accumulator (Fig. 36) is a hydraulic device
that has the sole purpose of cushioning the application
of a band or clutch. The accumulator consists of
a dual-land piston and a spring located in a bore in
the transmission case.
OPERATION
Line pressure is directed betw ...