Jeep Cherokee (KL): Front Ventilated Seats. Head Restraints. 60/40 Split Folding Rear Seat With Fold-Flat Feature
Located in the seat cushion and seat back are fans that
draw the air from the passenger compartment and move
air through fine perforations in the seat cover to help
keep the driver and front passenger cooler in higher
ambient temperatures. The fans operate at two speeds,
HI and LO. The front ventilated seats control buttons are located
within the Uconnect system. You can gain access to the
control buttons through the climate screen or the controls
screen. NOTE: The engine must be running for the ventilated
seats to operate. Vehicles Equipped With Remote Start On models that are equipped with remote start, the
ventilated seats can be programed to come on during a
remote start. This feature can be programmed through the Uconnect
system. Refer to "Uconnect Settings" in "Understanding
Your Instrument Panel" for further information. Head restraints are designed to reduce the risk of injury
by restricting head movement in the event of a rear
impact. Head restraints should be adjusted so that the top
of the head restraint is located above the top of your ear. WARNING! The head restraints for all occupants must be properly
adjusted prior to operating the vehicle or occupying
a seat. Head restraints should never be adjusted
while the vehicle is in motion. Driving a
vehicle with the head restraints improperly adjusted
or removed could cause serious injury or death in the
event of a collision. NOTE: Do not reverse the head restraints (making the
rear of the head restraint face forward) in an attempt to
gain additional clearance to the back of your head. The front driver and passenger seats are equipped with
Reactive Head Restraints (RHR). In the event of a rear
impact the RHRs will automatically extend forward
minimizing the gap between the back of the occupant's
head and the RHR.
The RHRs will automatically return to their normal
position following a rear impact. If the RHRs do not
return to their normal position see your authorized
dealer immediately.
To raise the head restraint, pull upward on the head
restraint. To lower the head restraint, push the adjustment
button, located at the base of the head restraint, and
push downward on the head restraint. NOTE: To remove the head restraint, raise it as far as it
can go then push the release button and the adjustment
button at the base of each post while pulling the head
restraint up. Seatback angle may need to be adjusted to
fully remove the head restraint. To reinstall the head
restraint, put the head restraint posts into the holes and
push downward. Then adjust the head restraint to the
appropriate height.
1 - Release Button 2 - Adjustment Button WARNING! The rear outboard head restraints have three positions
Up, Mid and Down. The center head restraint has only
two positions, Up and Down. When the center seat is
being occupied the head restraint should be in the raised
position. When there is no occupant in the center seat the
head restraint can be lowered for maximum visibility for
the driver.
To raise the head restraint, pull upward on the head
restraint. To lower the head restraint, push the adjustment
button, located at the base of the head restraint, and
push downward on the head restraint. NOTE: To remove the head restraint, raise it as far as it
can go then push the release button and the adjustment
button at the base of each post while pulling the head
restraint up. To reinstall the head restraint, put the head
restraint posts into the holes and push downward. Then
adjust the head restraint to the appropriate height.
1 - Release Button 2 - Adjustment Button
1 - Adjustment Button 2 - Release Button WARNING! ALL the head restraints MUST be reinstalled in the
vehicle to properly protect the occupants. Follow the
re-installation instructions above prior to operating
the vehicle or occupying a seat. To provide additional storage area, each rear seat can be
folded flat. This allows for extended cargo space and still
maintains some rear seating room. NOTE: Prior to folding the rear seat, it may be necessary
to position the front seat to its mid-track position. Also,
be sure that the front seats are fully upright and positioned
forward. This will allow the rear seat to fold down
easily. WARNING! Lift up on the adjusting bar located at the front of the seat
near the floor and release it when the seat is at the desired
position. Then, using body pressure, move forward and
rearward on the seat to be sure that the seat adjusters
have latched.
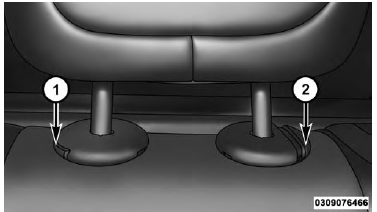
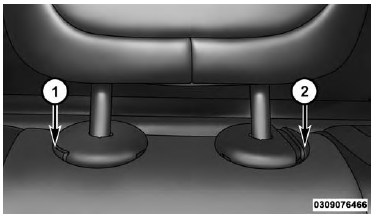
To Lower The Rear Seat 1. Lift the seatback release lever located on the upper
outer edge of the seat or pull the pull strap located on
the middle outer edge of the seat. 2. Fold the rear seatback completely forward. NOTE: If interference from the cargo area prevents the
seatback from fully locking, you will have difficulty
returning the seat to its proper position. Raise the seatback and lock it into place. WARNING! Be certain that the seatback is securely locked into
position. If the seatback is not securely locked into
position the seat will not provide the proper stability
for child seats and/or passengers. An improperly
latched seat could cause serious injury. Recliner Adjustment The rear seatback also reclines for additional passenger
comfort. Pull on the pull strap while sitting in the rear
seat to recline the seatback.
WARNING! Do not ride with the seatback reclined so that the
shoulder belt is no longer resting against your chest.
In a collision you could slide under the seat belt,
which could result in serious injury or death.Front Ventilated Seats - If Equipped
 once to choose HI.
 a second time to
choose LO.
a second time to
choose LO. a third time to
turn the ventilated seat OFF.
a third time to
turn the ventilated seat OFF.Head Restraints
Reactive Head Restraints - Front Seats
Front Head Restraint
Rear Head Restraints
Outboard Head Restraint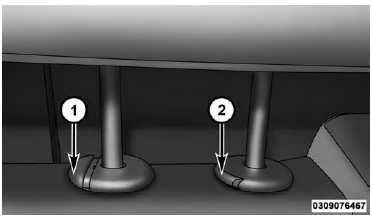
Center Head Restraint60/40 Split Folding Rear Seat With Fold-Flat Feature
Rear Seat Forward/Rearward Adjustment - If
Equipped

Rear Seat Adjustment Bar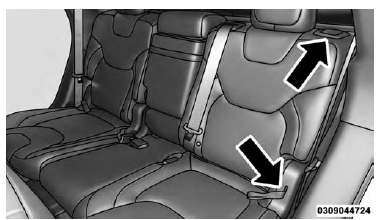
Rear Seatback Release Lever And Pull StrapTo Raise The Rear Seat
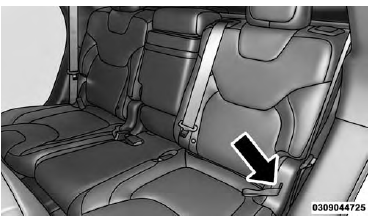
Rear Seat Recliner Pull Strap
 Power Seats. Manual Seats. Front Heated Seats

Other materials:
Service procedures
Clutch component lubrication
Proper clutch component lubrication is important
to satisfactory operation. Using the correct lubricant
and not over lubricating are equally important. Apply
recommended lubricant sparingly to avoid disc and
pressure plate contamination.
Clutch and transmission co ...