Jeep Cherokee (XJ): Service procedures
Proper clutch component lubrication is important
to satisfactory operation. Using the correct lubricant
and not over lubricating are equally important. Apply
recommended lubricant sparingly to avoid disc and
pressure plate contamination.
Clutch and transmission components requiring
lubrication are: NOTE: Never apply grease to any part of the clutch
cover, or disc. RECOMMENDED LUBRICANTS Use Mopart multi-purpose grease for the clutch
pedal bushings and pivot shaft. Use Mopart high
temperature grease (or equivalent) for all other lubrication
requirements. Apply recommended amounts
and do not over lubricate. If inspection or diagnosis indicates additional fluid
may be needed, use Mopart brake fluid, or an equivalent meeting standards SAE
J1703 and DOT 3. Do
not use any other type of fluid. The clutch fluid reservoir, master cylinder, slave
cylinder and fluid lines are pre-filled with fluid at
the factory during assembly operations.
The hydraulic system should not require additional
fluid under normal circumstances. In fact, the reservoir
fluid level will actually increase as normal
clutch wear occurs. For this reason, it is important
to avoid overfilling, or removing fluid from
the reservoir.
Clutch fluid level is checked at the master cylinder
reservoir (Fig. 9). An indicator ring is provided on the
outside rim of the reservoir.
Be sure to wipe the reservoir and cover clean
before removing the cover. This will avoid having dirt
or foreign material fall into the reservoir during a
fluid level check.
1 - CAP Inspect the flywheel whenever the clutch disc,
cover and housing are removed for service. Check
condition of the flywheel face, hub, ring gear teeth,
and flywheel bolts.
Minor scratches, burrs, or glazing on the flywheel
face can be reduced with 180 grit emery cloth. However,
the flywheel should be replaced if the disc contact
surface is severely scored, heat checked, cracked,
or obviously worn.
Flywheel machining is not recommended. The flywheel
surface is manufactured with a unique contour
that would be negated by machining. However,
cleanup of minor flywheel scoring can be performed
by hand with 180 grit emery, or with surface grinding
equipment. Replace the flywheel if scoring is
deeper than 0.0762 mm (0.003 in.).
Heavy stock removal by grinding is not recommended.
Excessive stock removal can result in flywheel
cracking or warpage after installation. It can
also weaken the flywheel and interfere with proper
clutch release.
Check flywheel runout if misalignment is suspected.
Runout should not exceed 0.08 mm (0.003
in.). Measure runout at the outer edge of the flywheel
face with a dial indicator. Mount the dial indicator
on a stud installed in place of one of the clutch
housing attaching bolts.
Clean the crankshaft flange before mounting the
flywheel. Dirt and grease on the flange surface may
cock the flywheel causing excessive runout.
Check condition of the flywheel hub and attaching
bolts. Replace the flywheel if the hub exhibits cracks
in the area of the attaching bolt holes.
Install new attaching bolts whenever the flywheel
is replaced and use Mopart Lock N' Seal, or Loctite
242 on the replacement bolt threads.
Recommended flywheel bolt torques are: Inspect the teeth on the starter ring gear. If the
teeth are worn or damaged, the flywheel should
be replaced as an assembly. This is the recommended
and preferred method of repair.
In cases where a new flywheel is not readily available,
a replacement ring gear can be installed. However,
the following precautions must be observed to
avoid damaging the flywheel and replacement gear.
(1) Mark position of the old gear for alignment reference
on the flywheel. Use a scriber for this purpose.
(2) Wear protective goggles or approved safety
glasses. Also wear heat resistent gloves when handling
a heated ring gear.
(3) Remove the old gear by cutting most of the way
through it (at one point) with an abrasive cut-off
wheel. Then complete removal with a cold chisel or
punch.
(4) The ring gear is a shrink fit on the flywheel.
This means the gear must be expanded by heating in
order to install it. The method of heating and
expanding the gear is extremely important.
Every surface of the gear must be heated at the same
time to produce uniform expansion. An oven or similar
enclosed heating device must be used. Temperature
required for uniform expansion is approximately
375 F. CAUTION: Do not use an oxy/acetylene torch to
remove the old gear, or to heat and expand a new
gear. The high temperature of the torch flame can
cause localized heating that will damage the flywheel.
In addition, using the torch to heat a replacement
gear will cause uneven heating and
expansion. The torch flame can also anneal the
gear teeth resulting in rapid wear and damage after
installation.
(5) The heated gear must be installed evenly to
avoid misalignment or distortion. A shop press and
suitable press plates should be used to install the
gear if at all possible.
(6) Be sure to wear eye and hand protection. Heat
resistent gloves and safety goggles are needed for
personal safety. Also use metal tongs, vise grips, or
similar tools to position the gear as necessary for
installation.
(7) Allow the flywheel and ring gear to cool down
before installation. Set the assembly on a workbench
and let it cool in normal shop air.
CAUTION: Do not use water, or compressed air to
cool the flywheel. The rapid cooling produced by
water or compressed air can distort, or crack the
gear and flywheel.Clutch component lubrication
Clutch linkage fluid
Clutch fluid level
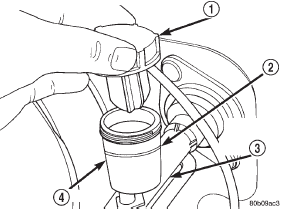
Fig. 9 Clutch Master Cylinder Reservoir And Cap
2 - FILL LINE
3 - CLUTCH MASTER CYLINDER
4 - RESERVOIRFlywheel


Other materials:
Enabling And Disabling ParkSense. Service The ParkSense Park Assist System. ParkSense System Usage Precautions
Enabling And Disabling ParkSense
ParkSense can be enabled and disabled with the
ParkSense switch, located on the switch panel below the
Uconnect display.
ParkSense Switch
When the ParkSense switch is pushed to disable the
system, the instrument cluster will display the
"PARKSENSE OFF" mess ...