Jeep Cherokee (XJ): Grille. Grille opening panel (gop). Hood
REMOVAL (1) Remove the headlamp/park lamp bezels.
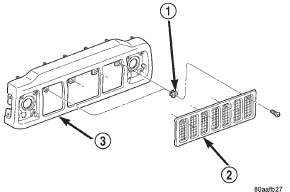
(2) Remove the screws attaching the grille to the
grille opening panel (GOP) (Fig. 1).
(3) Separate the grille from the GOP.
1 - NUT INSTALLATION (1) Position the grille in the GOP.
(2) Install the screws.
(3) Install the headlamp/park lamp bezels. REMOVAL (1) Remove headlamp bezels.
(2) Remove grille.
(3) Remove side marker lamps.
(4) Remove headlamps and park/turn signal
lamps.
(5) Open hood.
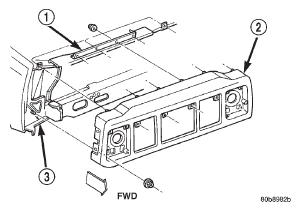
(6) Remove nuts that attach GOP to front fenders
(Fig. 2).
(7) Remove nuts attaching GOP to support
bracket.
(8) Pull GOP forward and disconnect harness clips
and front lamp harness connectors.
(9) Remove GOP from vehicle. INSTALLATION (1) Place GOP on bumper and secure all harness
clips.
(2) Connect all lamp wire harness connectors.
1 - SUPPORT BRACKET (3) Position GOP on vehicle.
(4) Install nuts attaching GOP to front fenders.
Tighten nuts to 4 N·m (38 in-lbs) torque.
(5) Install nuts attaching GOP to support bracket.
Tighten nuts to 4 N·m (38 in-lbs) torque.
(6) Install headlamps and park/turn signal lamps.
(7) Install grille.
(8) Install side marker lamps.
(9) Install headlamp bezels.
(10) Adjust headlamp aim, if necessary. REMOVAL (1) Raise hood.
(2) Disconnect underhood lamp wire harness connector,
if equipped.
(3) Disconnect release cable from latch release
bellcrank.
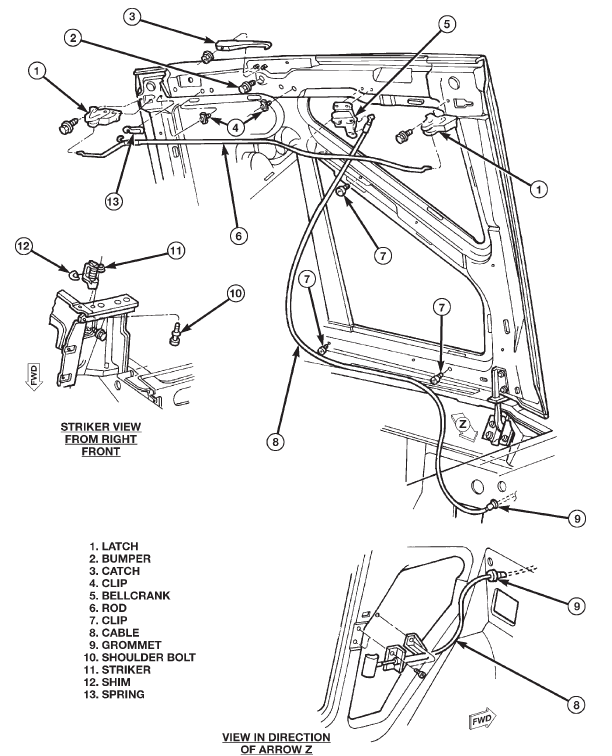
(4) Remove latch release cable clips and remove
cable from hood (Fig. 3).
(5) Mark location of hood, hinges and hinge shims
for installation.
(6) Remove bolts that attach hinges to hood.
(7) Remove hood from vehicle with aid of a helper. INSTALLATION (1) Position hood on shims and hinges; fingertighten
hinge bolts.
(2) Align hinges and shims with reference marks
and tighten hinge bolts.
(3) Connect latch release cable and latch connecting
rod to bellcrank.
(4) Attach latch release cable to clips.
(5) Connect underhood lamp wire harness connector.
Grille

Fig. 1 Grille
2 - GRILLE
3 - GRILLE OPENING PANELGrille opening panel (gop)

Fig. 2 Grille Opening Panel
2 - GRILLE OPENING PANEL
3 - BODYHood

Fig. 3 Hood Components
 Hood hinge. Hood latch. Hood latch striker
Other materials:
Transmission
DISASSEMBLY
(1) Remove torque converter.
(2) Remove clamps attaching wire harness and
throttle cable (Fig. 95) to transmission.
Fig. 95 Typical Harness And Cable Clamp Attachment
1 - CLAMP
2 - THROTTLE CABLE
3 - TRANSMISSION HARNESS
(3) Remove shift lever from manual valve shaft at
le ...

