Jeep Cherokee (XJ): Intake manifold
REMOVAL
(1) Disconnect the battery negative cable.
(2) Remove the air inlet hose and resonator from the throttle body and air cleaner (Fig. 49).
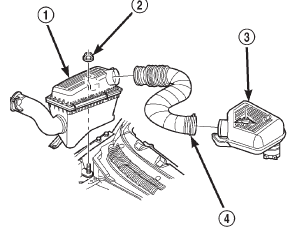
Fig. 49 Air Cleaner, Resonator and air Inlet Hose Removal and Installation
1 - AIR CLEANER ASSEMBLY
2 - NUT AND WASHER
3 - RESONATOR ASSEMBLY
4 - AIR INLET HOSE
(3) Loosen the accessory drive belt tension and remove the belt from the power steering pump (refer to Group 07, Cooling Systems for proper procedures).
(4) Remove the power steering pump and brackets from the water pump and intake manifold. Secure power steering pump and bracket out of the way.
(5) Perform fuel system pressure release procedure (refer to Group 14, Fuel System for correct procedure).
(6) Disconnect fuel supply tube from the fuel rail.
Some fuel lines require a special tool for removal/installation (refer to Group 14, Fuel System - Quick Connect Fittings).
(7) Disconnect the accelerator cable, the cruise control cable (if equipped), and the transmission line pressure cable (if equipped) from the throttle body and remove them from the cable bracket.
CAUTION: When disconnecting the cruise control connector at the throttle body, DO NOT pry the connector off with pliers or screwdriver. Use finger pressure only. Prying the connector off could break it.
(8) Disconnect the electrical connectors. Pull the harnesses away from the manifold and secure them so they do not interfere with the manifold removal and installation process.
- The throttle position sensor.
- The idle air control motor.
- The coolant temperature sensor at the thermostat.
- The manifold air temperature sensor at the intake manifold.
- The fuel injectors.
- The oxygen sensor.
(9) Disconnect the crankcase ventilation (CCV) vacuum hose and manifold absolute pressure (MAP) sensor vacuum hose connector at the intake manifold.
(10) Disconnect vacuum hose from vacuum port on the intake manifold.
(11) Disconnect CCV hose at the cylinder head cover (Fig. 50).
(12) Remove the molded vacuum harness.
(13) Disconnect the vacuum brake booster hose at the intake manifold.
(14) Remove bolts 2 through 5 securing the intake manifold to the cylinder head (Fig. 51). Slightly loosen bolt No.1 and nuts 6 and 7.
(15) Remove the intake manifold and gaskets.
Drain the coolant from the manifold.
INSTALLATION
(1) Clean the intake manifold and cylinder head mating surfaces. DO NOT allow foreign material to enter either the intake manifold or the ports in the cylinder head.
(2) Install the new intake manifold gasket over the locating dowels.
(3) Position the manifold in place and finger tighten the mounting bolts.
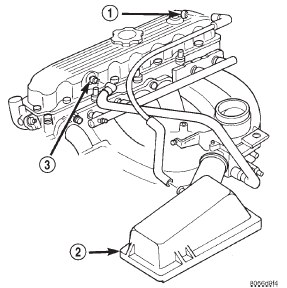
Fig. 50 Crankcase Ventilation (CCV) Hose-2.5L Engine
1 - AIR INLET FITTING
2 - AIR FILTER COVER
3 - FIXED ORIFICE FITTING
(4) Tighten the fasteners in sequence and to the specified torque (Fig. 51).
- Fastener No.1-Tighten to 41 N·m (30 ft. lbs.) torque.
- Fasteners Nos.2 through 5-Tighten to 31 N·m (23 ft. lbs.) torque.
- Fasteners Nos.6 and 7-Tighten to 23 N·m (17 ft. lbs.) torque.
(5) Connect fuel supply tube to the fuel rail inlet.
Push tube until a "click" is heard. Before connecting the fuel line to the fuel rail replace the O-rings at the quick-connect fuel line coupling.
(6) Pull out on the fuel supply tube to ensure that it is locked in place.
(7) Connect the molded vacuum hoses to the vacuum port on the intake manifold and the cylinder head cover.
(8) Connect the electrical connectors.
- The throttle position sensor.
- The idle air control motor.
- The coolant temperature sensor at the thermostat housing.
- The fuel injectors.
- The air manifold temperature sensor.
- The oxygen sensor.
(9) Connect the CCV vacuum hose and MAP sensor vacuum hose connectors to the throttle body.
(10) Install the power steering pump and bracket assembly to the water pump and intake manifold.
Hand start the three (3) tensioner bracket to p/s pump to intake manifold bolts and the two (2) tensioner bracket to water pump bolts.
(11) Tighten the power steering pump bolts to 28 N·m (21 ft. lbs.) Tighten the tensioner bracket to water pump bolts to 28 N·m (21 ft. lbs.).
(12) Connect the accelerator cable, cruise control cable (if equipped), and the transmission line pressure cable (if equipped) to the hold-down bracket and the throttle lever.
(13) Install and tension the accessory drive belt.
Refer to Group 7, Cooling System for the proper procedure.
CAUTION: Ensure that the accessory drive belt is routed correctly. Failure to do so can cause the water pump to turn in the opposite direction resulting in engine overheating. Refer to Group 7, Cooling System for the proper procedure.
(14) Connect the air inlet hose and resonator to the throttle body and the air cleaner.
(15) Connect the battery negative cable.
(16) Start the engine and check for leaks.
 Engine mounts-front. Engine mount-rear. Engine
 Exhaust manifold. Cylinder head cover. Rocker arms and push rods
Other materials:
Starting procedures
Before starting your vehicle, adjust your seat, adjust both
inside and outside mirrors, and fasten your seat belts.
WARNING!
When leaving the vehicle, always remove the key
fob from the ignition and lock your vehicle. If
equipped with Keyless Enter-N-Go, always make
sure the keyless igni ...