Jeep Cherokee (XJ): Lamp service
REMOVAL AND INSTALLATION
Headlamp
REMOVAL
(1) Remove the screws attaching the bezel to the grille opening panel (2) Remove the screws attaching the retaining ring to the headlamp bucket.
(3) Disconnect the headlamp bulb wire harness connector (Fig. 1).
(4) Separate the bulb from the vehicle.
(5) Remove the spring attaching the headlamp bucket to the grille opening panel (Fig. 2).
(6) Slide the headlamp bucket downward to disengage it from the headlamp adjusting screws.
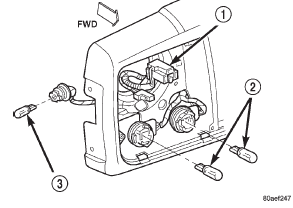
Fig. 1 Headlamp Connector
1 - HEADLAMP CONNECTOR
2 - PARK/TURN LAMP BULB
3 - SIDE MARKER LAMP BULB
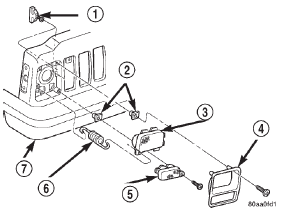
Fig. 2 Headlamp
1 - HEADLAMP ADJUSTMENT
2 - NUT
3 - HEADLAMP
4 - BEZEL
5 - PARK/TURN LAMP
6 - SPRING
7 - BUMPER
INSTALLATION
(1) Position the headlamp bucket in the grille opening panel and slide the headlamp bucket upward to engage it with the headlamp adjusting screws.
(2) Install the spring attaching the headlamp bucket to the grille opening panel.
(3) Connect the wire harness connector.
(4) Position the bulb in the bucket.
(5) Position retaining ring on the headlamp bulb and install screws.
(6) Install the headlamp bezel.
Fog lamp
REMOVAL
(1) Disconnect the fog lamp wire harness connector.
(2) Remove the screws attaching the fog lamp to the support (Fig. 3).
(3) Separate the fog lamp from the vehicle.

Fig. 3 Fog Lamp
1 - FOG LAMP
2 - BUMPER
INSTALLATION
(1) Position the fog lamp in the support bracket and install the screws.
(2) Connect the fog lamp wire harness connector
Front park/turn signal lamp
REMOVAL
(1) Remove the headlamp bezel.
(2) Remove the screws attaching the park/turn signal lamp housing to the grille opening panel (Fig. 4).
(3) Remove the bulb sockets and separate from the vehicle.
INSTALLATION
(1) Install bulbs and sockets in the lamp housing.
(2) Position the park/turn signal lamp housing on the grille opening panel and install the screws.
(3) Install the headlamp bezel.
Side marker lamp
REMOVAL
(1) Remove screws attaching side marker lamp lens to grille opening panel (Fig. 5).
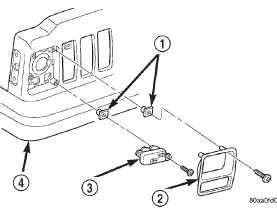
Fig. 4 Park/Turn Signal Lamp
1 - NUT
2 - BEZEL
3 - PARK/TURN LAMP
4 - BUMPER
(2) Remove bulb and socket from back side of lamp.
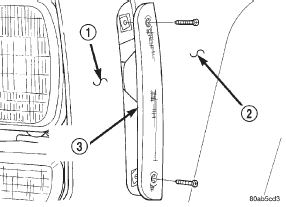
Fig. 5 Side Marker Lamp
1 - GRILLE OPENING PANEL
2 - FENDER
3 - SIDE MARKER LAMP
INSTALLATION
(1) Install bulb and socket in back of side marker lamp.
(2) Install side marker lamp in grille opening panel.
Back-up/brake/rear turn signal/tail lamp
REMOVAL
(1) Open the liftgate.
(2) Remove the bolts attaching the tail lamp housing to the quarter panel (Fig. 6).
(3) Grasp the lamp and pull to disengage it from the grommet at the base of the lamp.
(4) Rotate the bulb sockets one-third turn and remove the bulb sockets from the lamp housing.
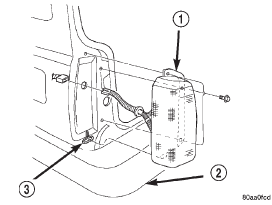
Fig. 6 Tail Lamp
1 - TAIL LAMP
2 - REAR BUMPER
3 - GROMMET
INSTALLATION
(1) Install the bulb and sockets in the lamp housing.
(2) Position the lamp housing in the quarter panel and push to engage the grommet.
(3) Install the lamp housing screws. Tighten the screws securely.
(4) Install the bolts attaching the tail lamp housing to the quarter panel.
(5) Close the liftgate.
Center high mounted stop lamp (CHMSL)
REMOVAL
(1) Remove the screws attaching the CHMSL to the liftgate (Fig. 7).
(2) Disconnect the wire harness connector.
(3) Separate the CHMSL from the vehicle.
INSTALLATION
(1) Connect the wire harness connector.
(2) Position the CHMSL on the liftgate.
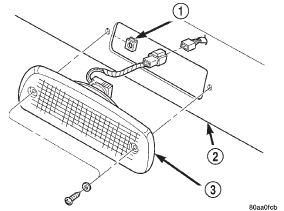
Fig. 7 Center High Mounted Stop lamp
1 - U-NUT
2 - LIFTGATE
3 - CHMSL
(3) Install the screws attaching the CHMSL to the liftgate.
License plate lamp
REMOVAL
(1) Remove screws attaching the license plate lamp to the liftgate.
(2) Remove the bulb from the lamp socket.
INSTALLATION
(1) Install bulb in the lamp socket.
(2) Position the license plate lamp on the liftgate and install screws.
Underhood lamp
The underhood lamp is installed on the hood inner panel. The lamp illuminates when the hood is opened. A switch that is integral with the lamp base controls the operation. The switch provides automatic ON/OFF functions each time the hood is opened and closed.
REMOVAL
(1) Disconnect the wire harness connector from the lamp.
(2) Remove lamp lens.
(3) Remove bulb.
(4) Remove screw attaching underhood lamp to the inner hood panel.
(5) Separate underhood lamp from vehicle.
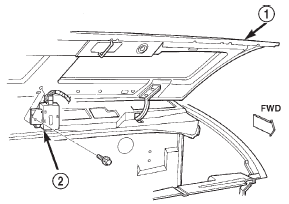
Fig. 8 Underhood Lamp
1 - HOOD
2 - UNDERHOOD LAMP/SWITCH
INSTALLATION
(1) Position underhood lamp on hood inner panel.
Ensure anti-rotation tab is positioned in slot on hood inner panel.
(2) Install the attaching screw through the lamp and into the hood panel (Fig. 8). Tighten the screw securely.
(3) Fold lamp housing over and firmly press onto base to snap into place.
(4) Connect the wire harness connector to the lamp.
Cargo lamp
REMOVAL
(1) Insert a small flat blade into the access slots (Fig. 9).
(2) Carefully pry the lens from the lamp.
(3) Disengage the lens mounting tabs from the lamp mounting pins (Fig. 10).
(4) Remove the fasteners attaching the lamp to the roof.
(5) Remove the lamp housing from the headliner cavity.
(6) Disconnect the wire harness connector.
INSTALLATION
(1) Position the dome lamp housing at the headliner cavity.
(2) Connect the wire harness connector.
(3) Install the fasteners attaching the lamp to the roof.
(4) Position the lens at the lamp housing and force it upward into the housing until the mounting tabs are seated on the lamp mounting pins.
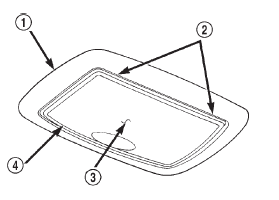
Fig. 9 Cargo Lamp
1 - HOUSING
2 - SCREWDRIVER SLOTS
3 - CARGO LAMP
4 - LENS
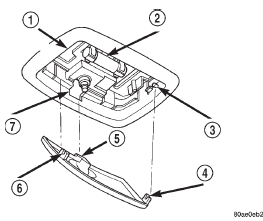
Fig. 10 Cargo Lamp Lens
1 - MOUNTING PIN ON UNDERSIDE
2 - BULB
3 - MOUNTING PIN
4 - MOUNTING TAB
5 - TAB "A"
6 - MOUNTING TAB
7 - SLOT "B"
Map/reading lamp
The map/reading lamp can be serviced by removing the overhead console. Refer to Group 8C, Overhead Console for removal/installation procedures.
Visor vanity lamp
REMOVAL
(1) Fold down sunvisor.
(2) Starting at the base of the lamp assembly and working right-to-left, use a small flat blade, carefully pry lamp from visor.
(3) Disconnect visor lamp wire connector and remove from vehicle.
INSTALLATION
(1) Position visor lamp at visor and connect visor lamp wire connector.
(2) Position visor lamp in visor and press into place.


Other materials:
Removal and installation
Front skid plate
REMOVAL
(1) Remove the screws that attach skid plate to
side sills.
(2) Remove the nuts that attach the skid plate to
the crossmember (Fig. 1).
(3) Remove the skid plate from the vehicle.
Fig. 1 Front Skid Plate
1 - STUD
2 - PUSH NUT
3 - SPLASH SHIELD
4 - SKID PLAT ...