Jeep Cherokee (XJ): Lamp systems
REMOVAL AND INSTALLATION
Sentinel headlamp delay module
REMOVAL
(1) Remove the knee blocker.
(2) Remove the screw that attaches the module to the inside of the instrument panel (Fig. 1).
(3) Disconnect the wire harness connector and remove the module from the instrument panel.
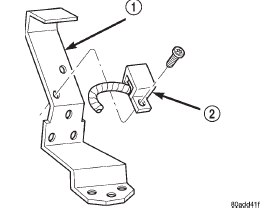
Fig. 1 Headlamp Delay Module
1 - BRACKET
2 - HEADLAMP DELAY MODULE
INSTALLATION
(1) Position the module inside the I/P and connect the wire harness connector to the module.
(2) Install the screw that attaches the module to the inside of the instrument panel.
(3) Install the knee blocker.
Daytime running lamp module
REMOVAL
The Daytime Running Lights (DRL) module is located on the right fender inner panel adjacent to the dash panel (Fig. 2).
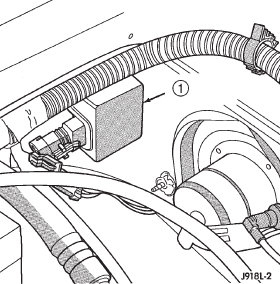
Fig. 2 Daytime Running Lamp Module
1 - DAYTIME RUNNING LIGHT MODULE
(1) Disconnect the wire harness connector from the module.
(2) Remove the screws that attach the module to the fender inner panel.
(3) Remove the module from the fender inner panel.
INSTALLATION
(1) Position the module on the right fender inner panel.
(2) Install the attaching screws. Tighten the screws securely.
(3) Connect the wire harness connector to the module.


Other materials:
Description and operation
Cooling system
DESCRIPTION
The cooling system regulates engine operating temperature.
It allows the engine to reach normal operating
temperature as quickly as possible, maintains
normal operating temperature and prevents overheating.
The cooling system also provides a means of heating
the ...