Jeep Cherokee (XJ): Planetary/brake pack/output shaft

Rear Planetary, Brake Pack, Output Shaft Components
1 - FIRST-REVERSE BRAKE PACK
2 - SNAP RING
3 - NO. 2 ONE-WAY CLUTCH
4 - REAR PLANETARY GEAR
5 - REAR THRUST WASHER
6 - FRONT THRUST WASHER
7 - ONE-WAY CLUTCH INNER RACE
8 - SNAP RING
9 - RING GEAR HUB
10 - REAR PLANETARY RING GEAR
11 - THRUST BEARING
12 - RACES
13 - OUTPUT SHAFT
14 - SEAL RING
DISASSEMBLY
(1) Remove output shaft from gear assembly (Fig.
287).
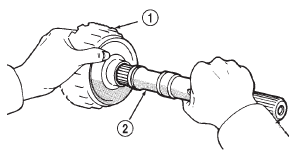
Fig. 287 Removing/Installing Output Shaft
1 - GEAR ASSEMBLY
2 - OUTPUT SHAFT
(2) Remove and discard shaft seal ring (Fig. 288).
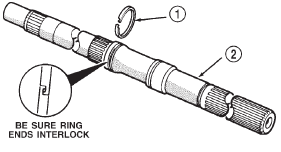
Fig. 288 Removing/Installing Shaft Seal Ring
1 - SEAL RING
2 - OUTPUT SHAFT
(3) Remove brake pack from planetary gear (Fig.
289).
(4) Remove planetary gear from ring gear (Fig.
290).
(5) Check No. 2 one-way clutch (Fig. 291). Hold planetary gear and turn clutch inner race in both directions. Race should turn freely counterclockwise, but lock when turned clockwise. Replace one-way clutch if necessary.
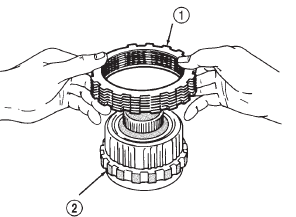
Fig. 289 Removing/Installing First-Reverse Brake Pack
1 - FIRST-REVERSE BRAKE PACK
2 - REAR PLANETARY GEAR
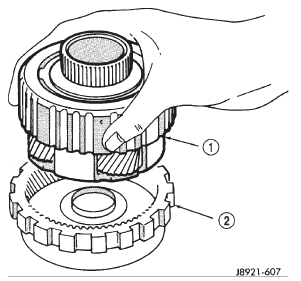
Fig. 290 Removing/Installing Rear Plane
1 - REAR PLANETARY GEAR
2 - RING GEAR
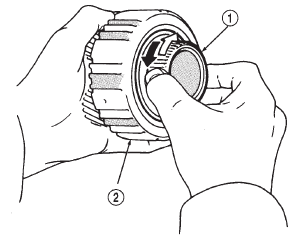
Fig. 291 Checking No. 2 One-Way Clutch Operation
1 - CLUTCH INNER RACE
2 - PLANETARY GEAR
(6) Remove clutch inner race from planetary gear (Fig. 292).
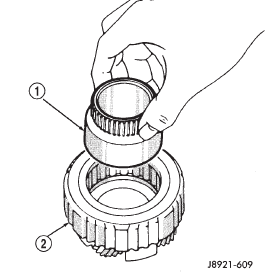
Fig. 292 Removing/Installing Clutch Inner Race
1 - CLUTCH INNER RACE
2 - REAR PLANETARY
(7) Remove clutch snap ring and remove No. 2 one-way clutch top end cap from planetary.
(8) Remove No. 2 one-way clutch from planetary (Fig. 293).
(9) Remove No. 2 one-way clutch bottom end cap from planetary.
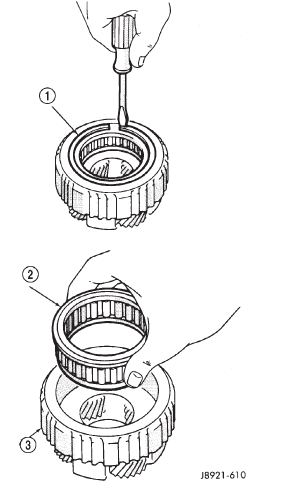
Fig. 293 Removing/Installing One-Way Clutch
1 - CLUTCH SNAP RING
2 - NO. 2 ONE-WAY CLUTCH
3 - PLANETARY GEAR
(10) Remove front and rear thrust washers from planetary gear (Fig. 294).
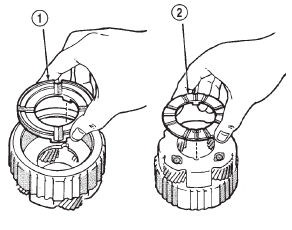
Fig. 294 Removing/Installing Rear Planetary Thrust Washers
1 - FRONT THRUST WASHER
2 - REAR THRUST WASHER
(11) Remove thrust bearing and washers from ring gear (Fig. 295).
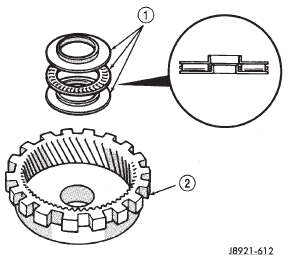
Fig. 295 Removing/Installing Ring Gear Thrust Bearing And Races
1 - THRUST BEARING AND RACES
2 - RING GEAR
(12) Remove ring gear snap ring and remove ring gear hub (Fig. 296).
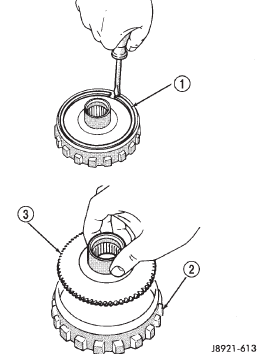
Fig. 296 Removing/Installing Ring Gear Hub
1 - SNAP RING
2 - RING GEAR
3 - HUB
(13) Inspect and replace any worn or damaged planetary gear components.
ASSEMBLY
(1) Measure thickness of each brake pack disc.
Minimum thickness is 1.51 mm (0.0594 in.). Replace all discs if any disc is thinner than specified.
(2) Install hub and snap ring in ring gear (Fig.
296) (3) Identify ring gear thrust bearing and races by following dimensions (Fig. 295) :
- Outer diameter of bottom race is 44.8 mm (1.764 in.) and inner diameter is 27.6 mm (1.087 in.).
- Outer diameter of bearing is 44.7 mm (1.760 in.) and inner diameter is 30.1 mm (1.185 in.).
- Outer diameter of upper race is 44.8 mm (1.764 in.) and inner diameter is 28.8 mm (1.134 in.).
(4) Lubricate ring gear thrust bearing and races with petroleum jelly and install them in ring gear (Fig. 295).
(5) Coat planetary thrust washers with petroleum jelly and install them in gear (Fig. 294).
(6) Install No. 2 one-way clutch bottom end cap into the planetary gear.
(7) Install No. 2 one-way clutch in planetary gear.
Be sure flanged side of clutch faces upward (Fig.
297).
(8) Install No. 2 one-way clutch top end cap into the planetary gear.
Fig. 297 Installing No. 2 One-Way Clutch
1 - FLANGED SIDE OF CLUTCH
2 - NO. 2 ONE-WAY CLUTCH
3 - REAR PLANETARY
(9) Install clutch retaining snap ring and install clutch inner race (Fig. 292). Turn race counterclockwise to ease installation.
(10) Verify one-way clutch operation. Hold gear and turn inner race in both directions. Race should turn freely counterclockwise, but lock when turned clockwise.
(11) Install planetary gear in ring gear.
(12) Install thrust bearing and washers onto the ring gear (Fig. 295).
(13) Assemble clutch discs and clutch plates (Fig.
289). Sequence is disc first, then a plate. Use seven discs and plates.
(14) Install brake pack on planetary gear (Fig.
289).
(15) Install new seal ring on output shaft (Fig.
288). Be sure ring ends are interlocked as shown.
 Front planetary gear. Sun gear and no. 1 one-way clutch. Second brake

Other materials:
Heater and air conditioner. Heater and air conditioner control. Heater core
Heater and air conditioner
DESCRIPTION
All vehicles are equipped with a common heater-
A/C housing assembly (Fig. 4). The system combines
air conditioning, heating, and ventilating capabilities
in a single unit housing mounted under the instrument
panel. On heater-only systems, the evaporator
...