Jeep Cherokee (XJ): Service procedures. Removal and installation. Disassembly and assembly
Service procedures
Driveline angle measurement
preparation
Before measuring universal joint angles, the following
must be done;
- Inflate all tires to correct pressure.
- Check the angles in the same loaded or
unloaded condition as when the vibration occurred.
Propeller shaft angles change according to the
amount of load in the vehicle.
- Check the condition of all suspension components
and verify all fasteners are torqued to specifications.
- Check the condition of the engine and transmission
mounts and verify all fasteners are torqued to
specifications.
Propeller shaft angle measurement
To accurately check driveline alignment, raise and
support the vehicle at the axles as level as possible.
Allow the wheels and propeller shaft to turn.
- Remove any external bearing snap rings, if
equipped, from universal joint so protractor base sits
flat.
- Rotate the shaft until transmission/transfer
case output yoke bearing is facing downward.
Always make measurements from front to
rear. Also, be sure to take all measurements
while working from the same side of the vehicle.
- Place Inclinometer on yoke bearing (A) parallel
to the shaft (Fig. 9). Center bubble in sight glass and
record measurement.
This measurement will give you the transmission
or Output Yoke Angle (A).
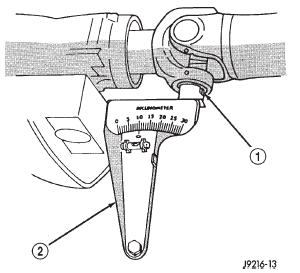
Fig. 9 Front (Output) Angle Measurement (A)
1 - SLIP YOKE BEARING CAP
2 - SPECIAL TOOL 7663 (J-23498A)
- Rotate propeller shaft 90 degrees and place
Inclinometer on yoke bearing parallel to the shaft
(Fig. 10). Center bubble in sight glass and record
measurement. This measurement can also be taken
at the rear end of the shaft.
This measurement will give you the Propeller
Shaft Angle (C).
- Subtract smaller figure from larger (C minus
A) to obtain Transmission Output Operating Angle.
- Rotate propeller shaft 90 degrees and place
Inclinometer on pinion yoke bearing parallel to the
shaft (Fig. 11). Center bubble in sight glass and
record measurement.
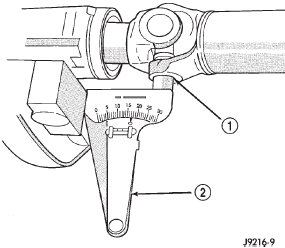
Fig. 10 Propeller Shaft Angle Measurement (C)
1 - SHAFT YOKE BEARING CAP
2 - SPECIAL TOOL 7663 (J23498-A)
This measurement will give you the pinion
shaft or Input Yoke Angle (B).
(7) Subtract smaller figure from larger (C minus
B) to obtain axle Input Operating Angle.
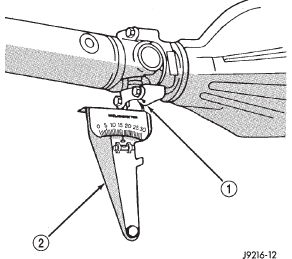
Fig. 11 Rear (Input) Angle Measurement (B)
1 - PINION YOKE BEARING CAP
2 - SPECIAL TOOL 7663 (J-23498A)
Refer to rules given below and the example in
(Fig. 12) for additional information.
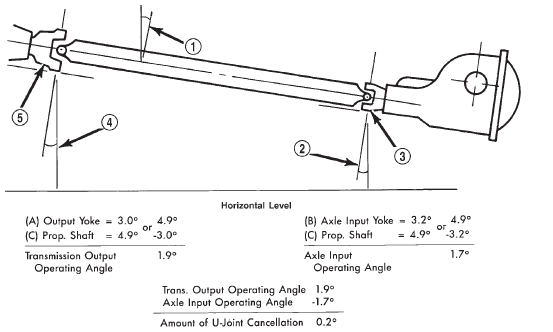
Fig. 12 Universal Joint Angle Example
1 - 4.9 Angle (C)
2 - 3.2 Angle (B)
3 - Input Yoke
4 - 3.0 Angle (A)
5 - Output Yoke
- Good cancellation of U-joint operating angles
(within 1).
- Operating angles less than 3.
- At least 1/2 of one degree continuous operating
(propeller shaft) angle.
Removal and installation
Front propeller shaft
REMOVAL
- Hoist and support vehicle on safety stands.
- Remove the crossmember/skid plate as necessary
to gain access to the propeller shaft.
- Shift the transmission and transfer case, if necessary,
into the Neutral position.
- Using a suitable marker, mark a line across
the yoke at the transfer case, the link yoke, and propeller
shaft yoke at the rear of the front propeller
shaft for installation reference (Fig. 13).
- Mark a line across the propeller shaft yoke and
the pinion shaft yoke for installation reference.
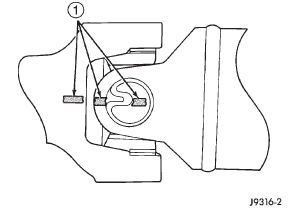
Fig. 13 Reference Marks on Yokes
1 - REFERENCE MARKS
- Remove the U-joint strap bolts at the pinion
shaft yoke (Fig. 14).
- Remove bolts holding rear universal joint to
the transfer case yoke.
- Separate the rear universal joint from the
transfer case yoke.
- Push rear of propeller shaft upward to clear
transfer case yoke.
- Separate front universal joint from front axle.
- Separate propeller shaft from vehicle.
INSTALLATION
- Position front propeller shaft under vehicle
with rear universal joint over the transfer case yoke.
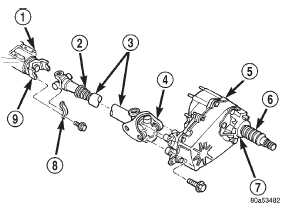
Fig. 14 Front Propeller Shaft
1 - FRONT AXLE
2 - BOOT
3 - PROPELLER SHAFT
4 - CV-JOINT
5 - TRANSFER CASE
6 - BOOT
7 - SLINGER
8 - CLAMP
9 - YOKE
- Place front universal joint into the axle pinion
yoke.
- Align mark on the rear link yoke and universal
joint to the mark on the transfer case yoke (Fig. 13).
- Loosely install bolts to hold universal joint to
transfer case yoke.
- Align mark on front universal joint to the mark
on the axle pinion yoke.
- Tighten the U-joint strap/clamp bolts at the
axle yoke to 19 N·m (14 ft. lbs.) torque.
- Tighten the universal joint to transfer case
bolts to 27 N·m (20 ft. lbs.) torque.
- Lower the vehicle.
Rear propeller shaft
REMOVAL
- Shift the transmission and transfer case into
Neutral.
- Hoist and support vehicle on safety stands.
- Scribe alignment marks at the pinion shaft and
at each end of the propeller shaft. These marks will
be used for installation reference.
- Remove the U-joint strap bolts at the pinion
shaft yoke.
- Pry open clamp holding the dust boot to propeller
shaft yoke (Fig. 15).
- Slide the slip yoke off of the transmission/
transfer case output shaft and remove the propeller
shaft (Fig. 16).

Fig. 15 Dust Boot Clamp
1 - SLINGER
2 - BOOT
3 - AWL
4 - TRANSFER CASE
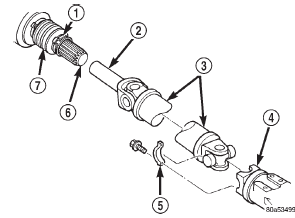
Fig. 16 Rear Propeller Shaft
1 - CLAMP
2 - YOKE
3 - PROPELLER SHAFT
4 - AXLE YOKE
5 - CLAMP
6 - OUTPUT SHAFT
7 - BOOT
INSTALLATION
- Slide the slip yoke on the transmission/transfer
case output shaft. Align the installation reference
marks at the axle yoke and install the propeller shaft
(Fig. 16).
- Tighten the U-joint strap/clamp bolts at the
axle yoke to 19 N·m (14 ft. lbs.) torque.
- Crimp clamp to hold dust boot to propeller
shaft yoke (Fig. 17).
- Lower the vehicle.
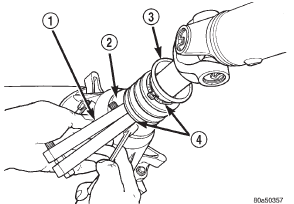
Fig. 17 Crimping Dust Boot Clamp
1 - SPECIAL TOOL C-4975-A
2 - SLINGER
3 - BOOT
4 - CLAMP
Disassembly and assembly
Single cardan universal joint
DISASSEMBLY
Individual components of cardan universal joints
are not serviceable. If worn or leaking, they must be
replaced as an assembly.
- Remove the propeller shaft.
- Using a soft drift, tap the outside of the bearing
cap assembly to loosen snap ring.
- Remove snap rings from both sides of yoke
(Fig. 18).
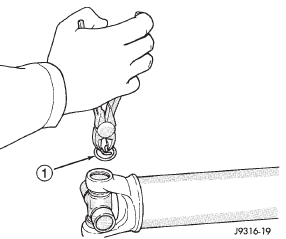
Fig. 18 Remove Snap Ring
1 - SNAP RING
- Set the yoke in an arbor press or vise with a
socket whose inside diameter is large enough to
receive the bearing cap positioned beneath the yoke.
- Position the yoke with the grease fitting, if
equipped, pointing up.
- Place a socket with an outside diameter
smaller than the upper bearing cap on the upper
bearing cap and press the cap through the yoke to
release the lower bearing cap (Fig. 19).
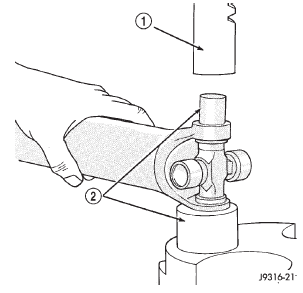
Fig. 19 Press Out Bearing
1 - PRESS
2 - SOCKET
- If the bearing cap will not pull out of the yoke
by hand after pressing, tap the yoke ear near the
bearing cap to dislodge the cap.
- To remove the opposite bearing cap, turn the
yoke over and straighten the cross in the open hole.
Then, carefully press the end of the cross until the
remaining bearing cap can be removed (Fig. 20).
CAUTION: If the cross or bearing cap are not
straight during installation, the bearing cap will
score the walls of the yoke bore and damage can
occur.
ASSEMBLY
- Apply extreme pressure (EP) N.L.G.I. Grade 1
or 2 grease to inside of yoke bores to aid in installation.
- Position the cross in the yoke with its lube fitting,
if equipped, pointing up (Fig. 21).
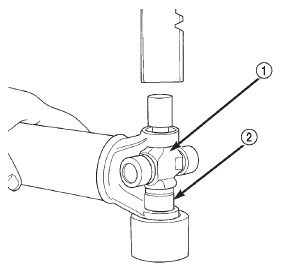
Fig. 20 Press Out Remaining Bearing
1 - CROSS
2 - BEARING CAP
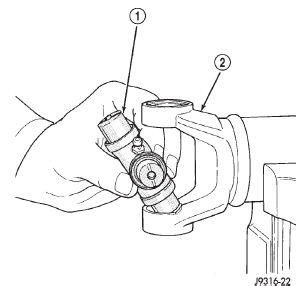
Fig. 21 Install Cross In Yoke
1 - CROSS
2 - YOKE
- Place a bearing cap over the trunnion and
align the cap with the yoke bore (Fig. 22). Keep the
needle bearings upright in the bearing assembly. A
needle bearing lying at the bottom of the cap will
prevent proper assembly.
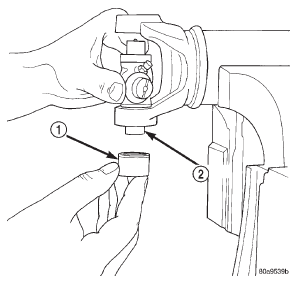
Fig. 22 Install Bearing On Trunnion
1 - BEARING CAP
2 - TRUNNION
- Press the bearing cap into the yoke bore
enough to install a snap ring.
- Install a snap ring.
- Repeat Step 3 and Step 4to install the opposite
bearing cap. If the joint is stiff or binding, strike the
yoke with a soft hammer to seat the needle bearings.
- Add grease to lube fitting, if equipped.
- Install the propeller shaft.
Double cardan joint
DISASSEMBLY
Individual components of cardan universal joints
are not serviceable. If worn or leaking, they must be
replaced as an assembly.
- Remove the propeller shaft.
- Using a soft drift, tap the outside of the bearing
cap assembly to loosen snap ring.
- Remove all the bearing cap snap rings (Fig. 23).
- Set the joint in an arbor press or vise with a
socket whose inside diameter is large enough to
receive the bearing cap positioned beneath the link
yoke.
- Place a socket with an outside diameter
smaller than the upper bearing cap on the upper
bearing cap and partially press one bearing cap from
the outboard side of the link yoke enough to grasp
the bearing cap with vise jaws (Fig. 24). Be sure to
remove grease fittings that interfere with removal.
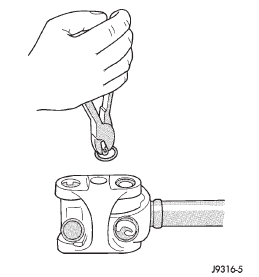
Fig. 23 Remove Snap Rings
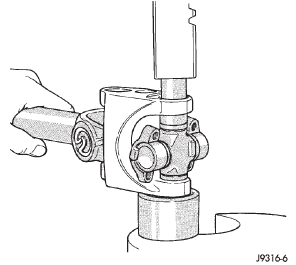
Fig. 24 Press Out Bearing
- Grasp the protruding bearing by vise jaws. Tap
the link yoke with a mallet and drift to dislodge the
bearing cap from the yoke (Fig. 25).
- Flip assembly and repeat Step 4, Step 5, and
Step 6 to remove the opposite bearing cap. This will
then allow removal of the cross centering kit assembly
and spring (Fig. 26).
- Press the remaining bearing caps out the other
end of the link yoke as described above to complete
the disassembly.
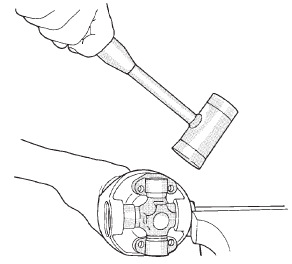
Fig. 25 Remove Bearing From Yoke
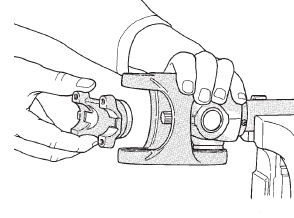
Fig. 26 Remove Centering Kit
ASSEMBLY
During assembly, ensure that the alignment
marks on the link yoke and propeller shaft
yoke are aligned.
- Apply extreme pressure (EP) N.L.G.I. Grade 1
or 2 grease to inside of yoke bores to aid in installation.
- Fit a cross into the propeller shaft yoke (Fig. 27).
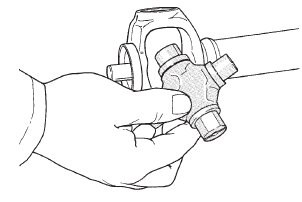
Fig. 27 Install Cross In Yoke
- Place a bearing cap over the trunnion and
align the cap with the yoke bore (Fig. 28). Keep the
needle bearings upright in the bearing assembly. A
needle bearing lying at the bottom of the cap will
prevent proper assembly.
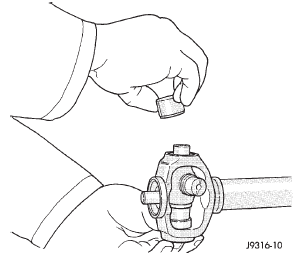
Fig. 28 Install Bearing Cap
- Press the bearing cap into the yoke bore
enough to install a snap ring (Fig. 29).
- Install a snap ring.
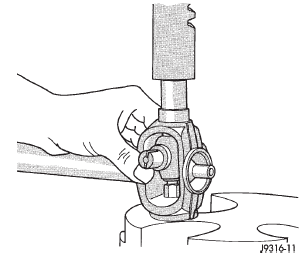
Fig. 29 Press In Bearing Cap
- Flip the propeller shaft yoke and install the
bearing cap onto the opposite trunnion. Install a
snap ring (Fig. 30).
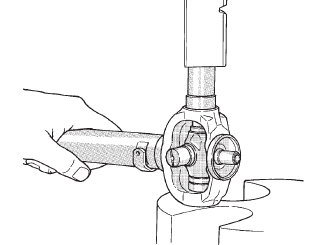
Fig. 30 Press In Bearing Cap
- Fit the link yoke on the remaining two trunnions
and press both bearing caps into place (Fig.
31).
- Install snap rings.
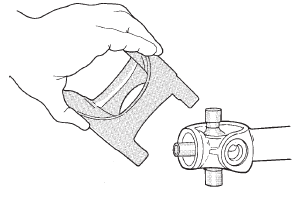
Fig. 31 Install Link Yoke
- Install the centering kit assembly inside the
link yoke making sure the spring is properly positioned
(Fig. 32).
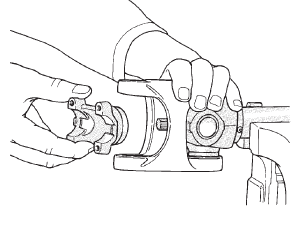
Fig. 32 Install Centering Kit
- Place two bearing caps on opposite trunnions
of the remaining cross. Fit the open trunnions into
the link yoke bores and the bearing caps into the
centering kit (Fig. 33).
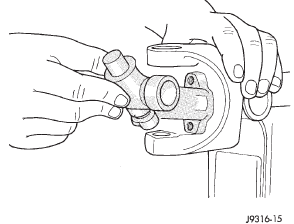
Fig. 33 Install Remaining Cross
- Press the remaining two bearing caps into
place and install snap rings (Fig. 34).
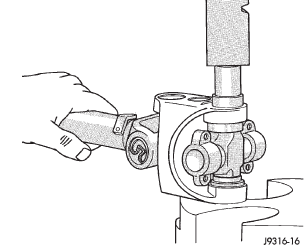
Fig. 34 Press In Bearing Cap
- Tap the snap rings to allow them to seat into
the grooves (Fig. 35).
- Check for proper assembly. Flex the joint
beyond center, it should snap over-center in both
directions when correctly assembled (Fig. 36).
- Install the propeller shaft.
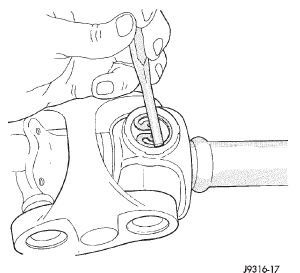
Fig. 35 Seat Snap Rings In Groove

Fig. 36 Check Assembly
 Diagnosis and testing
Vibration
Tires that are out-of-round, or wheels that are
unbalanced, will cause a low frequency vibration.
Refer to Group 22, Tires and Wheels, for additional
information.
Brake drums that ar ...
Other materials:
Cooling system fans. Viscous fan drive removal/
installation
Cooling system fans
REMOVAL
Some engines have the mechanical fan/viscous fan
drive assembly mounted directly to the water pump
hub (Fig. 55). It may also be mounted to a hub/bearing
attached to an aluminum bracket on the right
front side of engine (Fig. 56).
(1) Loosen but do not remove at t ...
 Cleaning and inspection. Adjustments. Specifications