Jeep Cherokee (XJ): Diagnosis and testing. Removal and installation
A low transmission lubricant level is generally the
result of a leak, inadequate lubricant fill, or an incorrect
lubricant level check.
Leaks can occur at the mating surfaces of the gear
case, intermediate plate and adaptor or extension
housing, or from the front/rear seals. A suspected
leak could also be the result of an overfill condition.
Leaks at the rear of the extension or adapter housing
will be from the housing oil seals. Leaks at component
mating surfaces will probably be the result of
inadequate sealer, gaps in the sealer, incorrect bolt
tightening, or use of a non-recommended sealer.
A leak at the front of the transmission will be from
either the front bearing retainer or retainer seal.
Lubricant may be seen dripping from the clutch
housing after extended operation. If the leak is
severe, it may also contaminate the clutch disc causing
the disc to slip, grab, and/or chatter.
A correct lubricant level check can only be made
when the vehicle is level. Also allow the lubricant to
settle for a minute or so before checking. These recommendations
will ensure an accurate check and
avoid an underfill or overfill condition. Always check
the lubricant level after any addition of fluid to avoid
an incorrect lubricant level condition. Hard shifting is usually caused by a low lubricant
level, improper, or contaminated lubricants. The consequence
of using non-recommended lubricants is
noise, excessive wear, internal bind, and hard shifting.
Substantial lubricant leaks can result in gear,
shift rail, synchro, and bearing damage. If a leak
goes undetected for an extended period, the first indications
of component damage are usually hard shifting
and noise.
Component damage, incorrect clutch adjustment,
or a damaged clutch pressure plate or disc are additional
probable causes of increased shift effort. Incorrect
adjustment or a worn/damaged pressure plate or
disc can cause incorrect release. If the clutch problem
is advanced, gear clash during shifts can result.
Worn or damaged synchro rings can cause gear clash
when shifting into any forward gear. In some new or
rebuilt transmissions, new synchro rings may tend to
stick slightly causing hard or noisy shifts. In most
cases, this condition will decline as the rings wear-
in. Most manual transmissions make some noise during
normal operation. Rotating gears generate a mild
whine that is audible, but generally only at extreme
speeds.
Severe, highly audible transmission noise is generally
the initial indicator of a lubricant problem.
Insufficient, improper, or contaminated lubricant will
promote rapid wear of gears, synchros, shift rails,
forks and bearings. The overheating caused by a
lubricant problem, can also lead to gear breakage. REMOVAL (1) Shift transmission into first or third gear.
(2) Raise and support vehicle on suitable safety
stands.
(3) Support engine with adjustable jack stand.
Position wood block between jack and oil pan to
avoid damaging pan.
(4) Remove crossmember/skid plate.
(5) Disconnect necessary exhaust system components.
(6) Remove skid plate, if equipped.
(7) Remove slave cylinder (Fig. 4) from clutch
housing.
(8) Mark rear propeller shaft and rear axle yokes
for installation alignment (Fig. 5).
1 - CLUTCH SLAVE CYLINDER
1 - REFERENCE MARKS (9) Mark front propeller shaft, axle, and transfer
case yokes for installation alignment, if equipped.
(10) Remove propeller shaft(s).
(11) Unclip wire harnesses from transmission and
transfer case, if equipped.
(12) Disconnect transfer case vent hose, if
equipped.
(13) Disengage any wire connectors attached to
transmission or transfer case, if equipped, components.
(14) Support transfer case, if equipped, with transmission
jack.
(15) Secure transfer case, if equipped, to jack with
safety chains.
(16) Disconnect transfer case shift linkage at
transfer case, if equipped.
(17) Remove nuts attaching transfer case to transmission,
if equipped.
(18) Remove transfer case, if equipped.
(19) Remove crankshaft position sensor (Fig. 6).
1 - ENGINE SPEED SENSOR CAUTION: It is important that the crankshaft position
sensor be removed prior to transmission
removal. The sensor can easily be damaged if left
in place during removal operations.
(20) Support engine with adjustable jack stand.
Position wood block between jack and oil pan to
avoid damaging pan.
(21) Support transmission with transmission jack.
(22) Secure transmission to jack with safety
chains.
(23) Disconnect rear cushion and bracket from
transmission.
(24) Remove rear crossmember.
(25) Disconnect transmission shift lever as follows:
(a) Lower transmission approximately 7-8 cm (3
in.) for access to shift lever.
(b) Reach up and around transmission case and
unseat shift lever dust boot from transmission shift
tower (Fig. 7). Move boot upward on shift lever for
access to retainer that secures lever in shift tower.
(c) Reach up and around transmission case and
press shift lever retainer downward with finger
pressure. Turn retainer counterclockwise to release
it.
(d) Lift lever and retainer out of shift tower (Fig.
7). Do not remove the shift lever from the floor console shifter boots. Leave
the lever in place for
transmission installation.
1 - SHIFT LEVER RETAINER (26) Remove clutch housing brace rod.
(27) Remove clutch housing-to-engine bolts.
(28) Pull transmission jack rearward until input
shaft clears clutch. Then slide transmission out from
under vehicle.
(29) Remove clutch release bearing, release fork,
and retainer clip.
(30) Remove clutch housing from transmission
(Fig. 8). INSTALLATION (1) Install clutch housing (Fig. 8) on transmission.
Tighten housing bolts to 46 N·m (34 ft. lbs.) torque.
(2) Lubricate contact surfaces of release fork pivot
ball stud and release fork with high temp grease.
(3) Install release bearing, fork, and retainer clip.
(4) Position and secure transmission on transmission
jack.
(5) Lightly lubricate pilot bearing and transmission
input shaft splines with Mopart high temp
grease.
(6) Raise transmission and align transmission
input shaft and clutch disc splines. Then slide transmission
into place.
(7) Install and tighten clutch housing-to-engine
bolts to the appropriate torque: Be sure the housing
is properly seated on engine block before
tightening bolts.
1 - HOUSING-TO-TRANSMISSION BOLTS (46 N·m/34 ft. lbs.) (8) Install clutch housing brace rod.
(9) Lower transmission approximately 7-8 cm (3
in.) for access to shift tower. Be sure transmission is
in first or third gear.
(10) Reach up and around transmission and insert
shift lever in shift tower. Press lever retainer downward
and turn it clockwise to lock it in place. Then
install lever dust boot on shift tower.
(11) Install rear crossmember. Tighten crossmember-
to-frame bolts to 41 N·m (31 ft. lbs.) torque.
(12) Install fasteners to hold rear cushion and
bracket to transmission. Then tighten transmissionto-
rear support bolts/nuts to 54 N·m (40 ft. lbs.)
torque.
(13) Remove support stands from engine and
transmission.
(14) Install and connect crankshaft position sensor.
(15) Position transfer case on transmission jack, if
equipped.
(16) Secure transfer case to jack with safety
chains, if equipped.
(17) Raise transfer case, if equipped, and align
transfer case input shaft to the transmission output
shaft. (18) Slide transfer case forward until case is
seated on transmission, if necessary.
(19) Install nuts to attach transfer case to transmission,
if equipped. Tighten transfer case-to-transmission
nuts to 35 N·m (26 ft. lbs.) torque.
(20) Connect transfer case shift linkage at transfer
case, if equipped.
(21) Connect transfer case vent hose, if equipped.
(22) Secure wire harnesses in clips/tie straps on
transmission and transfer case, if equipped.
(23) Engage wire connectors attached to all necessary
transmission or transfer case, if equipped, components.
(24) Install rear propeller shaft slip yoke to transmission
or transfer case, if equipped, output shaft.
(25) Align marks on rear propeller shaft and rear
axle yokes (Fig. 9).
1 - REFERENCE MARKS (26) Install and tighten propeller shaft U-joint
clamp bolts to 19 N·m (170 in. lbs.) torque.
(27) Align marks on front propeller shaft, axle,
and transfer case yokes, if equipped.
(28) Install and tighten propeller shaft U-joint
clamp bolts to 19 N·m (170 in. lbs.) torque.
(29) Install slave cylinder in clutch housing.
(30) Install skid plate, if equipped. Tighten bolts to
42 N·m (31 ft. lbs.) torque. Tighten stud nuts to 17
N·m (150 in. lbs.) torque.
(31) Fill transmission and transfer case, if
equipped, with recommended lubricants. Refer to the
Lubricant Recommendation sections of the appropriate
component for correct fluid.
(32) Lower vehicle. REMOVAL (1) Remove release bearing and lever from the
transmission.
(2) Remove the bolts holding the front bearing
retainer to the transmission case.
(3) Remove the front bearing retainer from the
transmission case.
(4) Using a suitable pry tool, remove the front
bearing retainer seal. INSTALLATION (1) Using Tool Handle C-4171 and Seal Installer
8211, install new seal in to the front bearing retainer
(Fig. 10).
1 - SPECIAL TOOL C-4171 (2) Remove any residual gasket material from the
sealing surfaces of the bearing retainer and the
transmission case.
(3) Install new front bearing retainer gasket to the
front bearing retainer.
(4) Install the front bearing retainer onto the
transmission case.
(5) Install the bolts to hold the bearing retainer
onto the transmission case.
(6) Tighten the bolts to 17 N·m (12 ft. lbs.).
(7) Install release bearing and lever onto the
transmission. REMOVAL (1) Raise and support vehicle.
(2) Remove propeller shaft. Refer to Group 3, Differential
and Driveline, for proper procedures.
(3) Using a suitable seal puller or screw with a
slide hammer, remove the extension housing seal
(Fig. 11).
1 - SLIDE HAMMER INSTALLATION (1) Clean seal bore of extension housing of any
residual sealer material from original seal.
(2) Using Tool Handle C-4171 and Seal Installer
8212, install new extension housing seal so that the
seal is located 0 6 0.5 mm (0 6 0.02 in.) to the face
of the extension housing (Fig. 12).
(3) Install propeller shaft. Refer to Group 3, Differential
and Driveline, for proper procedures.
(4) Check and add fluid to transmission as necessary.
Refer to the Recommended Lubricant section for
proper fluid requirements.
(5) Lower vehicle. REMOVAL (1) Hoist and support vehicle.
(2) Remove transfer case.
(3) Using a suitable pry tool, or a slide hammer
mounted screw, remove the adapter housing seal
(Fig. 13).
1 - SPECIAL TOOL
C-4171
1 - ADAPTER HOUSING OIL SEAL INSTALLATION (1) Clean seal bore of adapter housing of any
residual sealer material from original seal.
(2) Using Tool Handle C-4171 and Seal Installer
8208, install new seal so that the seal is located 0 6
0.2 mm (0 6 0.008 in.) to the seal bore face of
adapter housing (Fig. 14).
(3) Install transfer case.
(4) Check and add fluid to transmission as necessary.
Refer to the Recommended Lubricant section for
proper fluid requirements.
(5) Lower vehicle.
1 - SPECIAL TOOL 8208Diagnosis and testing
Low lubricant level
Hard shifting
Transmission noise
Removal and installation
Transmission
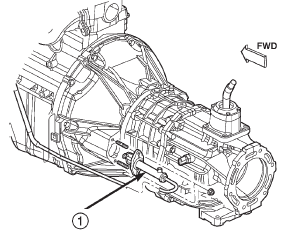
Fig. 4 Slave Cylinder-Typical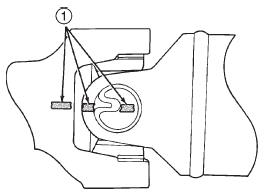
Fig. 5 Marking Propeller Shaft And Axle Yokes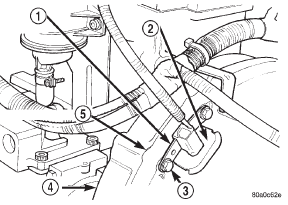
Fig. 6 Crankshaft Position Sensor -2.5 and 4.0L Engine
2 - GROMMET
3 - MOUNTING BOLT(S)
4 - LEFT REAR OF ENGINE
5 - TRANSMISSION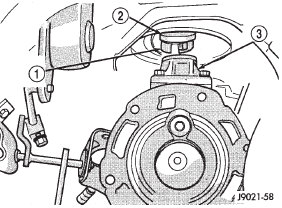
Fig. 7 Removing/Installing Shift Lever
2 - DUST BOOT
3 - SHIFT TOWER
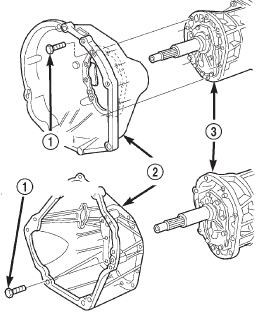
Fig. 8 Clutch Housing
2 - CLUTCH HOUSING
3 - TRANSMISSION
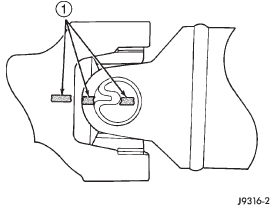
Fig. 9 Align Propeller Shaft And Rear Axle Yokes Alignment MarksFront bearing retainer seal
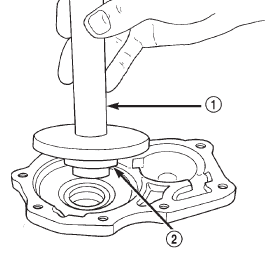
Fig. 10 Install Front Bearing Retainer Seal
2 - SPECIAL TOOL 8211 (AX5) OR 8209 (AX15)Extension housing seal
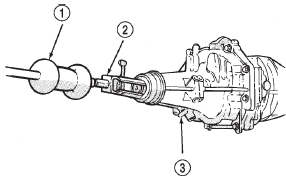
Fig. 11 Remove Extension Housing Seal
2 - SEAL PULLER
3 - 2WD EXTENSION HOUSINGAdapter housing seal
Fig. 12 Install Extension Housing Seal
2 - SPECIAL TOOL
8212
3 - EXTENSION HOUSING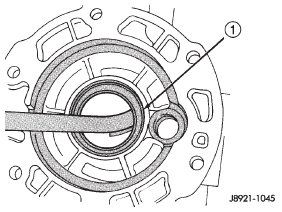
Fig. 13 Remove Adapter Housing Seal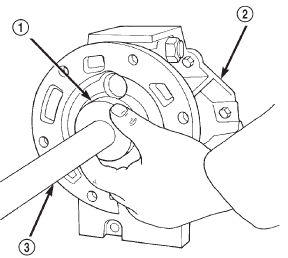
Fig. 14 Install Adapter Housing Seal
2 - ADAPTER HOUSING
3 - SPECIAL TOOL C-4171

 Adapter/extension housing and
front bearing retainer
Adapter/extension housing and
front bearing retainer
Other materials:
Description and operation
Power mirror
Each power mirror head contains two electric
motors, two drive mechanisms, and the mirror glass.
One motor and drive controls mirror up-and-down
movement, and the other controls right-and-left
movement.
The power mirrors in vehicles equipped with the
available heated mirror op ...