Jeep Cherokee (XJ): Door sill scuff plate. Assist handle. B-pillar trim
REMOVAL (1) Remove the screws attaching the door sill scuff
plate to the door sill (Fig. 67).
(2) Separate the scuff plate from the door sill.
1 - REAR DOOR SILL SCUFF PLATE INSTALLATION (1) Position the scuff plate on the door sill.
(2) Install the screws attaching the door sill scuff
plate to the door sill. REMOVAL (1) Using a trim stick or equivalent, open the end
covers to access the screws.
(2) Remove the screws (Fig. 65).
(3) Separate the assist handle from the trim. INSTALLATION (1) Position the handle on the trim.
(2) Install the screws.
(3) Install the covers. REMOVAL (1) Remove the inner scuff plate.
(2) Remove the upper door opening trim (4-door
vehicles) (Fig. 68).
(3) Remove the upper quarter panel trim (2-door
vehicles) (Fig. 65).
(4) Remove the rear A-pillar trim screw.
(5) Remove the shoulder belt turning loop.
(6) Remove the seat/shoulder belt anchor bolt.
(7) Remove the screws attaching the B-pillar trim
to the B-pillar (2-door vehicles).
(8) Route the shoulder belt through the lower
B-pillar trim (2-door vehicles).
(9) Separate the B-pillar trim from the B-pillar.
1 - UPPER DOOR OPENING TRIM INSTALLATION (1) Route the shoulder belt through the lower
B-pillar trim (2-door vehicles).
(2) Position the B-pillar trim on the B-pillar and
align push-in fasteners.
(3) Press the B-pillar trim on the B-pillar to
secure.
(4) Install the screws attaching the B-pillar trim to
the B-pillar (2-door vehicles).
(5) Install the seat/shoulder belt anchor bolt.
(6) Install the shoulder belt turning loop.
(7) Install the A-pillar trim.
(8) Install the upper quarter panel trim (2-door
vehicles) (Fig. 65).
(9) Install the upper door opening trim (4-door
vehicles) (Fig. 68).
(10) Install the inner scuff plate.Door sill scuff plate
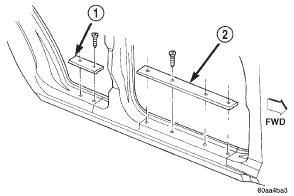
Fig. 67 Door Sill Scuff Plate
2 - FRONT DOOR SILL SCUFF PLATEAssist handle
B-pillar trim
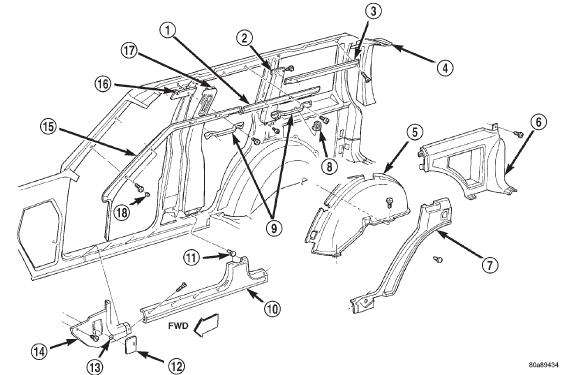
Fig. 68 B-Pillar Trim-4-Door Vehicles
2 - C-PILLAR TRIM
3 - UPPER QUARTER PANEL TRIM
4 - LIFTGATE PILLAR TRIM
5 - WHEEL HOUSE COVER
6 - LOWER QUARTER PANEL TRIM
7 - QUARTER PANEL TRIM EXTENSION
8 - COAT HOOK
9 - OVERHEAD ASSIST HANDLE
10 - INNER SCUFF PLATE
11 - PUSH-IN FASTENER
12 - ACCESS DOOR
13 - NUT
14 - COWL PANEL TRIM
15 - A-PILLAR TRIM
16 - HEADLINER
17 - B-PILLAR TRIM
18 - TRIM PLUG
 A-pillar trim. Lower a-pillar cowl trim. Front inner scuff plate
 C-pillar trim. Quarter panel trim extension. Quarter panel trim and wheelhouse
cover
C-pillar trim. Quarter panel trim extension. Quarter panel trim and wheelhouse
cover
Other materials:
Windshield Wiper De-icer. Dual Zone Automatic Climate Controls With Touchscreen. Climate Control Functions
Windshield Wiper De-icer - If Equipped
The windshield wiper de-icer is a heating element located
at the base of the windshield.
The windshield wiper de-icer operates automatically
once the following conditions are met:
Activation By Front Defrost
The wiper de-icer activates automatically ...