Jeep Cherokee (XJ): Evaporator coil. Fixed orifice tube. Heater-a/c control
WARNING: ON VEHICLES EQUIPPED WITH AIRBAGS,
REFER TO GROUP 8M - PASSIVE
RESTRAINT SYSTEMS BEFORE ATTEMPTING ANY
STEERING WHEEL, STEERING COLUMN, OR
INSTRUMENT PANEL COMPONENT DIAGNOSIS OR
SERVICE. FAILURE TO TAKE THE PROPER PRECAUTIONS
COULD RESULT IN ACCIDENTAL AIRBAG
DEPLOYMENT AND POSSIBLE PERSONAL
INJURY.
(1) Remove and disassemble the heater-A/C housing.
See Heater-A/C Housing in this group for the
procedures.
(2) Lift the evaporator coil unit out of the lower
half of the heater-A/C housing (Fig. 36).
(3) Reverse the removal procedures to install. Be
certain that the evaporator foam insulator wrap and
rubber tube seal are reinstalled.
NOTE: If the evaporator is replaced, add 60 milliliters
(2 fluid ounces) of refrigerant oil to the refrigerant
system. Use only refrigerant oil of the type
recommended for the compressor in the vehicle The fixed orifice tube is located in the liquid line
(Left-Hand Drive) or the liquid line jumper (Right-
Hand Drive) near the condenser. The orifice has filter
screens on the inlet and outlet ends of the tube body.
If the fixed orifice tube is faulty or plugged, the liquid
line unit or liquid line jumper unit must be
replaced. See Liquid Line in this group for the service
procedures.
1 - EVAPORATOR COIL WARNING: ON VEHICLES EQUIPPED WITH AIRBAGS,
REFER TO GROUP 8M - PASSIVE
RESTRAINT SYSTEMS BEFORE ATTEMPTING ANY
STEERING WHEEL, STEERING COLUMN, OR
INSTRUMENT PANEL COMPONENT DIAGNOSIS OR
SERVICE. FAILURE TO TAKE THE PROPER PRECAUTIONS
COULD RESULT IN ACCIDENTAL AIRBAG
DEPLOYMENT AND POSSIBLE PERSONAL
INJURY. REMOVAL (1) Disconnect and isolate the battery negative
cable.
(2) Roll down the glove box from the instrument
panel. Refer to Glove Box in Group 8E - Instrument
Panel Systems for the procedures.
(3) Reach through the instrument panel glove box
opening to access and unplug the two h (4) Remove the center bezel from the instrument
panel. Refer to Instrument Panel Center Bezel in
Group 8E - Instrument Panel Systems for the procedures.
(5) Release the vacuum harness push-in retainer
from the instrument panel directly beneath the heater-
A/C control.
(6) Remove the four screws that secure the heater-
A/C control to the instrument panel (Fig. 37).
1 - MOUNTING HOLES (7) Pull the heater-A/C control assembly away
from the instrument panel far enough to access the
connections on the back of the control.
(8) Unplug the wire harness connectors from the
back of the heater-A/C control (Fig. 38).
(9) Reach through the instrument panel glove box
opening to guide the heater-A/C control half of the
vacuum harness around any obstacles while pulling
the heater-A/C control out from the front of the
instrument panel. INSTALLATION (1) Plug the wire harness connectors into the back
of the heater-A/C control.
(2) Route the vacuum harness through the instrument
panel opening and reinstall the vacuum harness
push-in retainer.
(3) Reach through the instrument panel glove box
opening to reconnect the two halves of the heater-A/C
vacuum harness connector.
(4) Roll the glove box back up into the instrument
panel. Refer to Glove Box in Group 8E - Instrument
Panel Systems for the procedures.
1 - HEATER-A/C CONTROL HEAD (5) Position the heater-A/C control in the instrument
panel and secure it with four screws. Tighten
the screws to 2.2 N·m (20 in. lbs.).
(6) Reinstall the center bezel onto the instrument
panel. Refer to Instrument Panel Center Bezel in
Group 8E - Instrument Panel Systems for the procedures.
(7) Connect the battery negative cable.Evaporator coil
Fixed orifice tube
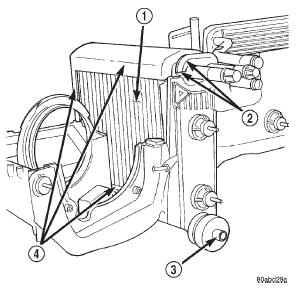
Fig. 36 Evaporator Coil Remove/Install
2 - TUBE SEAL
3 - CONDENSATE DRAIN TUBE
4 - FOAM INSULATOR WRAPHeater-a/c control
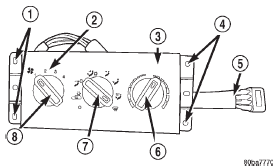
Fig. 37 Heater-A/C Control Remove/Install
2 - CONTROL HEAD
3 - HEATER-A/C CONTROL HEAD
4 - MOUNTING HOLES
5 - VACUUM HARNESS
6 - TEMPERATURE SELECT CONTROL
7 - MODE SELECT CONTROL
8 - BLOWER SPEED CONTROL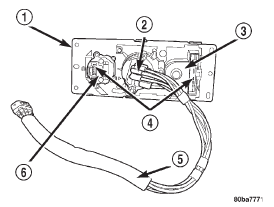
Fig. 38 Heater-A/C Control Connections
2 - MODE SELECT CONTROL
3 - BLOWER SPEED CONTROL
4 - ELECTRICAL CONNECTORS
5 - VACUUM HARNESS
6 - TEMPERATURE SELECT CONTROL


Other materials:
Engine break-in recommendations
A long break-in period is not required for the engine and
drivetrain (transmission and axle) in your vehicle.
Drive moderately during the first 300 miles (500 km).
After the initial 60 miles (100 km), speeds up to 50 or
55 mph (80 or 90 km/h) are desirable.
While cruising, brief full-thro ...