Jeep Cherokee (XJ): Exterior nameplates. Side view mirror. Front fender flare
REMOVAL NOTE: Exterior nameplates are attached to body
panels with adhesive tape.
(1) Apply a length of masking tape on the body,
parallel to the top edge of the nameplate to use as a
guide, if necessary.
(2) If temperature is below 21C (70F) warm
emblem with a heat lamp or gun. Do not exceed 52C
(120F) when heating emblem.
(3) Insert a plastic trim stick or a hard wood
wedge behind the emblem to separate the adhesive
backing from the body.
(4) Clean adhesive residue from body with MOPAR
Super Clean solvent or equivalent. INSTALLATION (1) Remove protective cover from adhesive tape on
back of emblem.
(2) Position emblem properly on body (Fig. 15).
(3) Press emblem firmly to body with palm of
hand.
(4) If temperature is below 21C (70F) warm
emblem with a heat lamp or gun to assure adhesion.
Do not exceed 52C (120F) when heating emblem.
1 - CHEROKEE REMOVAL (1) Remove the door trim panel.
(2) Remove the screw attaching the mirror trim
cover/speaker grille to the door inner panel.
(3) remove push-in fastener attaching trim cover
to door inner panel (use special tool C-4829).
(4) Disconnect the power mirror wire connector, if
equipped.
(5) Remove the screws attaching the mirror to the
door (Fig. 16).
(6) Separate the mirror from the door
1 - SIDE VIEW MIRROR INSTALLATION (1) Position the mirror on the door.
(2) Install the screws attaching the mirror to the
door.
(3) Connect the power mirror wire connector, if
equipped.
(4) Install new push-in fastener.
(5) Install the mirror trim cover/speaker grille.
(6) Install the door trim panel. REMOVAL (1) Remove the screw attaching the lower part of
flare to the bottom of the fender.
(2) Remove the nuts attaching the fender flare
retainer to the wheelhouse splash shield (Fig. 17).
(3) Remove the liner from the fender.
(4) Remove the fasteners attaching the fender flare
and retainer to the fender.
(5) Separate the fender flare and retainer from the
fender.
1 - FENDER FLARE INSTALLATION (1) Position the fender flare and retainer on the
fender.
(2) Install the nuts attaching the fender flare and
retainer to the wheelhouse fender.
(3) Install the screw attaching the lower part of
flare to the bottom of the fender.Exterior nameplates
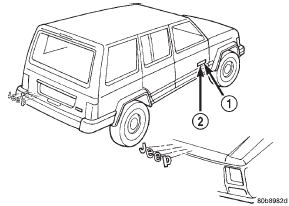
Fig. 15 Exterior Nameplates
2 - LIMITED-SPORT-CLASSICSide view mirror
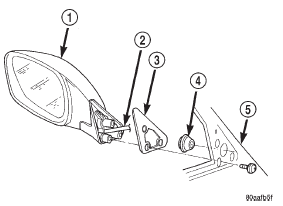
Fig. 16 Side View Mirror
2 - WIRE HARNESS
3 - SEAL
4 - GROMMET
5 - DOORFront fender flare
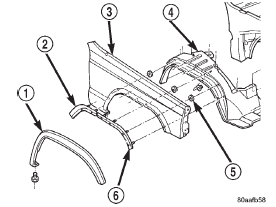
Fig. 17 Fender Flare
2 - RETAINER
3 - FENDER
4 - LINER
5 - PUSH NUT
6 - RETAINER

 Front wheelhouse liner. Right front fender. Left front fender
Other materials:
Wheels
Description and operation
WHEEL
DESCRIPTION
The rim size is on the vehicle safety certification
label located on the drivers door shut face. The size
of the rim is determined by the drivetrain package.
Original equipment wheels/rims are designed for
operation up to the specified maximum vehi ...