Jeep Cherokee (XJ): Front wheelhouse liner. Right front fender. Left front fender
REMOVAL (1) Hoist vehicle.
(2) Remove tire.
(3) Remove the push-in fasteners attaching the
wheelhouse liner to the inner fender.
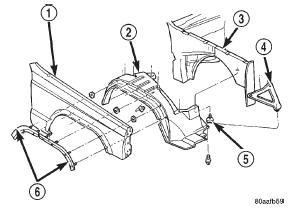
(4) Separate the wheelhouse liner from the fender
(Fig. 18).
1 - FENDER INSTALLATION (1) Position the wheelhouse liner in the fender.
(2) Install new push-in fasteners attaching the
wheelhouse liner to the inner fender.
(3) Install tire.
(4) Lower vehicle. REMOVAL (1) Raise and support the hood.
(2) Remove the grille opening panel (GOP).
(3) If equipped, remove the radio antenna mast,
and components from the fender.
(4) Remove the coolant recovery bottle.
(5) Raise and support the vehicle.
(6) Remove the right front wheel.
(7) Remove the front bumper end cap.
(8) Remove the wheelhouse liner.
(9) Remove the fender flare and retainers.
(10) Disconnect all wire harness connectors.
(11) Remove the air deflector.
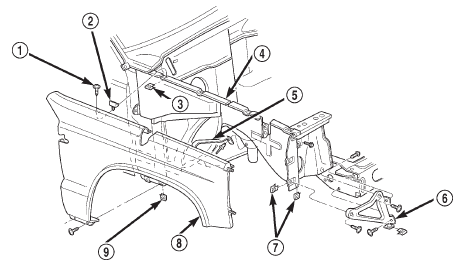
(12) Remove the fender lower screws (Fig. 19).
(13) Remove the fender top, front and the rear
screws.
(14) Remove the screws attaching the fender to the
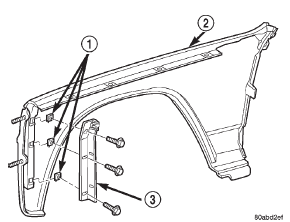
inner support bracket (Fig. 20).
(15) Separate the fender from the inner fender
panel. INSTALLATION (1) Position the fender on the inner fender panel.
(2) Install all fender screws finger-tight.
(3) Align the fender with the body panels and
tighten the screws attaching the fender to the body
panels.
(4) Install the air deflector.
(5) Install the fender flare and retainers.
(6) Install the wheelhouse liner.
(7) Install the front bumper end cap.
(8) Install the wheel, remove the support and
lower the vehicle.
(9) Install the grille opening panel (GOP).
(10) Install the radio antenna. REMOVAL (1) Raise and support the hood.
(2) Remove the grille opening panel (GOP).
(3) Raise and support the vehicle.
(4) Remove the left front wheel.
(5) Remove the front bumper end cap.
(6) Remove the fender flare and retainers.
(7) Remove the wheelhouse liner.
(8) Remove the air deflector.
(9) Remove the fender lower screws.
(10) Remove the fender top, front and the rear
screws.
(11) Remove the screws attaching the fender to the
inner support bracket.
(12) Separate the fender from the inner fender
panel. INSTALLATION (1) Position the fender on the inner fender panel.
(2) Install all fender screws finger-tight.
(3) Align the fender with the body panels and
tighten the screws attaching the fender to the body
panels.
(4) Install the air deflector.
(5) Install the wheelhouse liner.
(6) Install the fender flare and retainers.
(7) Install the front bumper.
(8) Install the wheel, remove the support and
lower the vehicle.
(9) Install the grille opening panel (GOP).
1 - SCREW
1 - U-NUTFront wheelhouse liner

Fig. 18 Front Wheelhouse Liner
2 - WHEELHOUSE LINER
3 - INNER FENDER PANEL
4 - BRACE
5 - PUSH-IN FASTENER
6 - RETAINERRight front fender
Left front fender

Fig. 19 Right Front Fender
2 - HOOD BUMPER
3 - U-NUT
4 - INNER FENDER PANEL
5 - FENDER BRACE
6 - FRAME SILL-TO-BAFFLE BRACE
7 - U-NUT
8 - OUTER FENDER PANEL
9 - U-NUT
Fig. 20 Inner Support Bracket
2 - FRONT FENDER
3 - SUPPORT BRACKET
 Exterior nameplates. Side view mirror. Front fender flare
 Front door trim panel. Front door waterdam. Front door
Other materials:
Driver side airbag module trim
cover
The horn switch is integral to the driver side airbag
module trim cover. If either component is faulty
or damaged, the entire driver side airbag module
trim cover and horn switch unit must be replaced.
WARNING:
THE AIRBAG SYSTEM IS A SENSITIVE, COMPLEX
ELECTROMECHANICAL UNIT. BEFORE
...
