Jeep Cherokee (XJ): Front door lock cylinder. Lock cylinders. Front door latch
REMOVAL (1) Remove the door trim panel.
(2) Peel back waterdam to access lock cylinder.
(3) Disconnect the door latch-to-lock cylinder rod
at the door latch (Fig. 29).
(4) Remove the lock cylinder retainer clip.
(5) Remove the lock cylinder.
(6) If applicable, remove the door latch-to-lock cylinder
rod from the original lock cylinder. Connect it
to the replacement lock cylinder.
1 - ACCESS PLUG INSTALLATION (1) Position the lock cylinder and in the door opening.
(2) Install the retainer clip.
(3) Connect the door latch-to-lock cylinder rod to
the door latch.
(4) Press the waterdam into position.
(5) Install the door trim panel Ignition, door, deck lid, and rear hatch lock cylinders
are all codable to the key. Lock barrels, tumblers,
and tumbler springs are available to allow the
technician to change replacement locks cylinders to
match the customer's original key set. See the appropriate
section in this manual for lock cylinder
removal. See the Mopart catalogue for part numbers
and lock coding procedures. REMOVAL (1) Remove door trim panel and waterdam.
(2) Remove screws attaching latch to door.
(3) Disconnect all rods from latch (Fig. 30).
(4) Disconnect power lock motor wire connector, if
equipped.
(5) Remove latch from door face.
1 - FRONT DOOR LATCH INSTALLATION (1) Position latch on door face.
(2) Connect power lock motor wire connector, if
equipped.
(3) Connect all rods to latch.
(4) Install screws attaching latch to door. Tighten
screws to 11 N·m (8 ft. lbs.) torque.
(5) Install waterdam and door trim panel.Front door lock cylinder
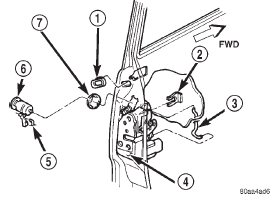
Fig. 29 Door Lock Cylinder
2 - RETAINER
3 - LOCK CYLINDER TO LATCH ROD
4 - LATCH
5 - LOCK CYLINDER TO LATCH ROD
6 - LOCK CYLINDER
7 - GASKETLock cylinders
Front door latch
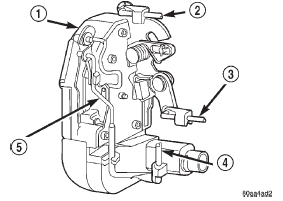
Fig. 30 Door Latch
2 - LOCK BUTTON TO LATCH ROD
3 - INSIDE HANDLE TO LATCH ROD
4 - OUTSIDE HANDLE TO LATCH ROD
5 - LOCK CYLINDER TO LATCH ROD
 Front door hinge. Front door restraint. Front door outside handle
 Front door latch striker. Front door inside handle actuator. Front door inner belt weatherstrip
Other materials:
Kick cover. Mode door vacuum actuator. Refrigerant line coupler
Kick cover
WARNING: ON VEHICLES EQUIPPED WITH AIRBAGS,
REFER TO GROUP 8M - PASSIVE
RESTRAINT SYSTEMS BEFORE ATTEMPTING ANY
STEERING WHEEL, STEERING COLUMN, OR
INSTRUMENT PANEL COMPONENT DIAGNOSIS OR
SERVICE. FAILURE TO TAKE THE PROPER PRECAUTIONS
COULD RESULT IN ACCIDENTAL AIRBAG
DEPLOYMENT A ...